Last time we were talking about Big Picture Event Storming (BPES) and now we have a helicopter view of our business process. Next, we need to climb down and model sub-processes that will address our business requirements and issues. We are going to use Process Level Event Storming (PLES) for that.
Back in the BPES workshop, we could notice some smaller, autonomic sub-processes within the whole process. Now we can focus on each of them and take care of the details. PLES gives us a few additional elements that will help us in this job.
Together with my guests, we created a part responsible for banning recruiters. Then I decided to do the rest independently as I didn’t want to take more of their time. It turned out that the image from Brandolini’s book was great support for me:
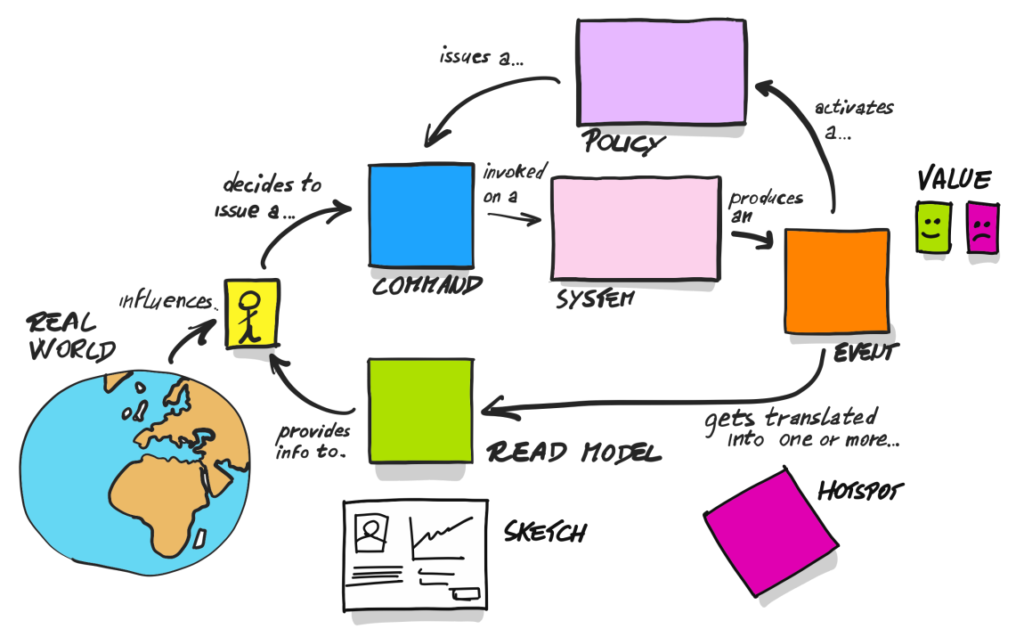
Brandolini calls this image: “the picture that explains everything”, and I can’t agree more.
On the BPES level, we were using only events. Now, we will use a few new elements, which you can notice in the above picture. So let’s take a moment to take a closer look at them and the whole cycle:
- The user, based on some impulse from the real world, decides to take an action. Usually, their decision is driven by information from the system (read model – the green sticky note).
- The user is taking action (command – the blue sticky note), which will be handled by the system (the pink note). As a result, the event will be produced (the orange note) – information about the change in the system.
- When the event occurs, two things can happen:
- policy/reaction (the purple note) to this type of event, which will result in a new command
- changes in read models, which in turn can give the user new information to make other decisions.
Ok, let’s use this knowledge in practice now! First, we will take a closer look at the advertisement’s draft process.
Draft
After the BPES workshop, this part looks as follows:

Now let’s think how this process should look like. Who should make the decision? What information should this decision be based on? Do events require any reactions? What has to happen to trigger a specific event? To sum it up: we need to use the knowledge we gained from “the picture that explains everything”. Thanks to it, we can design the process here as follows:

Before we go any further, please notice the purple/lilac notes. Those are policies – do not confuse them with a strategy/policy design pattern. Those here are the reactions to some events that should be a trigger for a command. Brandolini, in his book, describes them as follows:
“Of course there has to be some reaction to the event. We can capture reactive logic with (lilac) Policies, like “whenever we receive an order, we add the corresponding pizzas to the backlog.””
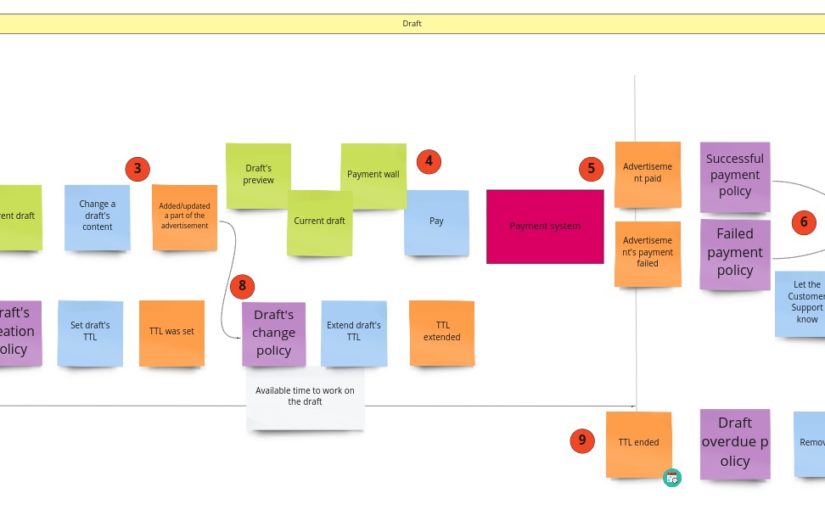
Ok, let’s get back to the modeling of the advertisement’s draft. Everything starts when a programmer (candidate) creates a draft by filling up the advertisement’s form (1). That’s the information for the system that it should store this data, in case the user wants to finish the whole process later on. In other words: we create a read model of the form (2). When the user makes any change to the form, the content of the draft will be changed (3). From the domain level, we are not interested in what exactly has been changed. We only care about the fact that it was changed so that we can update the read model. Then, when the user is done with the form and has chosen the payment option, he/she pays for the advertisement (4). Now the external payment system kicks in and eventually gives us the info whether the payment was successful or not (5). Finally, you can notice an interesting business decision: no matter what happens, we publish the advertisement (6). I decided to make this part of the process less complex. I assumed that the failed payment in an external system would be a pretty rare case. It makes no sense to focus on all cases that can go wrong and postpone the publication, at least at the start of the business. For now, let’s publish anyway, and when we eventually get the info that payment failed, we can send this information to the Customer Support. They can decide what to do with the advertisement. Maybe they will retrigger the payment, remove/block the ad or contact the developer to clarify the situation. If we get the information that there are too many such cases, we should solve the problem then. For now, let’s do it the agile way 🙂
It’s worth noticing that when we create a draft, another parallel process kicks in (7). Its responsibility is to remove all overdue drafts, not to store them too long in our system. So, first, we give them some time to live (TTL). Then, each time the draft is updated, we renew that time (8). Finally, we remove the draft when TTL is exceeded and the developer did not publish the advertisement (9).
Registration
Every single app has a registration, right? It’s quite a generic process, so that’s why we didn’t care about it during the BPES. It means that I can’t show you the “before” state. Even after PLES, there is not too much to consider:
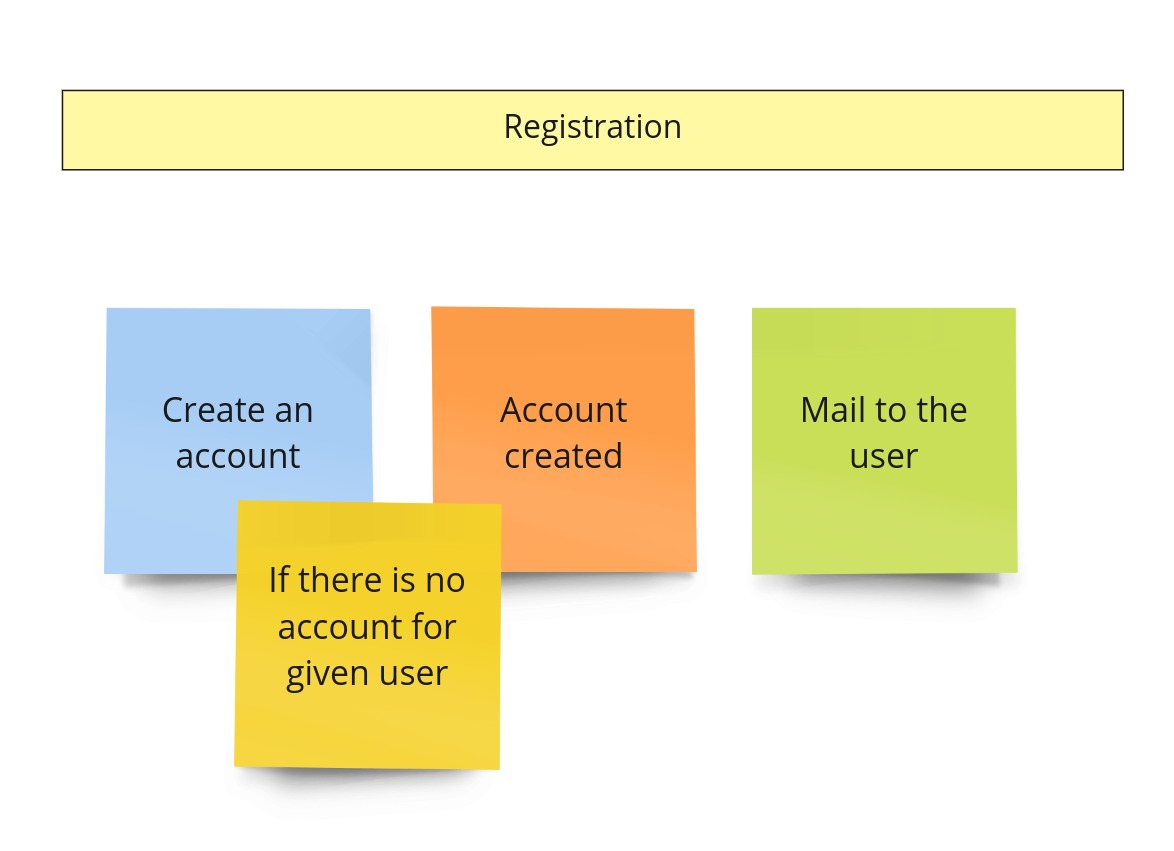
Usually, there is a belief that “our project is specific”. That’s why so many applications implement a separate service/app called something like “Accounts”. Nevertheless, in practice, it turns out that a service like Keycloak could often replace it. That being said, we are not going to overcomplicate this part. Even if we don’t use any off-the-shelf solution, we will simplify this process to a single step.
Publication process
After the payment, the advertisement can be viewed and searched in the system. Nevertheless, its life cycle ends when the paid time expires. During that period, the advertisement can be unpublished and published again due to different reasons. That’s why we decided to call this whole process: the publication process. Quite often, when we notice “published” and “unpublished” states, we can try to model the separate availability subdomain. However, we will not do it now, and we will stay with a bigger publication subdomain.
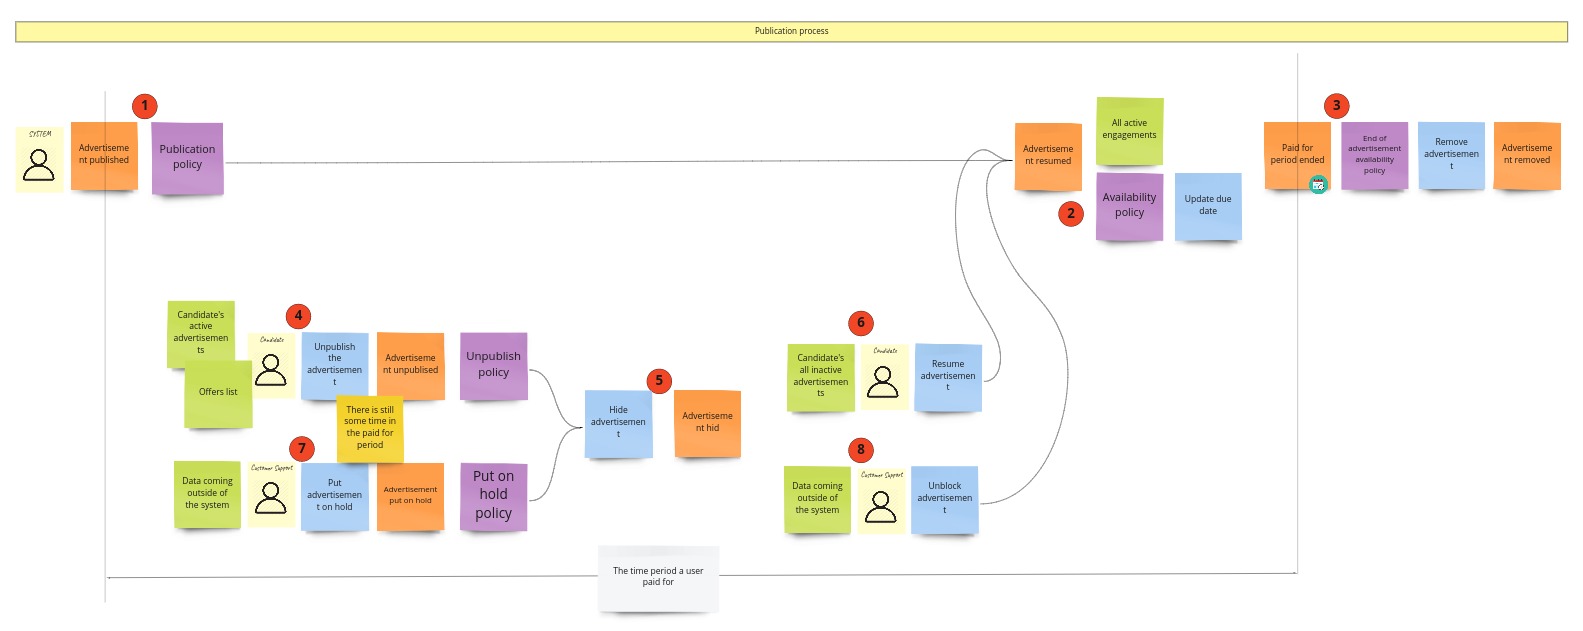
Let’s describe this process step by step. After the payment, we get the request to publish the advertisement (1). We react to this by making it available for searching and viewing (2). When we publish the advertisement, we also start the period when it is available. When it ends, we remove the advertisement from the service (3). To keep this process simple, I again decided to skip the cases where the user could extend this period or create a new advertisement based on the old one.
When the advertisement is published, two things can happen:
- A developer can decide about unpublishing it (4). This can happen when there is still some paid time available for the advertisement (it doesn’t make sense to unpublish it when it is already “outdated”). Then we put the ad on hold (5). It means that the user’s list of inactive advertisements is updated. Based on that list, a developer can decide to publish it again (6).
- Another case when the ad can be temporarily put on hold is when Customer Support does it. The whole process looks similar to the previous one, but different people make decisions. Moreover, they do it based on other premises or data. Customer Service can put the ad on hold when they get some complaint about it (7).
It’s noteworthy that we will not decrease the paid time when the advertisement is on hold in both cases. Instead, we will start doing it again when the advertisement resumes.
Just to remind you how this part looked like after the BPES:

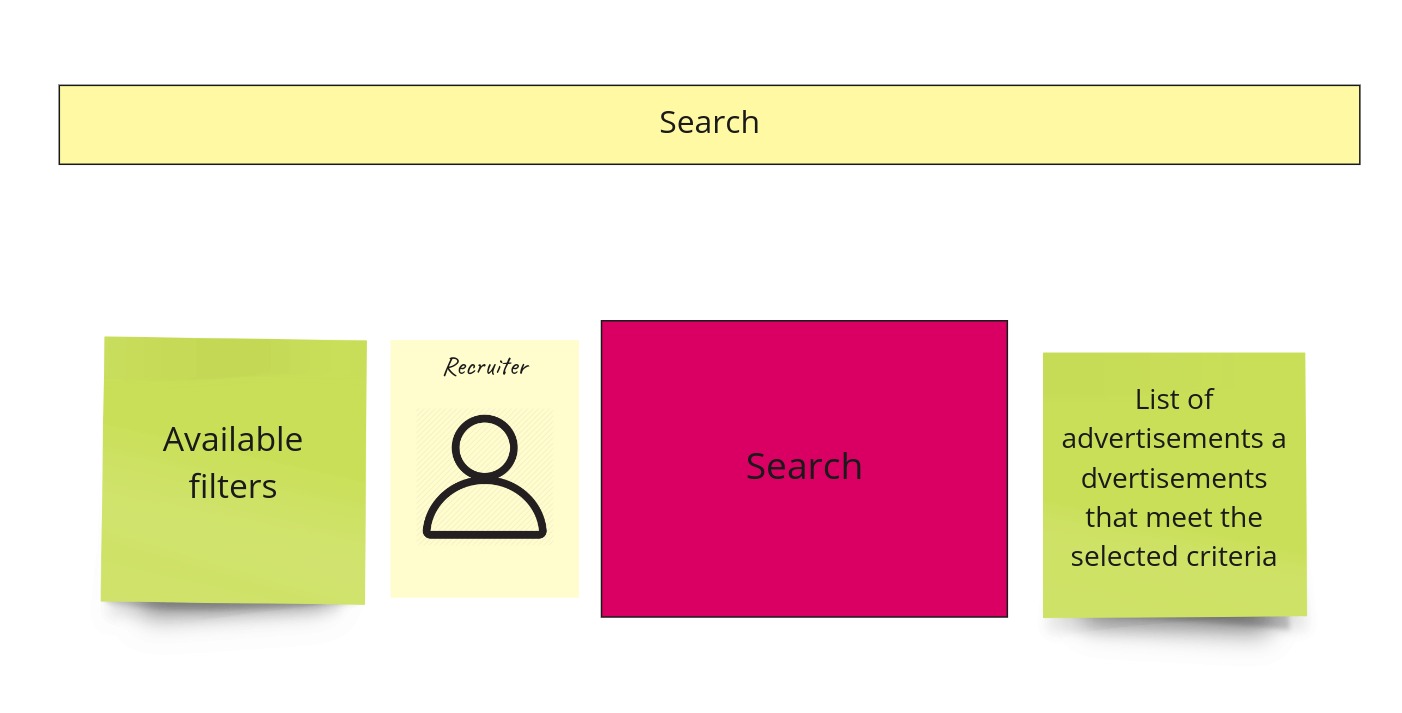
Search
It can happen that something that was an event during the BPES isn’t actually an event. An excellent example of it would be the “Advertisements found” event.
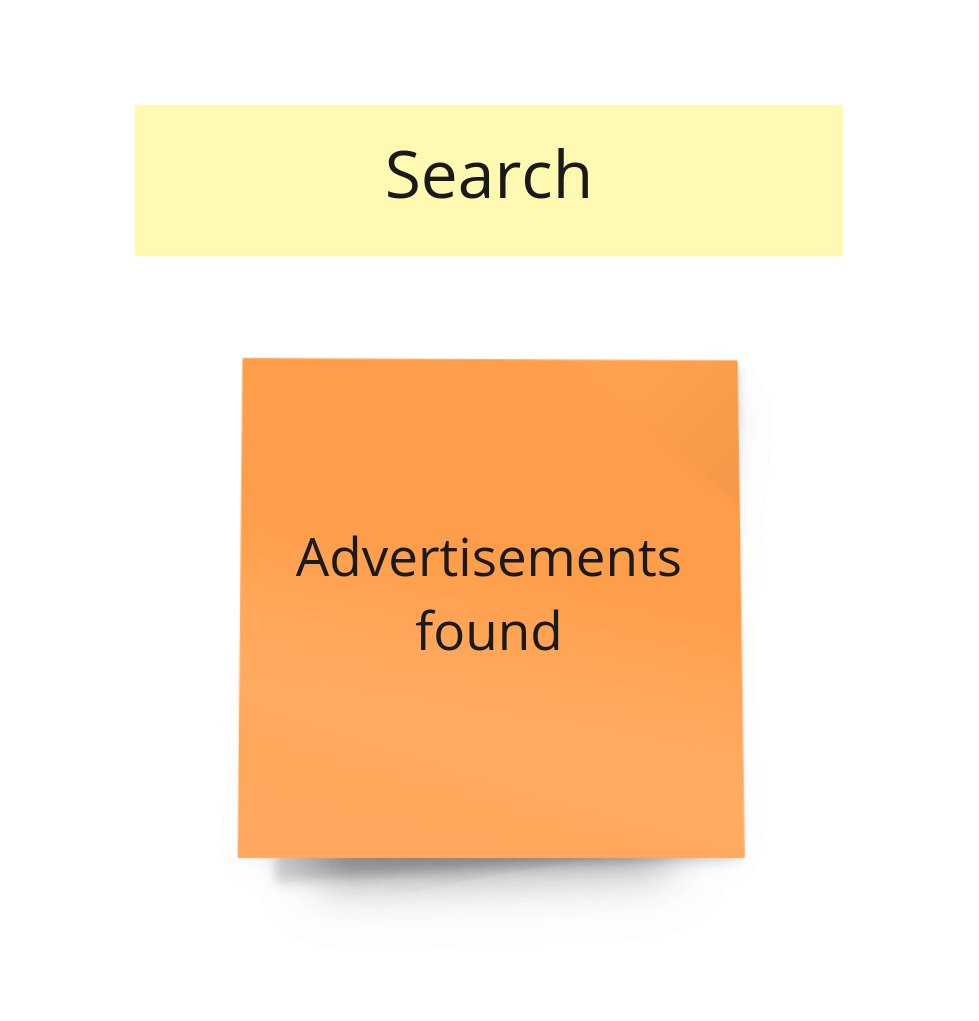
Search has nothing in common with the change/modification in our system. That’s just a query. Then, based on the available filters, the recruiter asks the system about the advertisements that meet the selected criteria. That’s why on PLES, we decided to represent this part as follows:
Offering
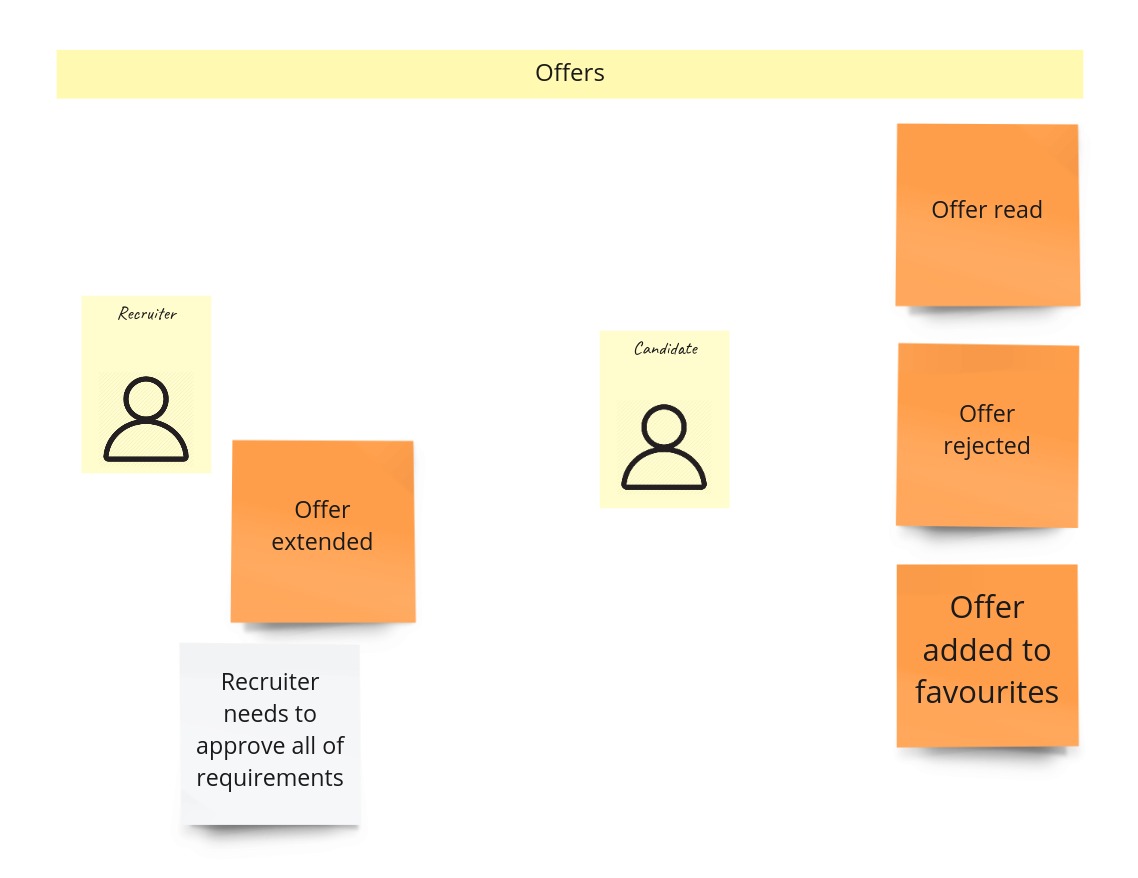
Let’s focus now on the key process – offering. That’s the part that differentiates our solution from the typical approach. First, a recruiter will have to accept all developers’ requirements if they want to offer any. Then, the offer can be read, rejected, or added to favorites.
After a PLES session, this process looks as follows:

Everything starts on the advertisement page. Recruiter, seeing it, can make an offer (1). They need to accept all requirements and give some contact details. Then the offer details are available to the developer on the offers page (2). This page can be a “starting point” for a few different actions. The most interesting one from a modeling perspective is “Mark as opened” (3). Notice that the UI triggers this one. You may ask why. So UI will present the new offers as… new ones – not “read”. Then, the developer can click any of them to see the details. This action itself doesn’t change the system’s state, as in this case, we just query the system for more information. Even more, we could already have those details fetched but “hidden” by UI. That’s why after displaying (sometimes after 1-2 seconds) those details, UI sends the command to change the offer state to “opened”/”read”. You could see similar functionality in email clients.
A developer triggers the rest of the commands on this page. Those can be: rejecting the offer (4) or adding to favorites (5).
“Self verification”
This process was quite interesting already in the Big Picture Event Storming. That’s because we cleaned up many events specific to the external system and not ours. To remind you how it looks like after the BPES:

The event informs us about the start of the verification process. What we want to achieve is to give the whole process on our side some TTL (time to live). All that sounds a bit… complex. There is also still a significant coupling between us and an external system. It became even more complex during the PLES part. That’s why I ended up with a much simpler solution:
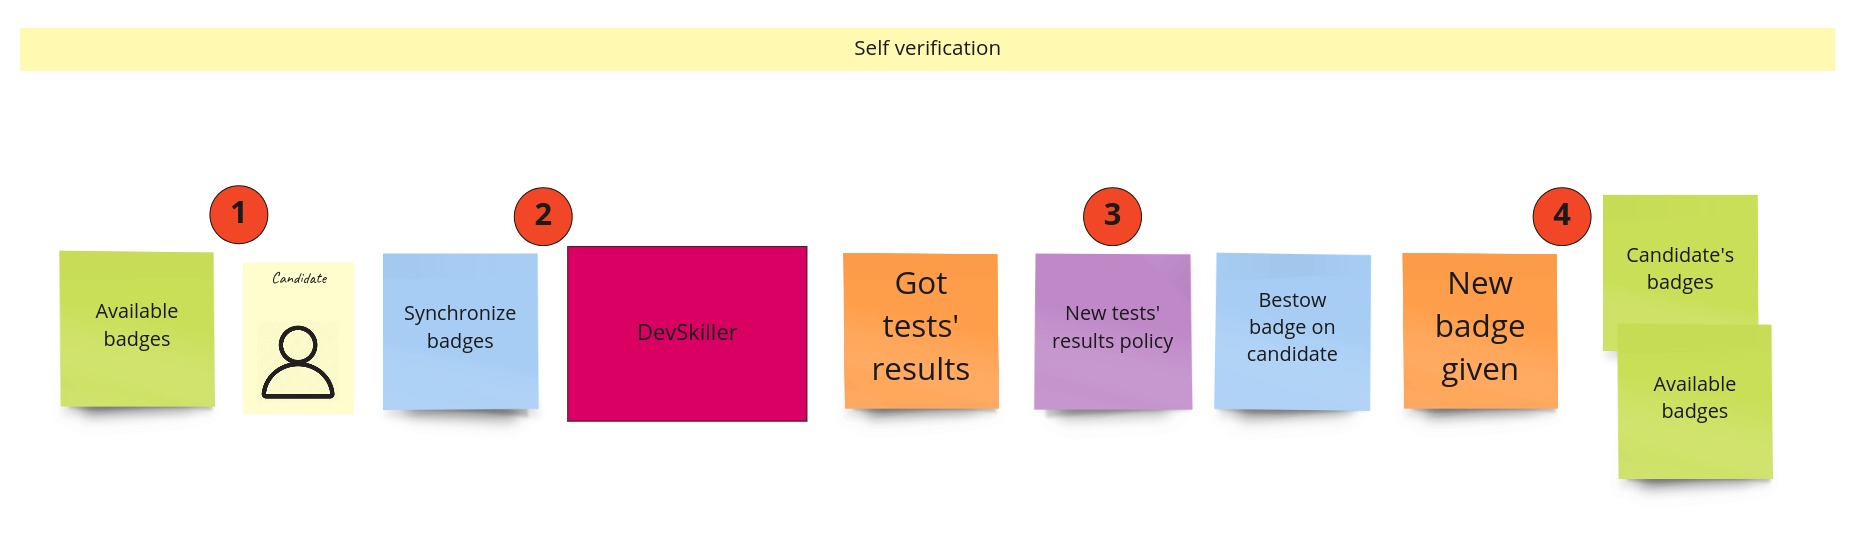
In this approach, we do not rely so much on the external system as in the previous one. Foremost, we don’t assume this system will expose any information about verification progress on their side. The only requirement for integrating with the external system is that it exposes the API with available tests and tests solved by the specific developer. But let’s follow this process from the beginning. First, the developers go to the badges’ page and see badges they can achieve (1). Each of these badges is linked to the appropriate test in the external system. It means the developer gets redirected to the external system and can start solving the test there. The whole process happens there, and we should not even care about what’s going on or how long it takes. When the developer is done with the test, they can get back to our system and initiate the synchronization (2). It means that our system will query the external one to get the tests’ results for a specific user. Based on the response, we can check whether the developer has achieved any new badge (3). If yes, we update two views: developer’s badges and badges to earn (4).
Banning recruiters
Last but not least, we have a process that we found the most interesting. Actually, we were modeling it in the first instance.
This part after BPES:
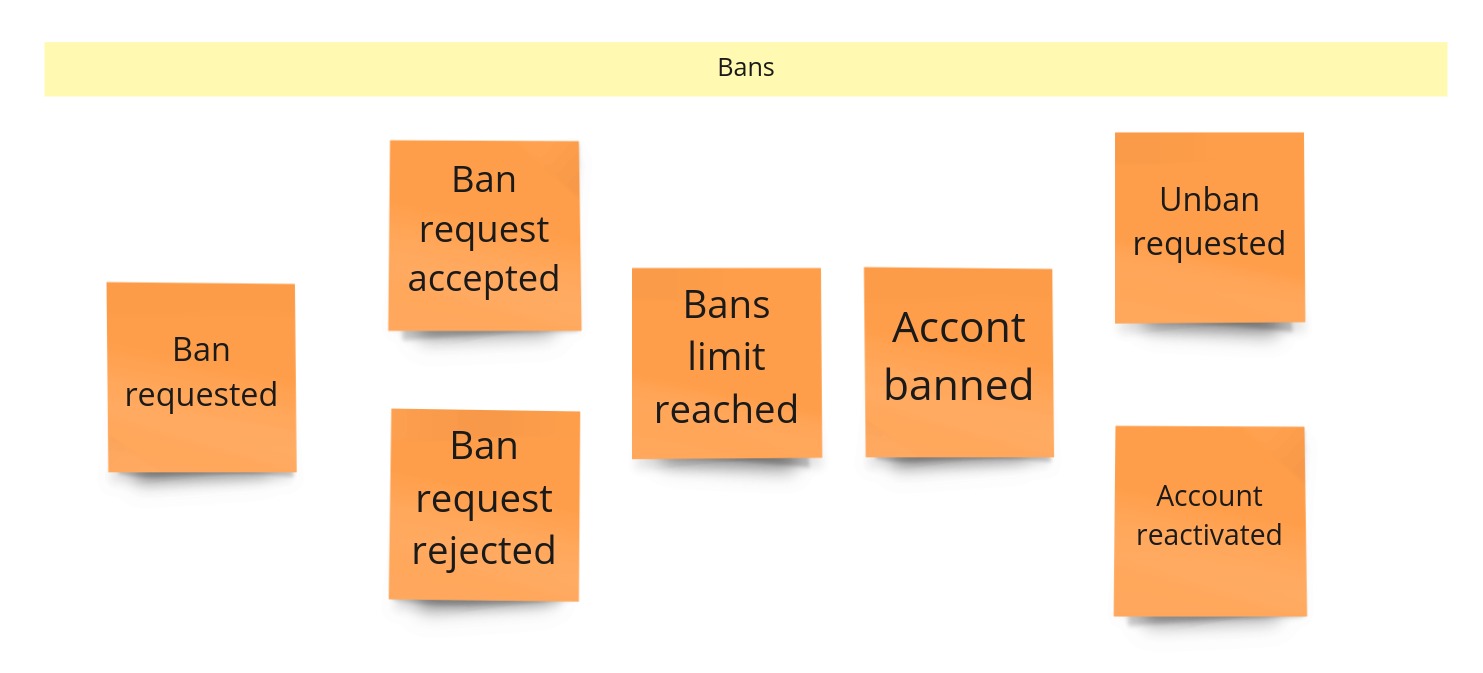
On PLES, it ended up as follows:

After the recruitment process, we want to give a developer the chance to evaluate the recruiter who has put in an offer. We assume that the trigger for that action could be something outside of our system (1). It could be, for example, a total mismatch between what the recruiter accepted in DevMountJob and the real offer. The developer, based on the experiences during the recruitment process, evaluates the recruiter. Then evaluation gets to some ranking system (2). This system recalculates the overall rating for the recruiter. Suppose the value falls below some predefined threshold. In that case, we should send a complaint to the Customer Support (3). Now process forks into two paths:
- The note has some time when it has to be processed (4). If Customer Support doesn’t handle it within this timeframe, we will need to handle it. It will get to the list with overdue notes. Thanks to that, we can monitor how many requests are not handled in a given time. We can introduce some notifications when there are too many of them or whenever the new one appears on that list.
- The note is processed in a given timeframe. Customer Support, based on the history of the recruiter and all other evaluations given by the developer that did the last evaluation, can make one of the two decisions:
- ban the recruiter (5) – the recruiter will get information (probably via an email) with the contact details to clarify the situation. Then, Customer Support can unlock the account (6)
- reject the note (7) – Customer Support can do it after analysis of additional data. For example, some evil developer could intentionally decrease the recruiter scoring by creating a lot of negative notes 😉
This model we got for the banning process is actually quite generic. I mean that there are many processes in other domains that could be designed the same way. For example, the refund process, to name one of them.
Congrats!
We’ve just done a hell of work! We designed step by step one process after another. We introduced new elements so that we could focus on details. Thanks to that, we could also validate previous assumptions.
Good job!

I bet many projects would benefit from designing their processes on Events Storming workshops, so please help me share knowledge about this technique by sharing this post!
Next time we are going to focus on Design Level Event Storming! Don’t miss it! Subscribe to the newsletter, so you will be the first to get to know about it.