Design Level Event Storming with examples!

We covered a lot of ground. We started with the domain description and mistakes that I’ve made. Then we did the Big Picture Event Storming (BPES) to get the helicopter view of the whole business process and its events. Finally, we split this process into smaller units in the latest post using the Process Level Event Storming (PLES) technique. Today we are going to propose some designs for our solution. We will use Design Level Event Storming (DLES) to achieve this goal. At the same time, this is the last post about Event Stormings and next time we will be implementing our system.

First of all, I have to admit something: I love abstract thinking, and hardly ever do I have problems with it but this time was different. I have surely been an excellent example of the novice in the Dreyfus model of skill acquisition, no question. I expected some simple rules, flows, and conventions while putting the context and the goal on the back burner. I was looking for some notation at a push. All of that combined with my internal need to name things and abstractions, made me feel pretty confused. Having spent many hours in Miro, trying to create some models, looking at some other examples of DLES, and a couple of calls with Lukasz and Mariusz, eventually, something “clicked”. Well, it turned out that on the Design Level, I should… wait for it… design ;). An Event Storming is a tool used to visualize the business process, and there could be different designs supporting this process. That being said, there are different approaches to visualize those designs. We can choose/create notation or convention based on the project context, the workshop’s goal, or our preferences. The most important thing here is to visualize and propose the model that we think suits our needs best. That’s the difference between PLES and DLES. In the PLES, we were focused on processes, how they should work. Now on DLES, we should focus on models that support those processes. I just couldn’t get it.

The matter of taste

When it comes to modeling, let’s think about how we can use our sticky notes to do it. I’ve seen a couple of different approaches. I want to show you one that I’m going to use here and a few others so you can compare them.

Let’s start with a go-to book when it comes to Event Storming by Alberto Brandolini. Unfortunately, the chapter about DLES has just 10% of its target capacity, so there is not too much information about this workshop phase. The main message here is that we finally need to make decisions about the design. Even if we find something new, we need to develop an idea of how we want to solve that. It could be a bit hard, as in this part of the workshop attendees are often technical people, and we all know that we can talk about different approaches for hours. Nevertheless, we need to focus on proposing some solutions that support our business process.

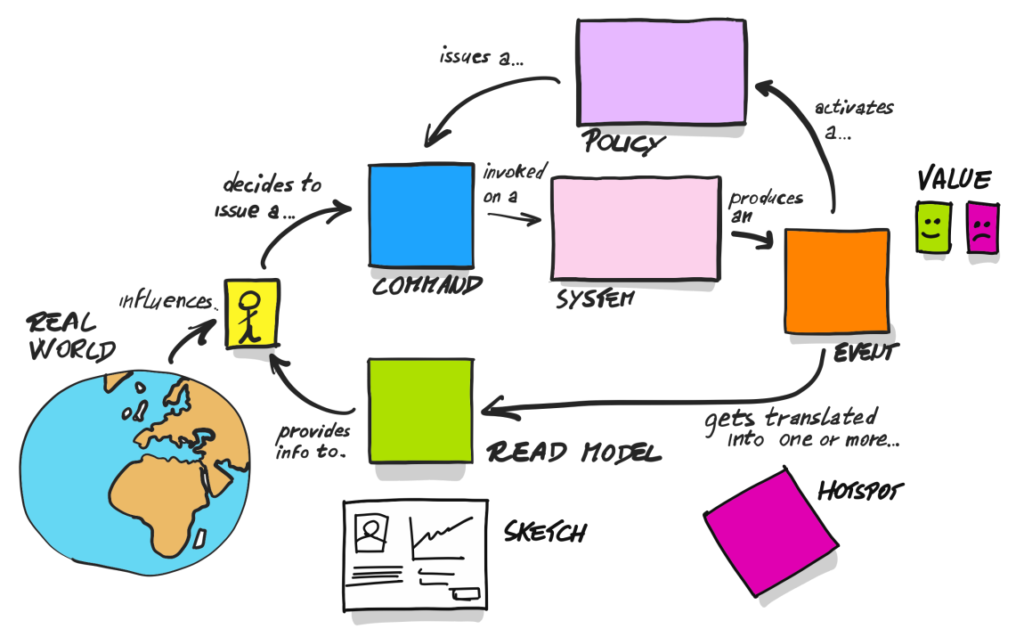
In DLES, we introduce a yellow sticky note which indicates an aggregate. Brandolini suggests postponing naming it, and I tilt to this suggestion. Sometimes the first name “hides” the actual responsibility of the aggregate. Regarding the general approach in this part of the workshop, Brandolini presents a slightly modified version of the image we’ve already seen in PLES:

Source: Introducing EventStorming – Alberto Brandolini

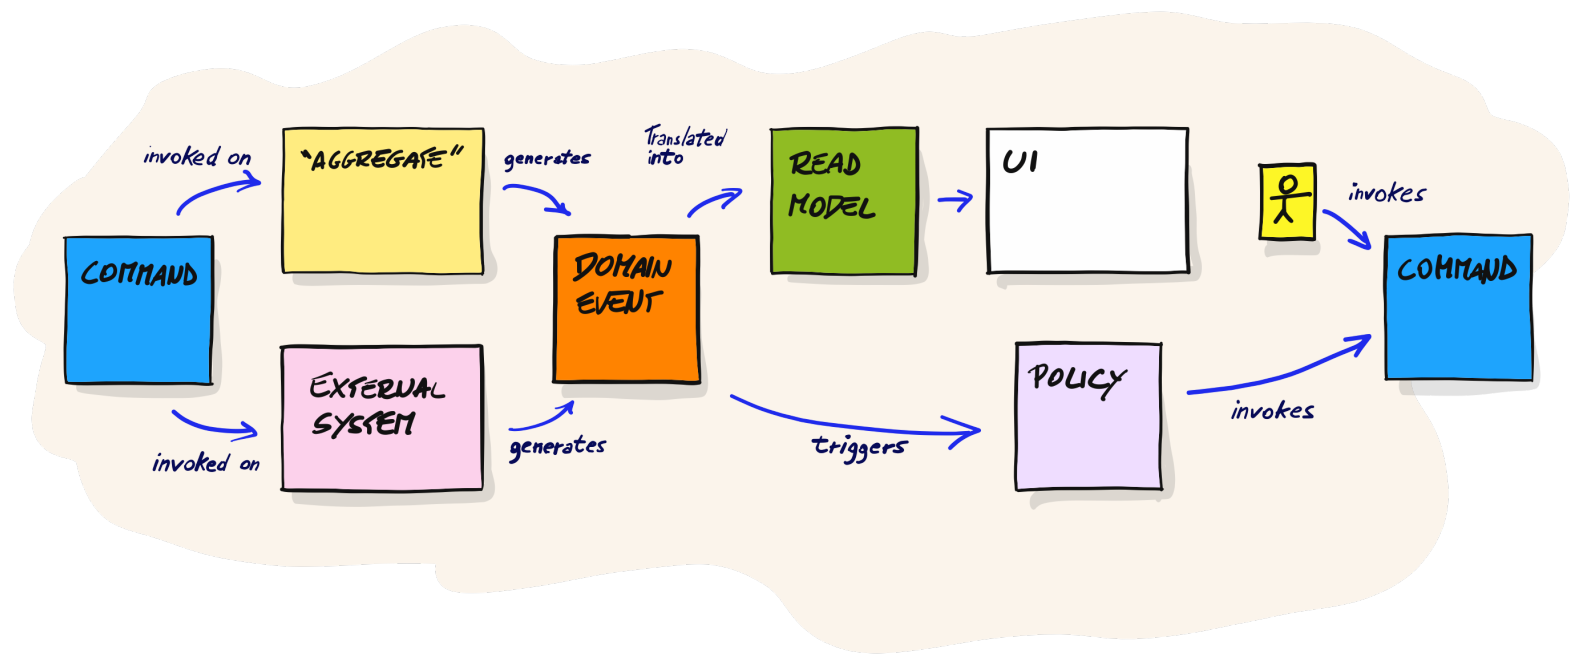
I think it’s a good moment to share some of my thoughts now. There is not too much said/written about DLES in the book itself, and mainly this picture drew my attention. Unfortunately, I fell into the trap of using this picture as a schema to modify my artifacts from PLES. In other words: I wasn’t thinking about creating design but about putting a yellow sticky note into processes. I think I’m not the only one who was trying to do it this way. When I was looking for examples of DLES, I often met PLES artifacts/thinking with one extra sticky note. That’s why it’s a good idea to participate in the workshop with an experienced facilitator who can explain the difference between DLES and PLES.

Finding aggregate boundaries or proposing other designs/models in places where there are no aggregates will be my goal in DLES. That’s why I will use the notation I used with Lukasz in one of the previous projects but bear in mind that you can modify it to your needs. You need to visualize your models in a way that is easy to understand, even if you get back to the board after some time. It’s you who are going to implement those models, so everything has to be straightforward for you and your team.

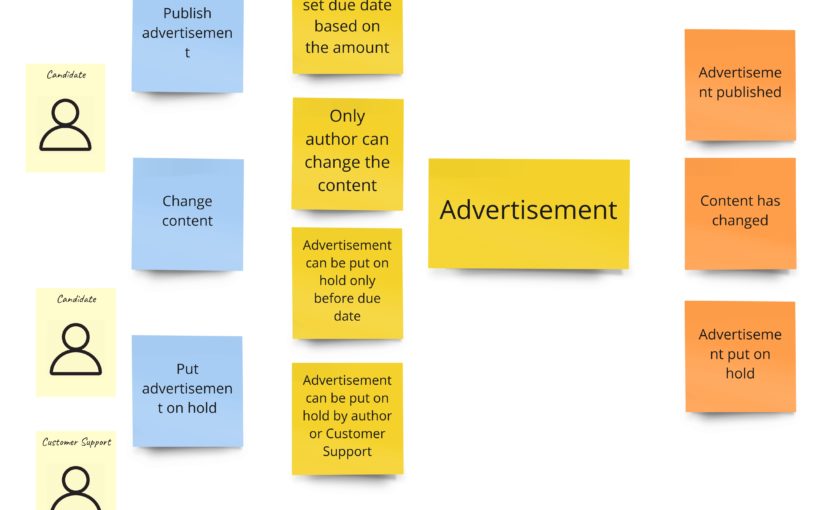
Let’s get back to the approach I will use here. In general, I want to gather business rules, commands, and events that “occur together”, no matter where they are in the process (in PLES). I also intuitively know that I usually have some model that aggregates those elements together. That’s why most cases will look as follows:

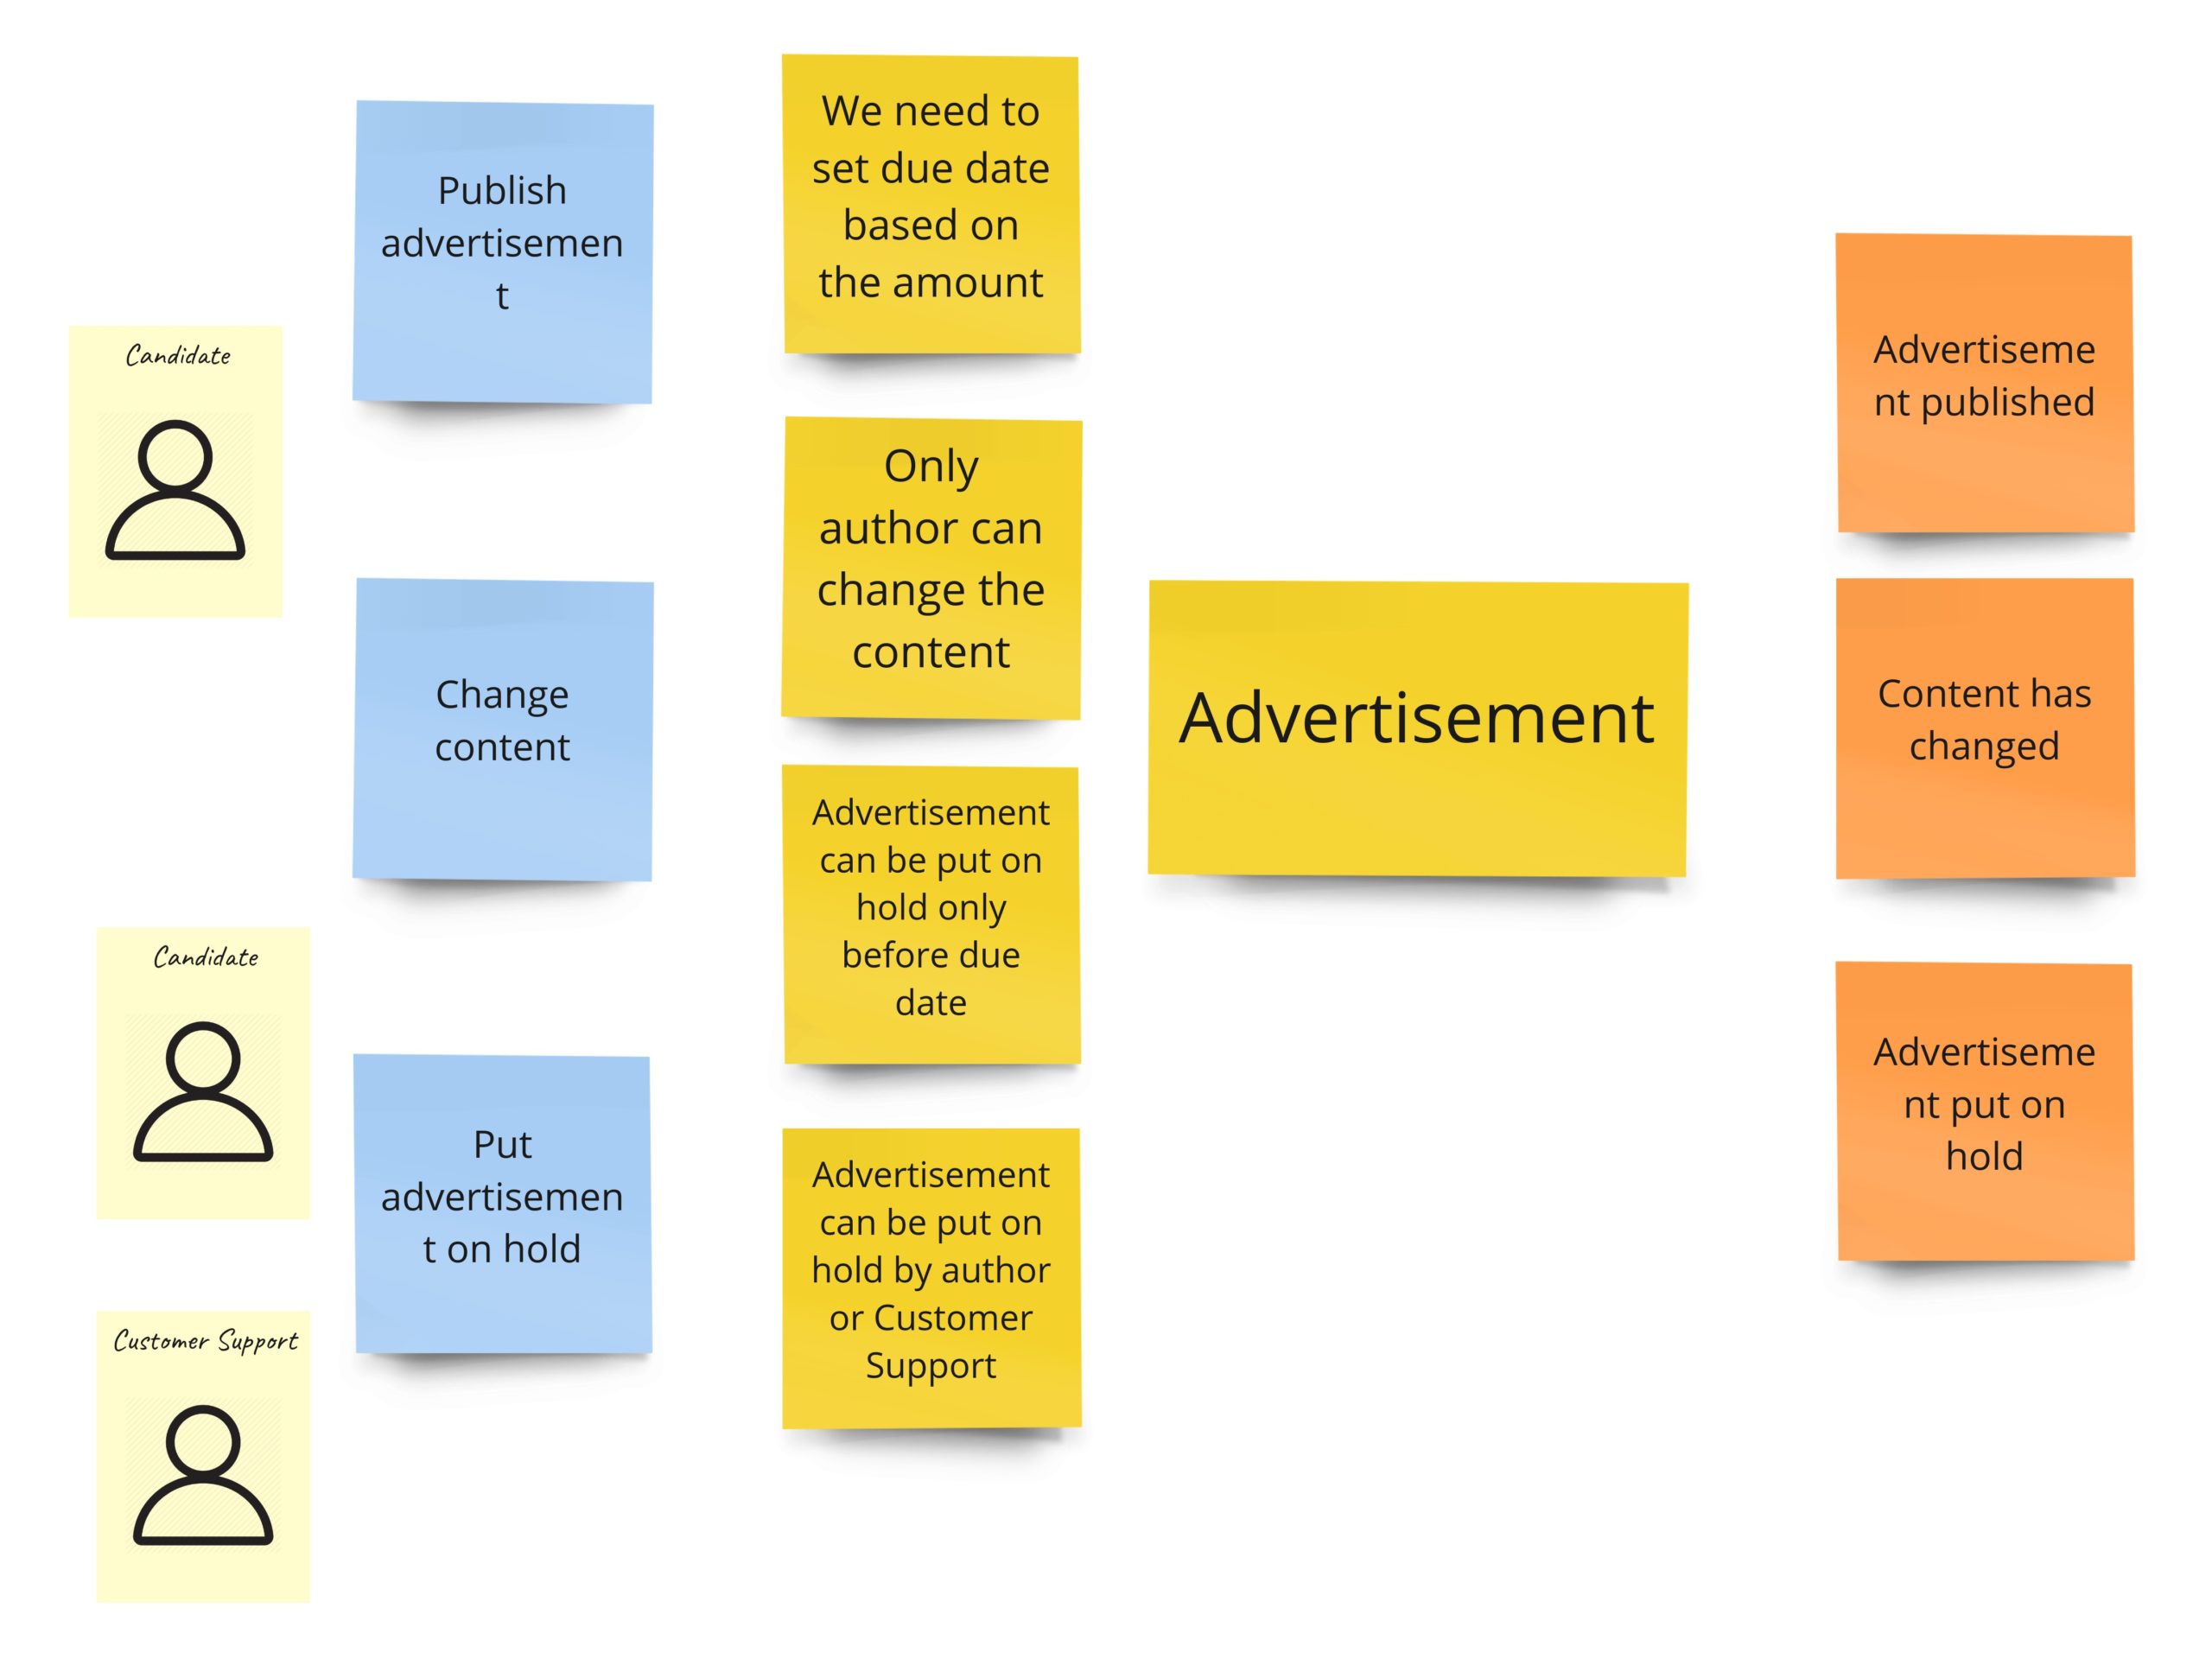
From the left: we see commands, then business rules, then an aggregate, and finally events that are thrown by the aggregate.

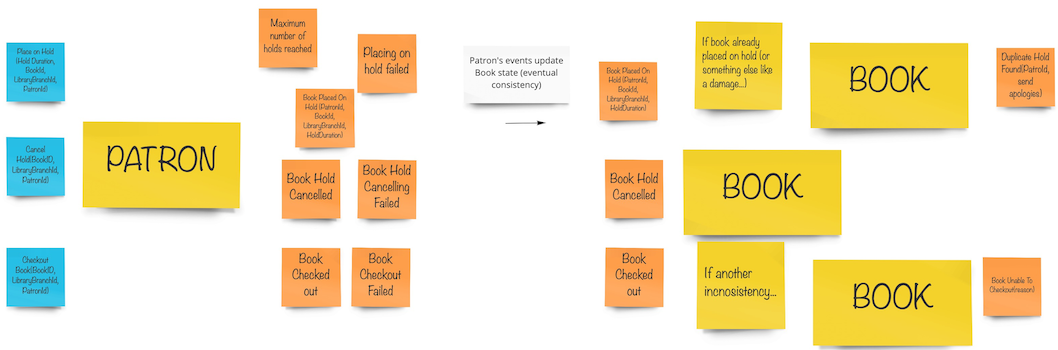
Another approach I’ve seen lately is the one where you have events below the commands. Thanks to that, we can have commands ordered by the time when they occur. So, for example, in this approach the previous case with the advertisement, we could model as follows:

You can see the rectangle that more or less shows the aggregate boundaries, so we know which commands and events are connected with it. 

The different approach I would like to show you is the one from the ddd-by-examples/library repository. Jakub Pilimon and Bartlomiej Slota use the Example Mapping in their DLES:

And the final result looks like that:

The last technique I would like to mention is the one I’ve spotted on  Mariusz Gil’s Miro boards. Mariusz takes modeling a step further, and instead of presenting boundaries, he literally writes code entwined with sticky notes of commands and events. It causes a wow effect, as you can see the code even before sitting to your IDE. I encourage you to take part in Mariusz’s workshops so that you can see this approach in action. 

Let’s get this party started

Now, after discussing all those approaches, we are going to do some work. Finally, we want to propose models that, based on our current knowledge, support processes we defined in PLES.

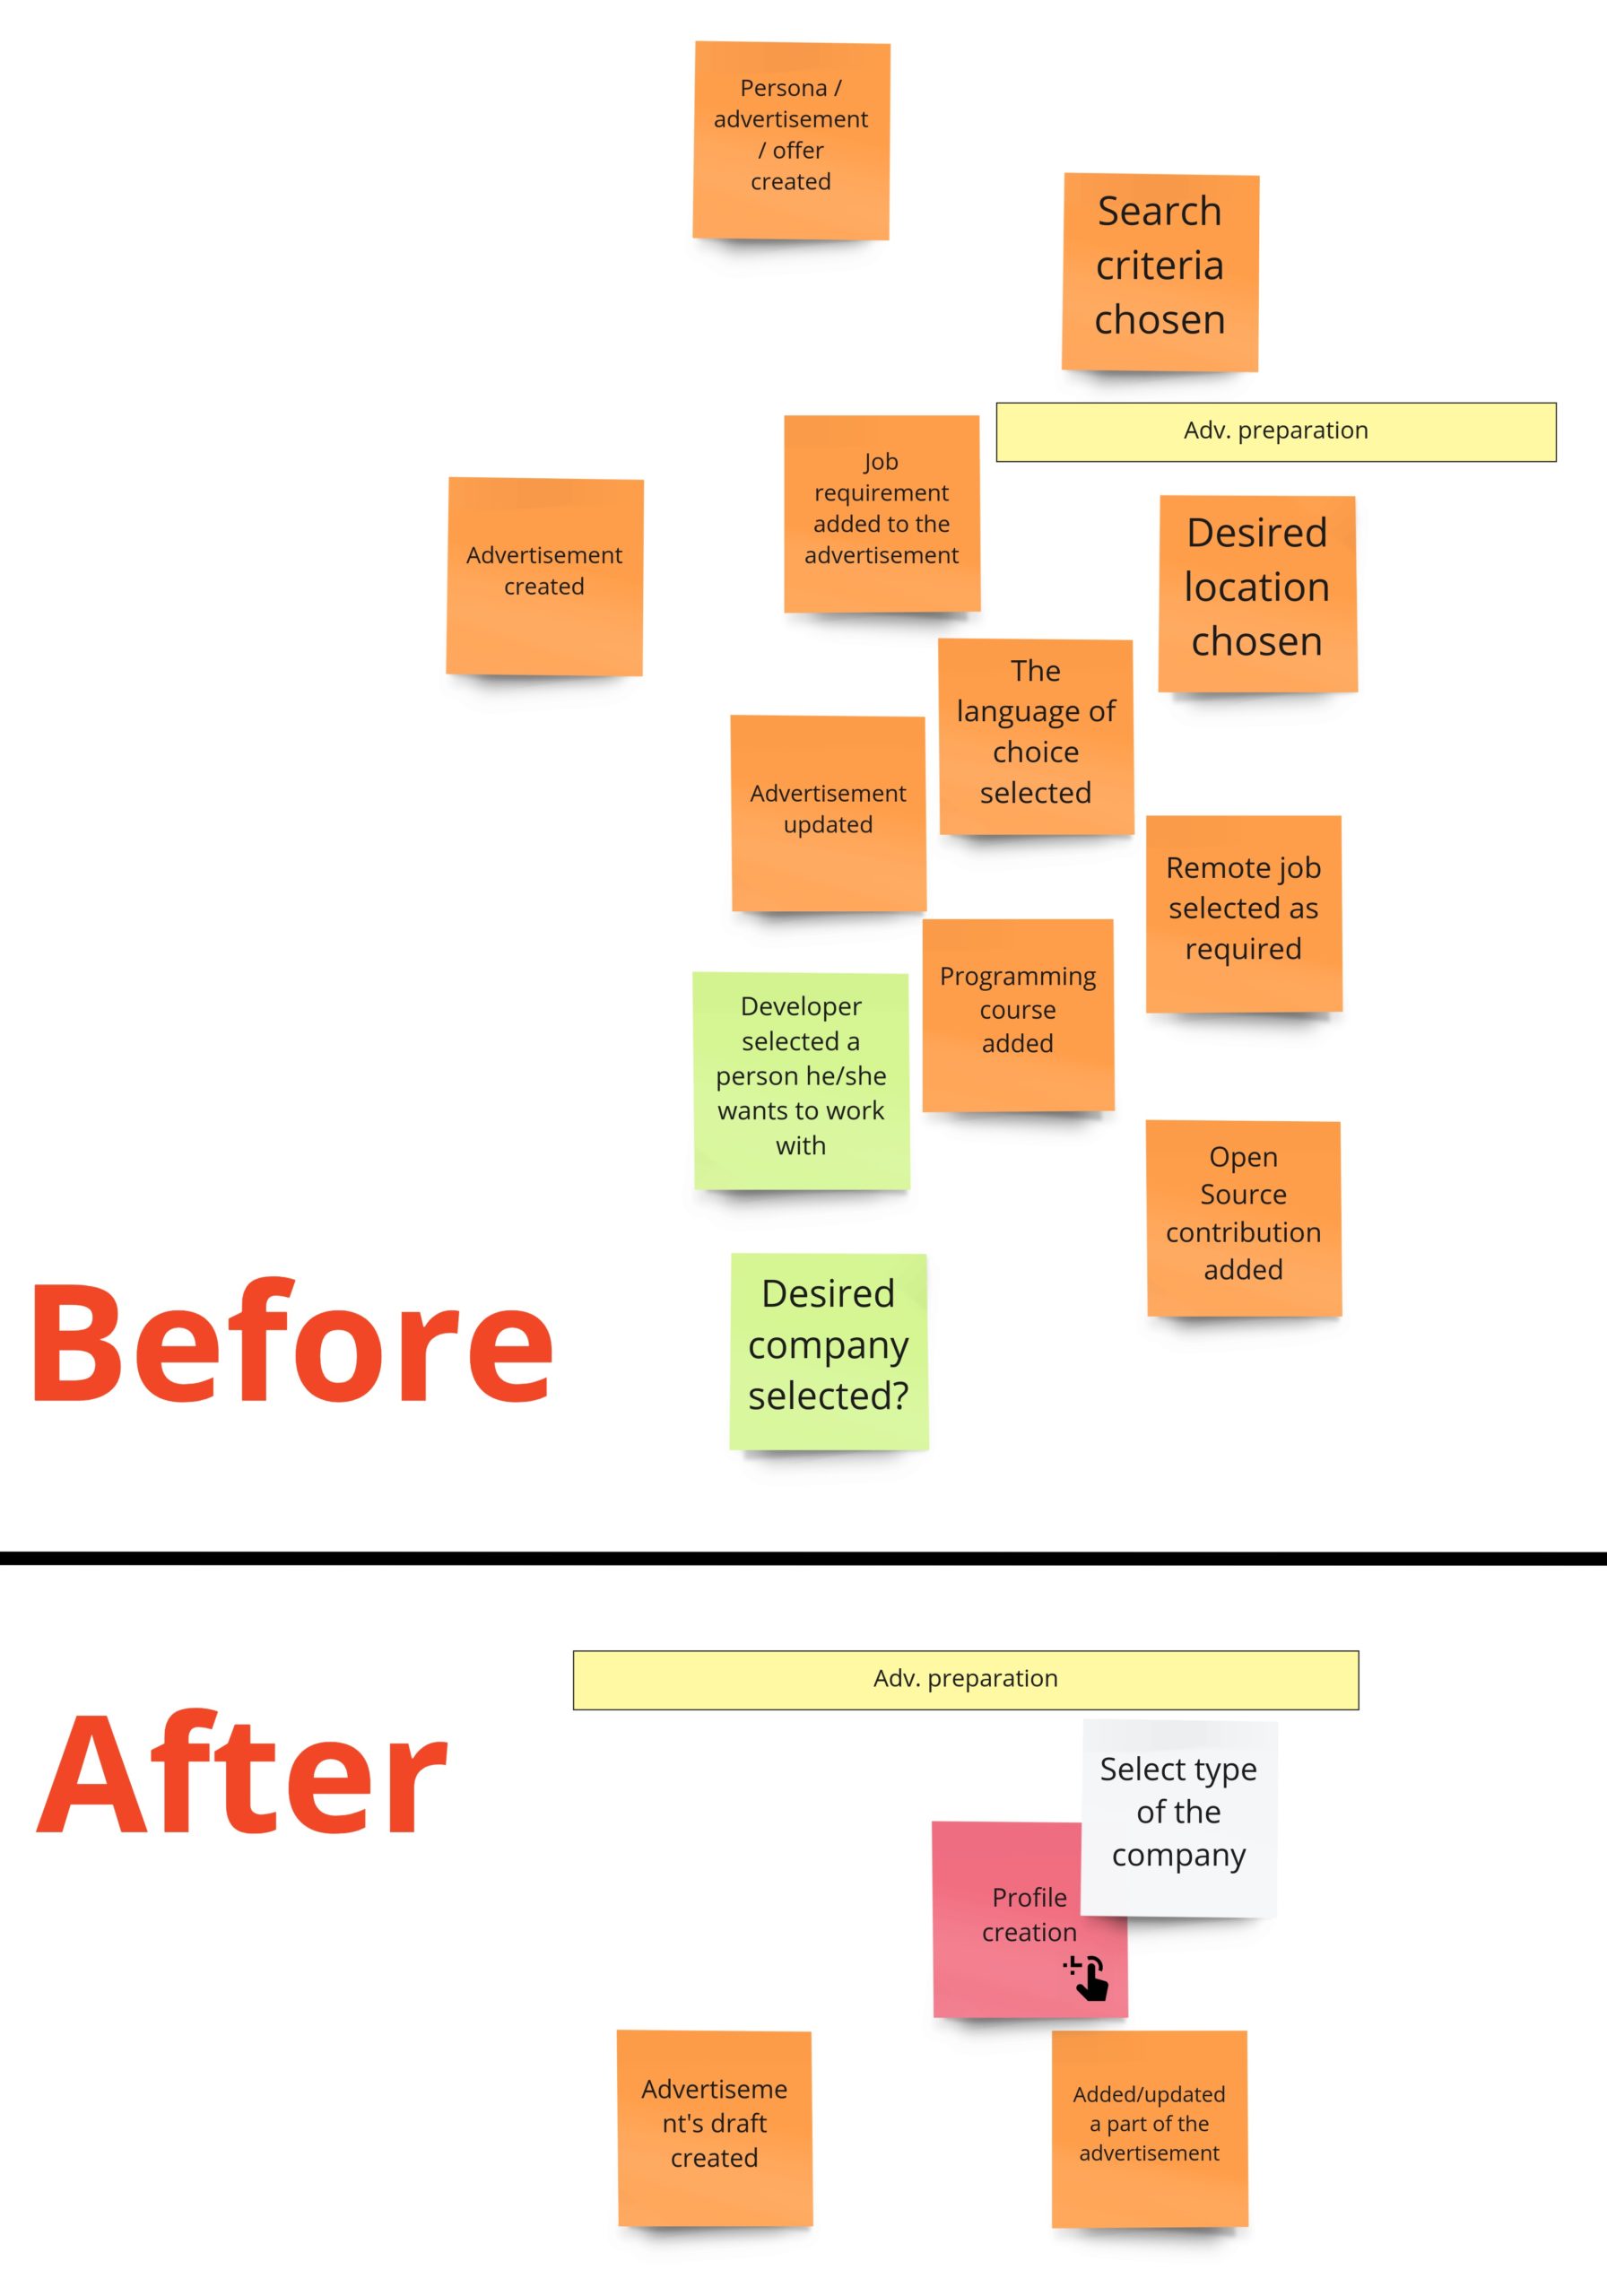
Advertisement’s preparation

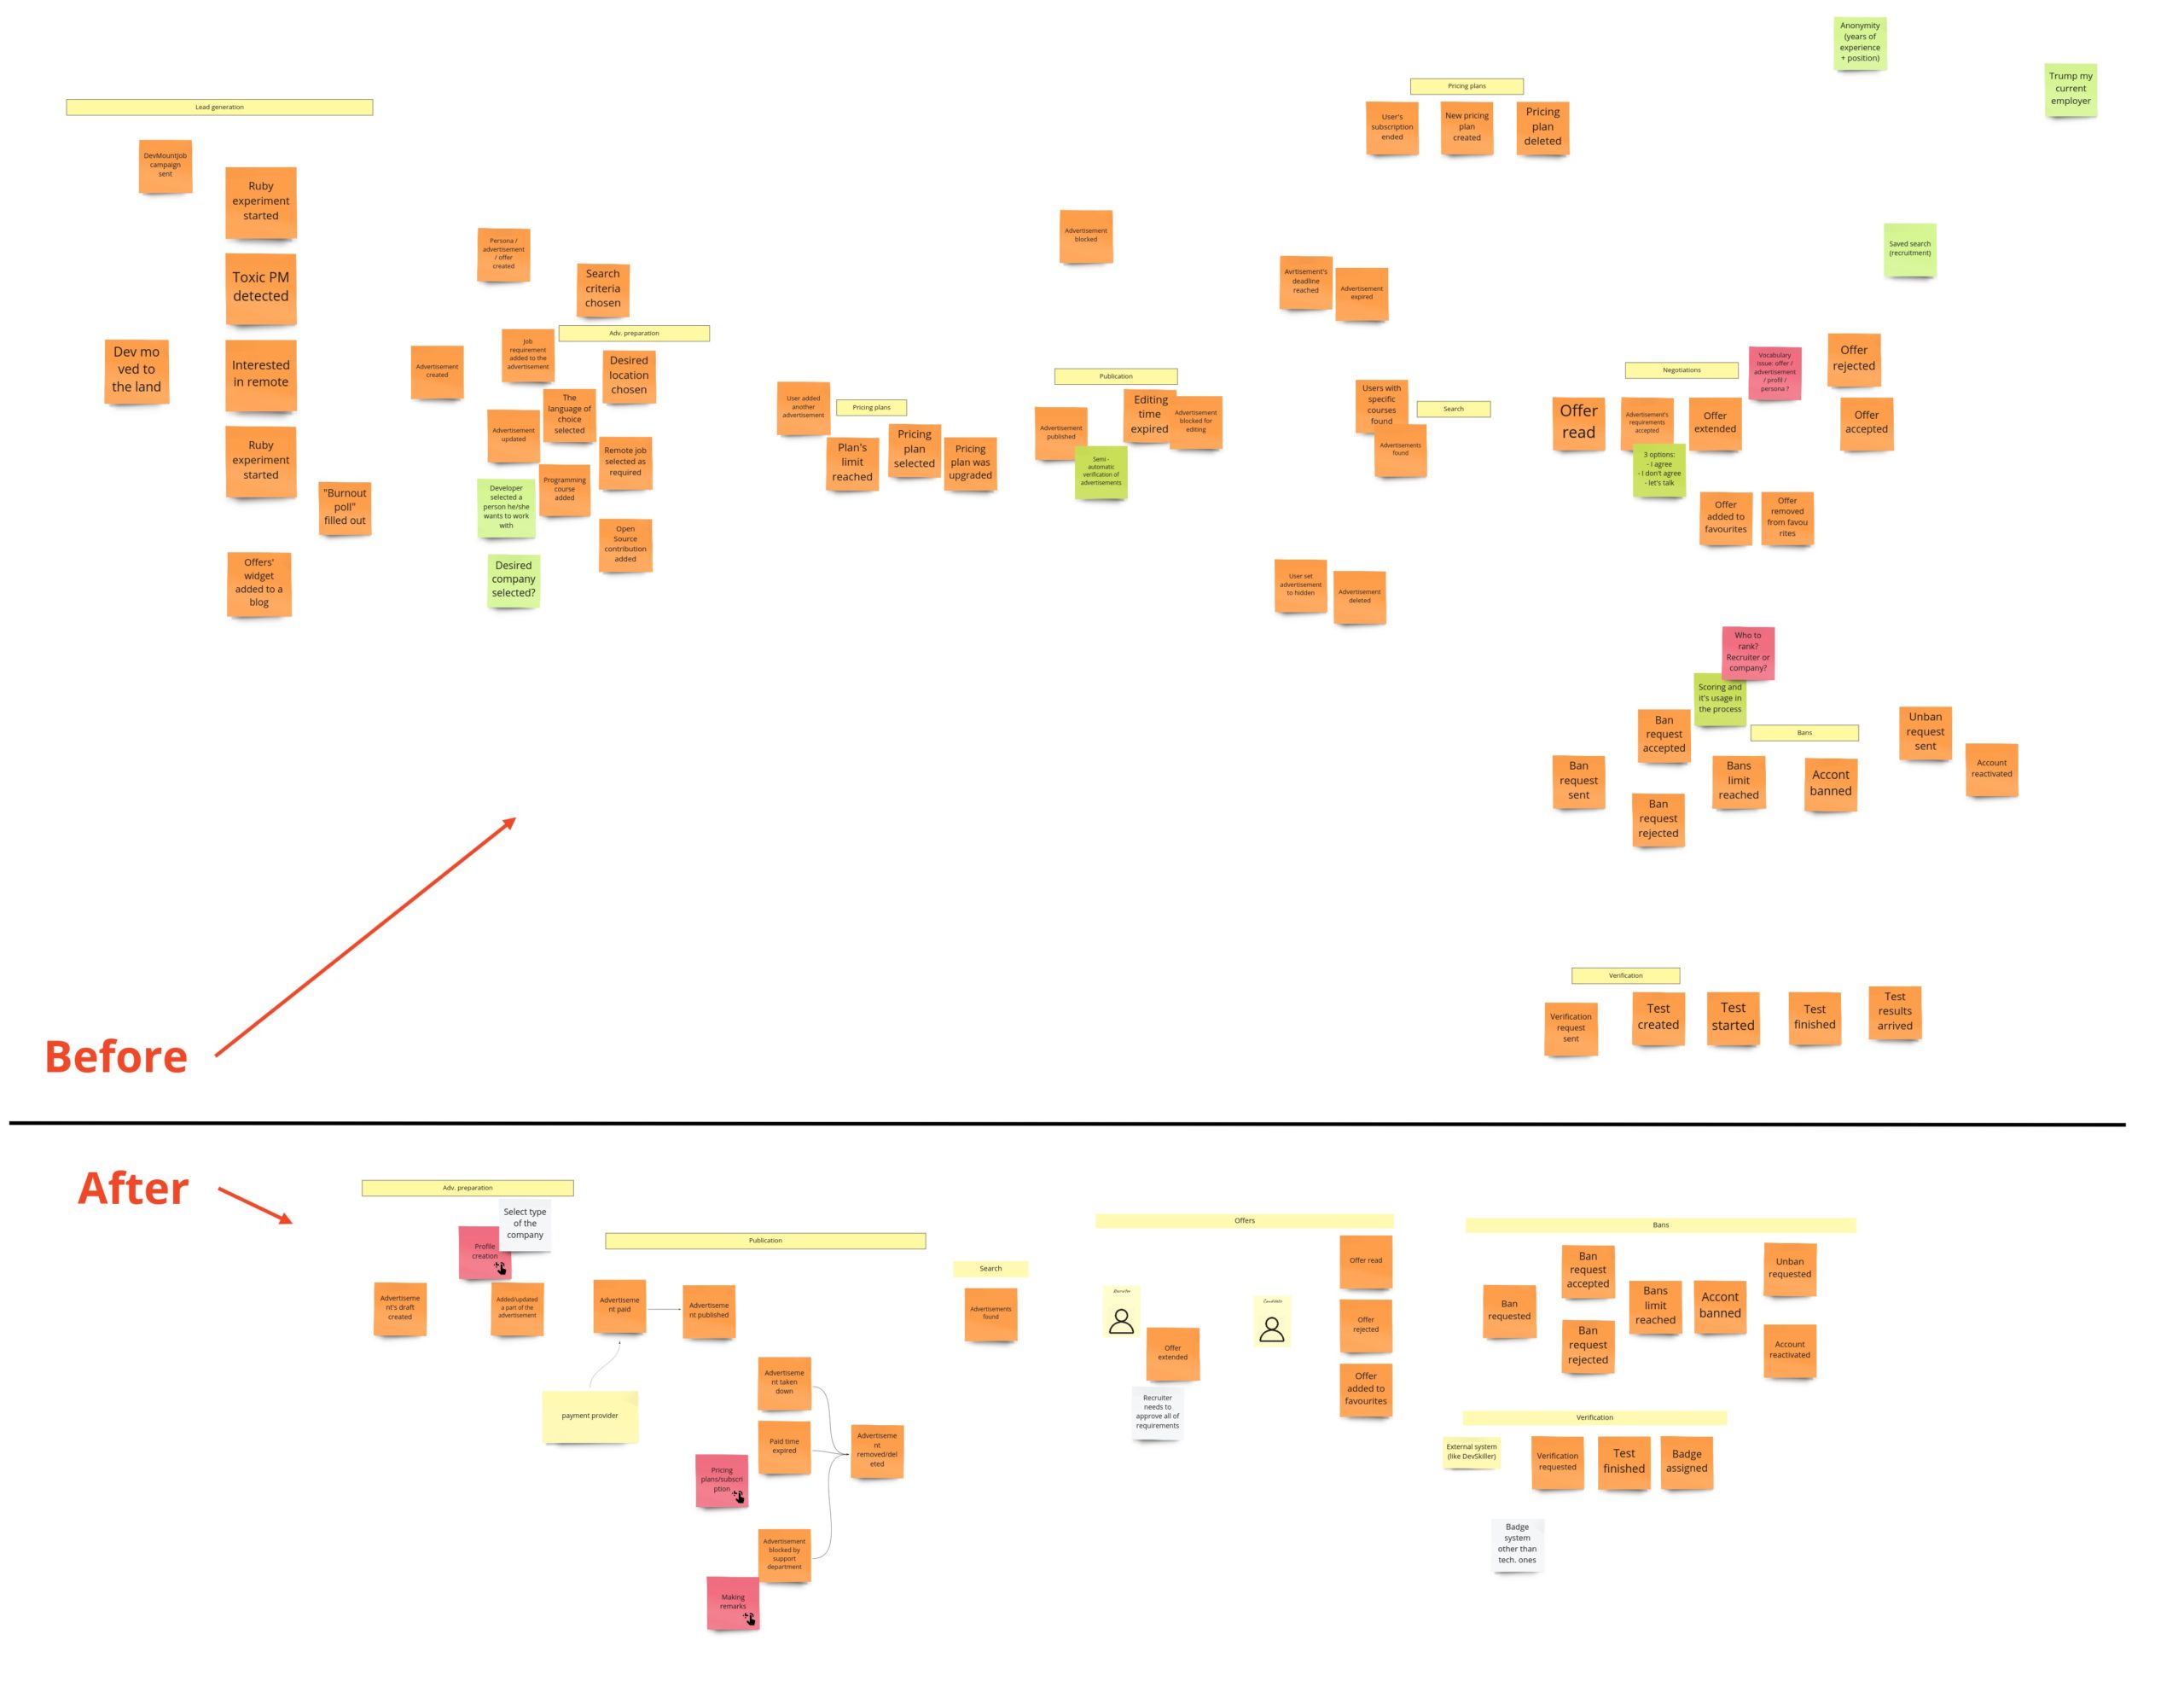
Let me remind you how this process looks after PLES:

I can tell you that you will witness quite a revolution here. Initially, I was thinking about some model of a draft. I wanted to support situations when the user starts filling up the form, leaves it for some time, and gets back to it after a few hours/days. Keeping a draft would prevent starting from scratch. I assumed that I needed some object here that would react to content changes, and if there are none, it will expire after some time. I also had another requirement saying that a draft should work for both: logged-in and logged-out users. It means we would identify drafts based on the id kept in cookies. I did not require support for multiple browsers/computers. Given all that, when I started to design the model I realized, that:

  1. we need to create a read model of the draft on the backend
  2. we need to refresh this model each time a user changes its content on the UI
  3. we need to remember to remove it from DB when there are no changes from UI
  4. we retrieve the draft for the user based on the value kept in the UI/browser

Can you spot what’s wrong here? Firstly, if the UI/browser controls the whole lifecycle of the draft, why do we even need it on the backend? Secondly, all that functionality could be done by a few lines of code on UI with local storage support. What’s interesting here is that we can support the process without the explicit model of the draft. We can just use what the browser gives us out of the box.

When we don’t care about the draft, we can skip everything that is before the payment. When it comes to the payment itself, I have just two requirements:

  1. no matter if the payment succeeded or failed, the advertisement has to be published. It means that we can publish the advertisement when we start the payment process. This decision simplifies the whole process.
  2. if the payment fails we need to send the information about the failure (some details) to the Customer Service

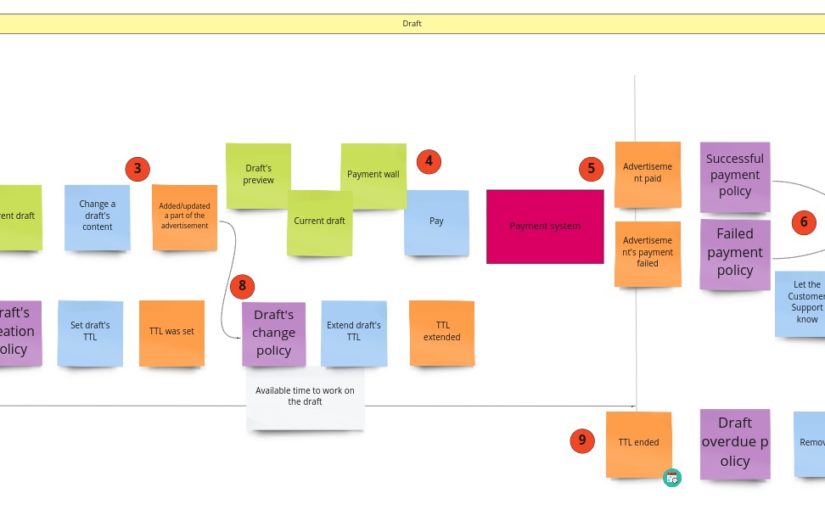
When I wanted to follow the notation I described in the first chapter, I got something like this:

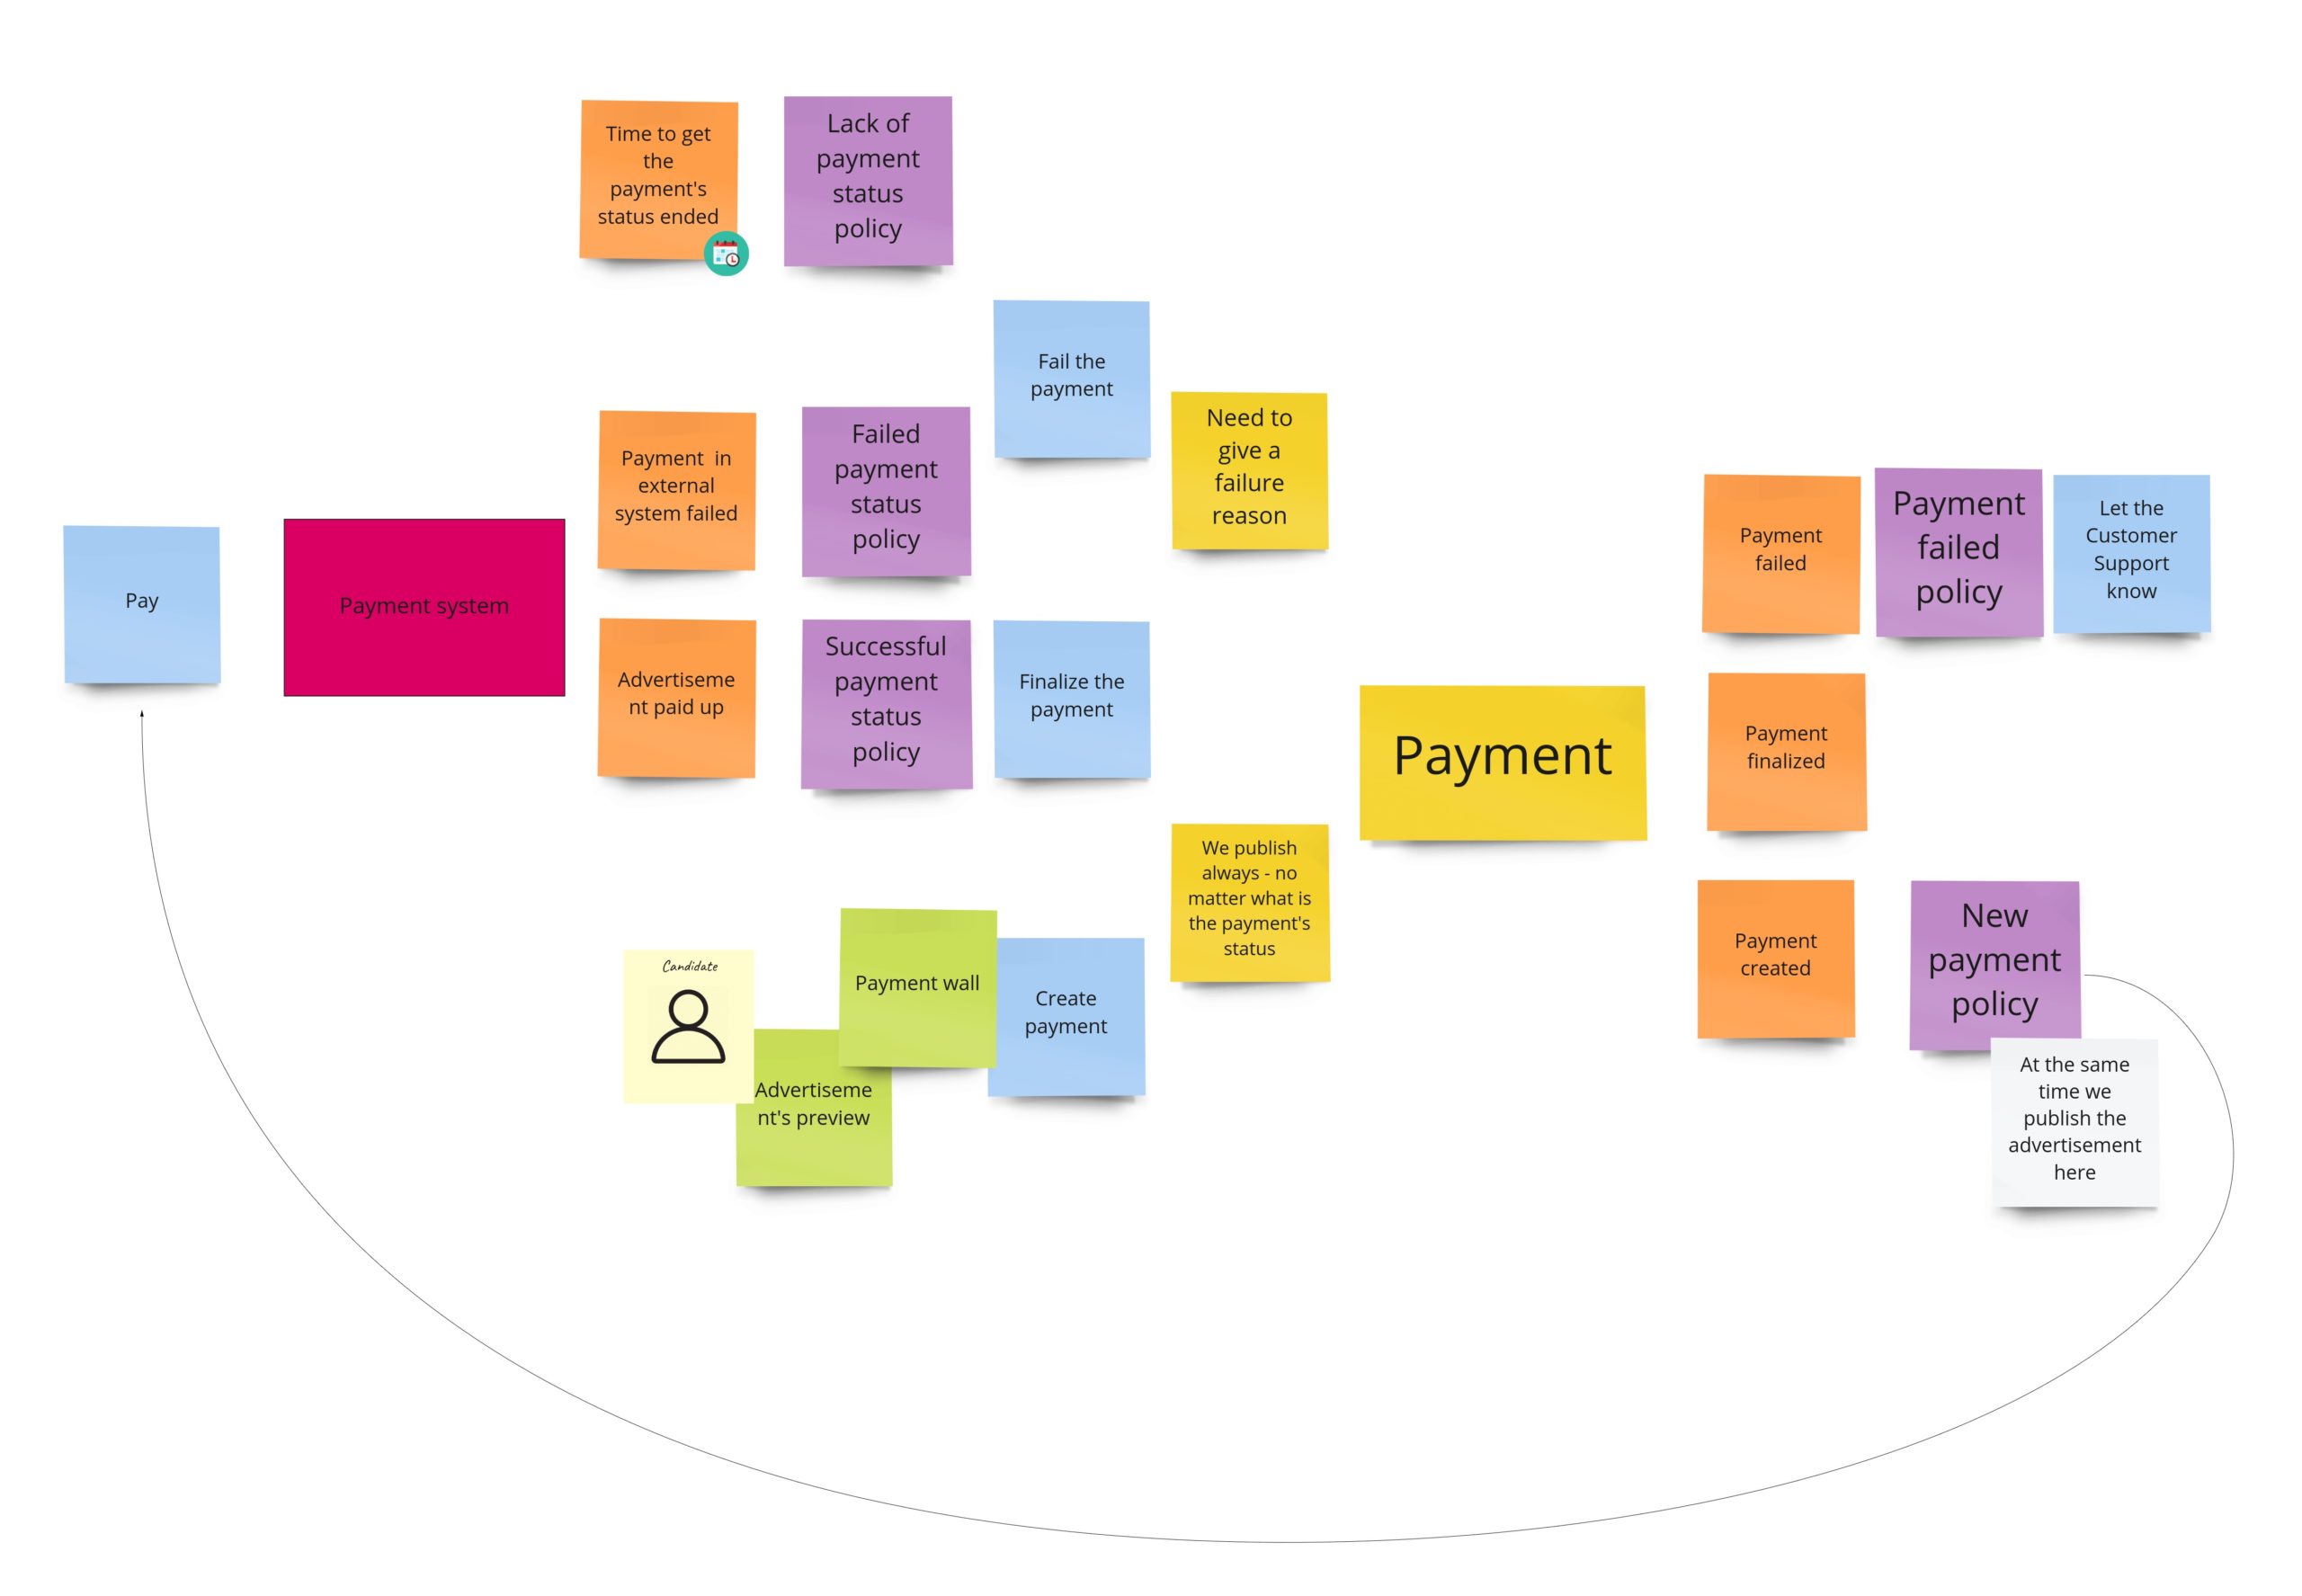
Some of the commands that change the payment’s state are triggered after responses from the payment system. Moreover, we request the payment in the external system after we have created the object of payment. Unfortunately, the readability is not so good here, so in DLES, I decided to not stick to my general notation but to show the chronology:

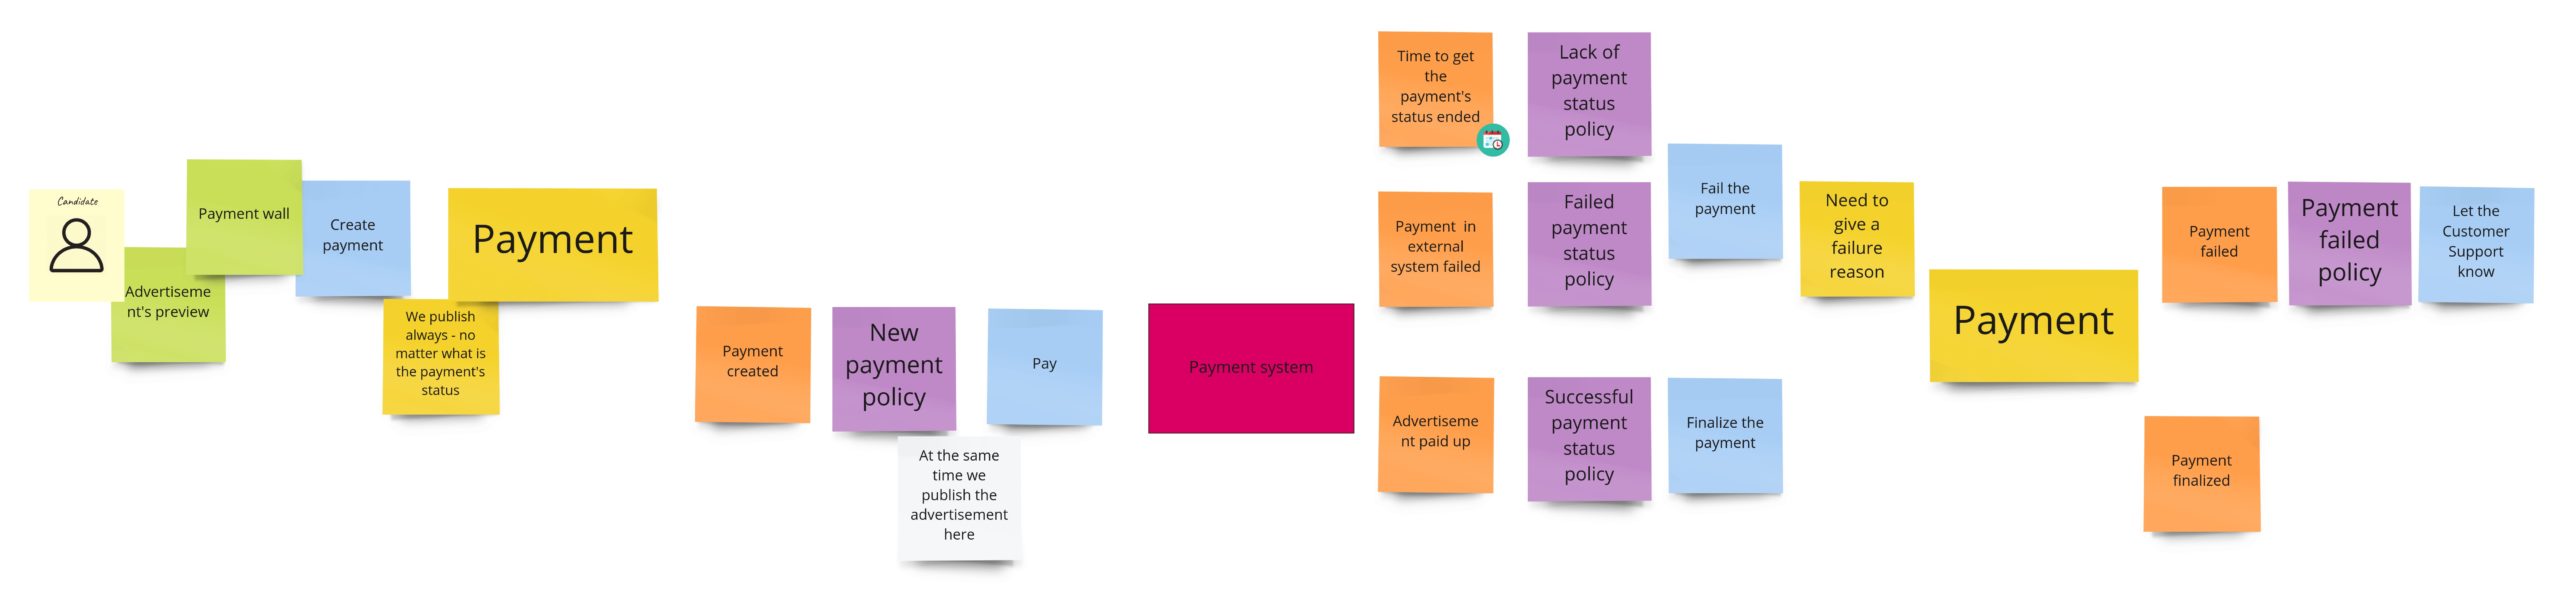
The difference here is that the sticky note with payment’s aggregate occurs twice. So now it’s easier to see when we change its state. I write about “aggregate” here, but conceptually, it would be the process manager if I were to publish the advertisement only after successful payment. Nevertheless, in both cases, I would probably call it the “Payment”.

Publication

During the PLES, we came up with such a publication process:

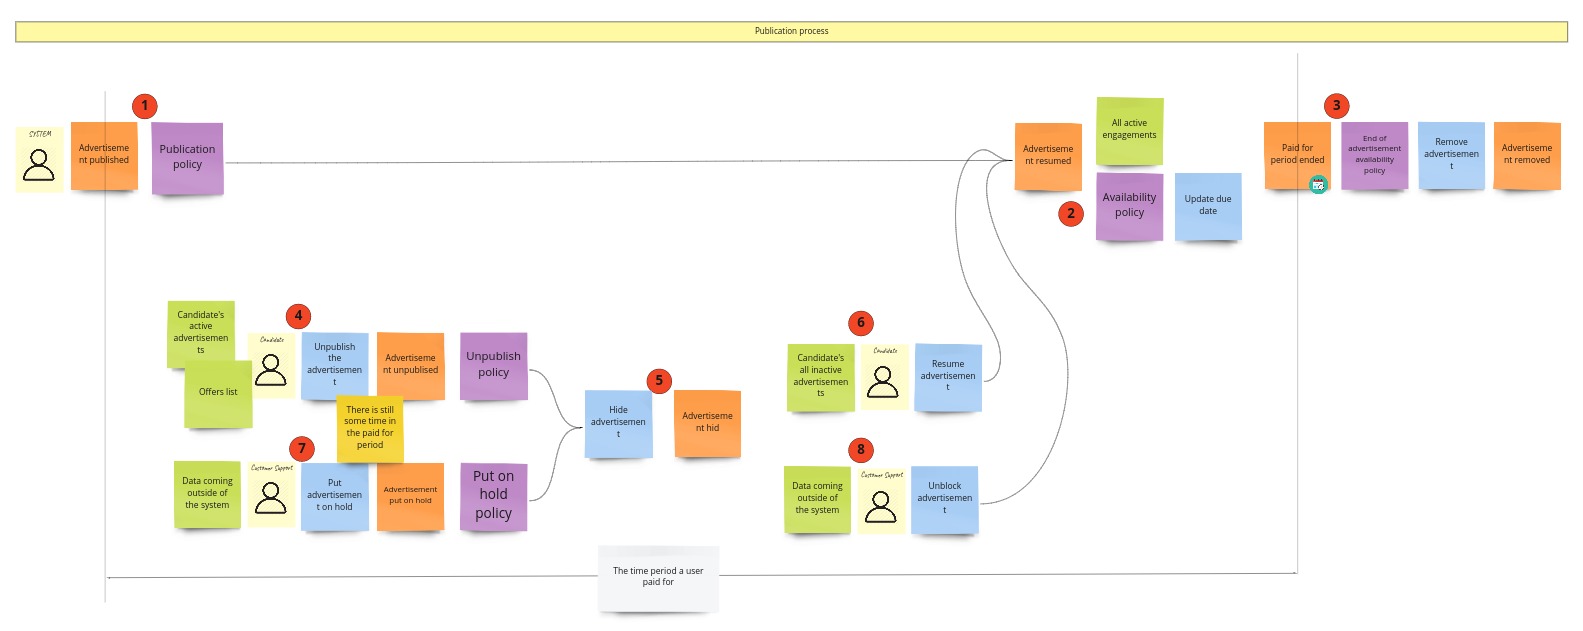
We call it “publication,” even so it’s about hiding/putting on hold and resuming the advertisement. Maybe you somewhere have seen a similar process under the “availability” name. It’s pretty generic and occurs in this or slightly different form in most of the domains. I’m still not convinced of the “publication” as a name of the Bounded Context, so it can change when I start the implementation. 

When it comes to the model of this part, I would see it like this:

Registration

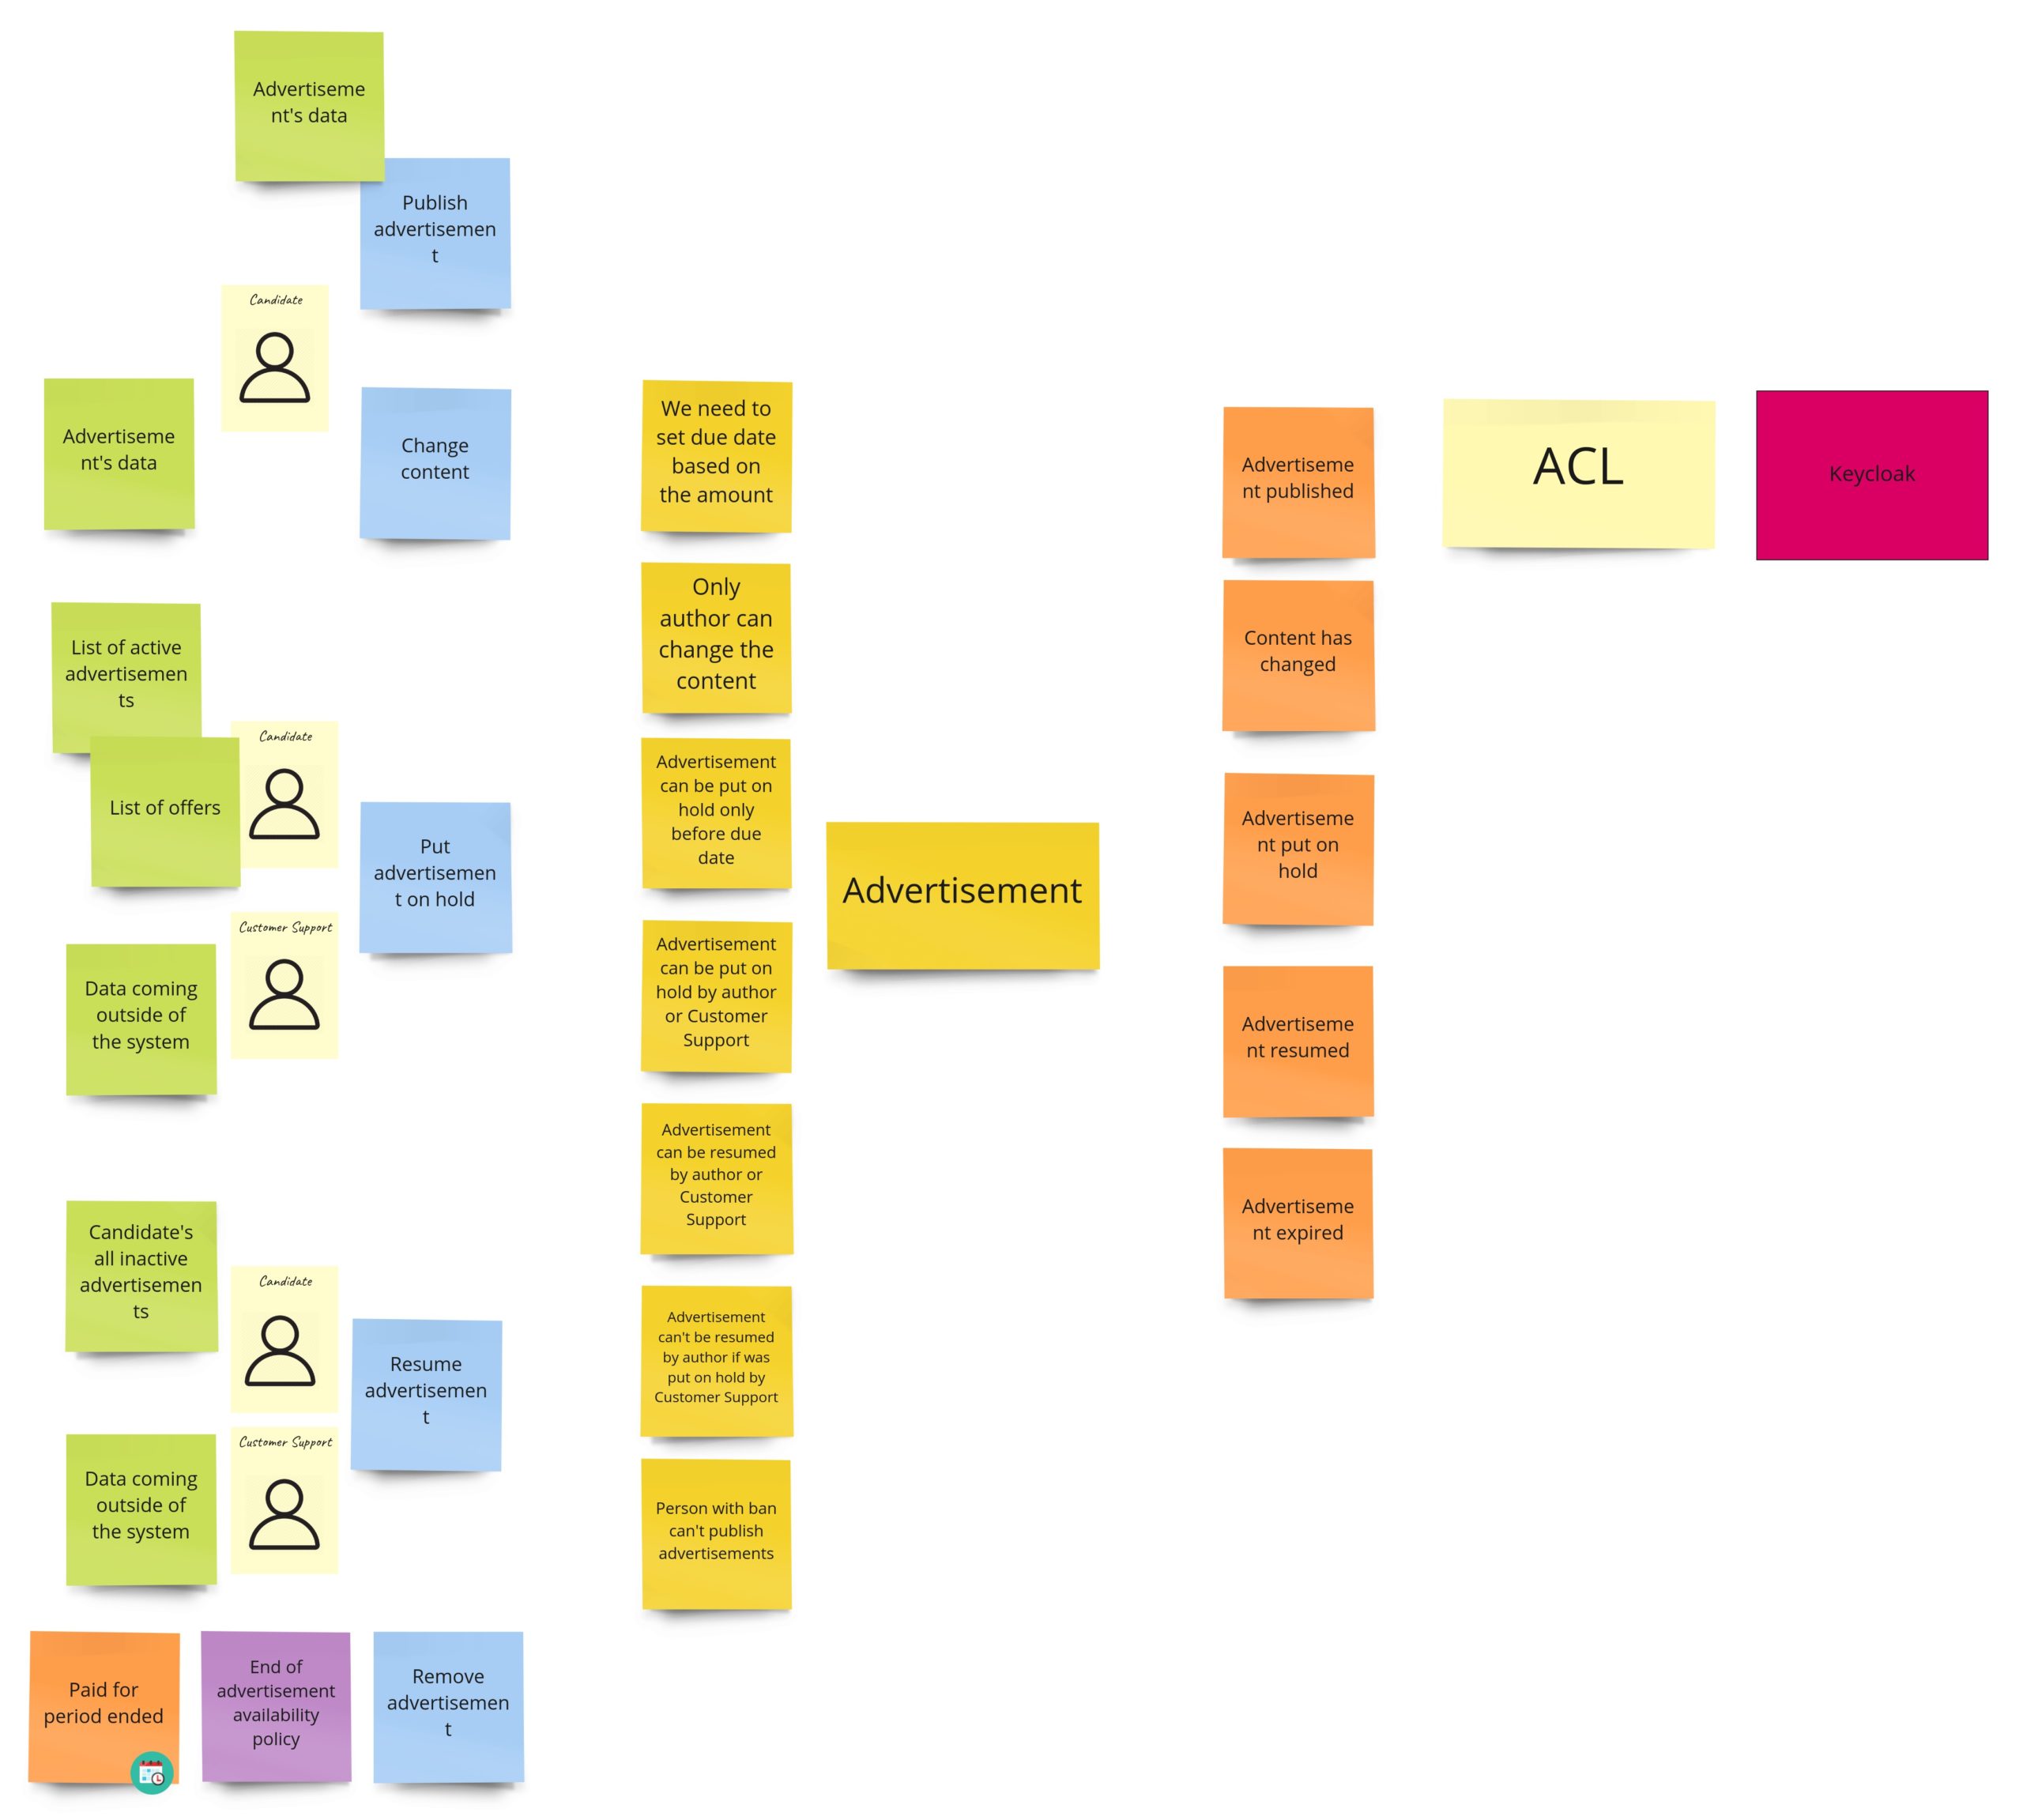
In the previous image (the one with the advertisement’s model), you could notice such a piece:

On the other hand, after the PLES, we had something like this:

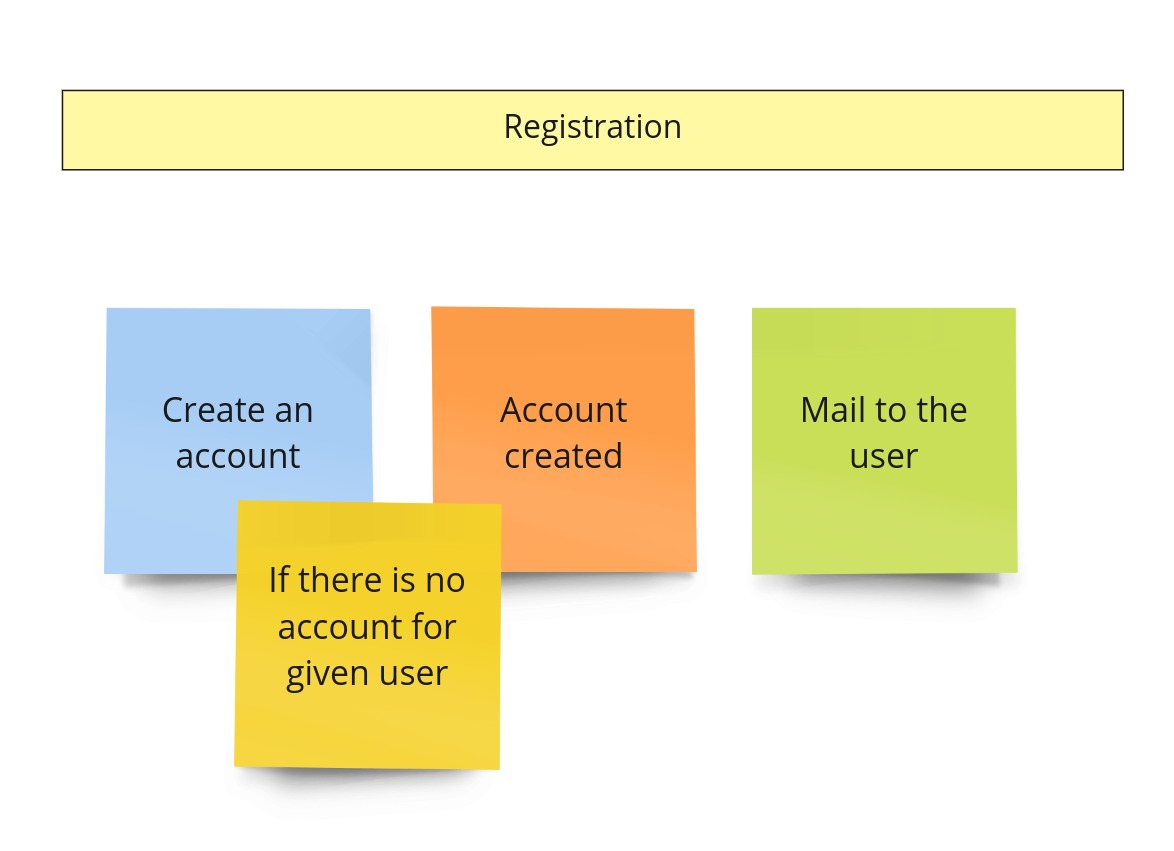
You might have noticed that there is usually something more than just the “registration”. This part of the system usually is responsible for user management and grows to a whole module or even a separate service. Initially, I was also thinking about it this way. For example, I was thinking about the case where the Bounded Context responsible for banning recruiters would also communicate with this module.

Those “accounts” modules are often developed from scratch, have additional integrations with external services, and keep users’ data. At the same time, such a module exposes API, used by most services in the company. Even though sometimes the user management itself is delegated to some external service. We could model this case like that:

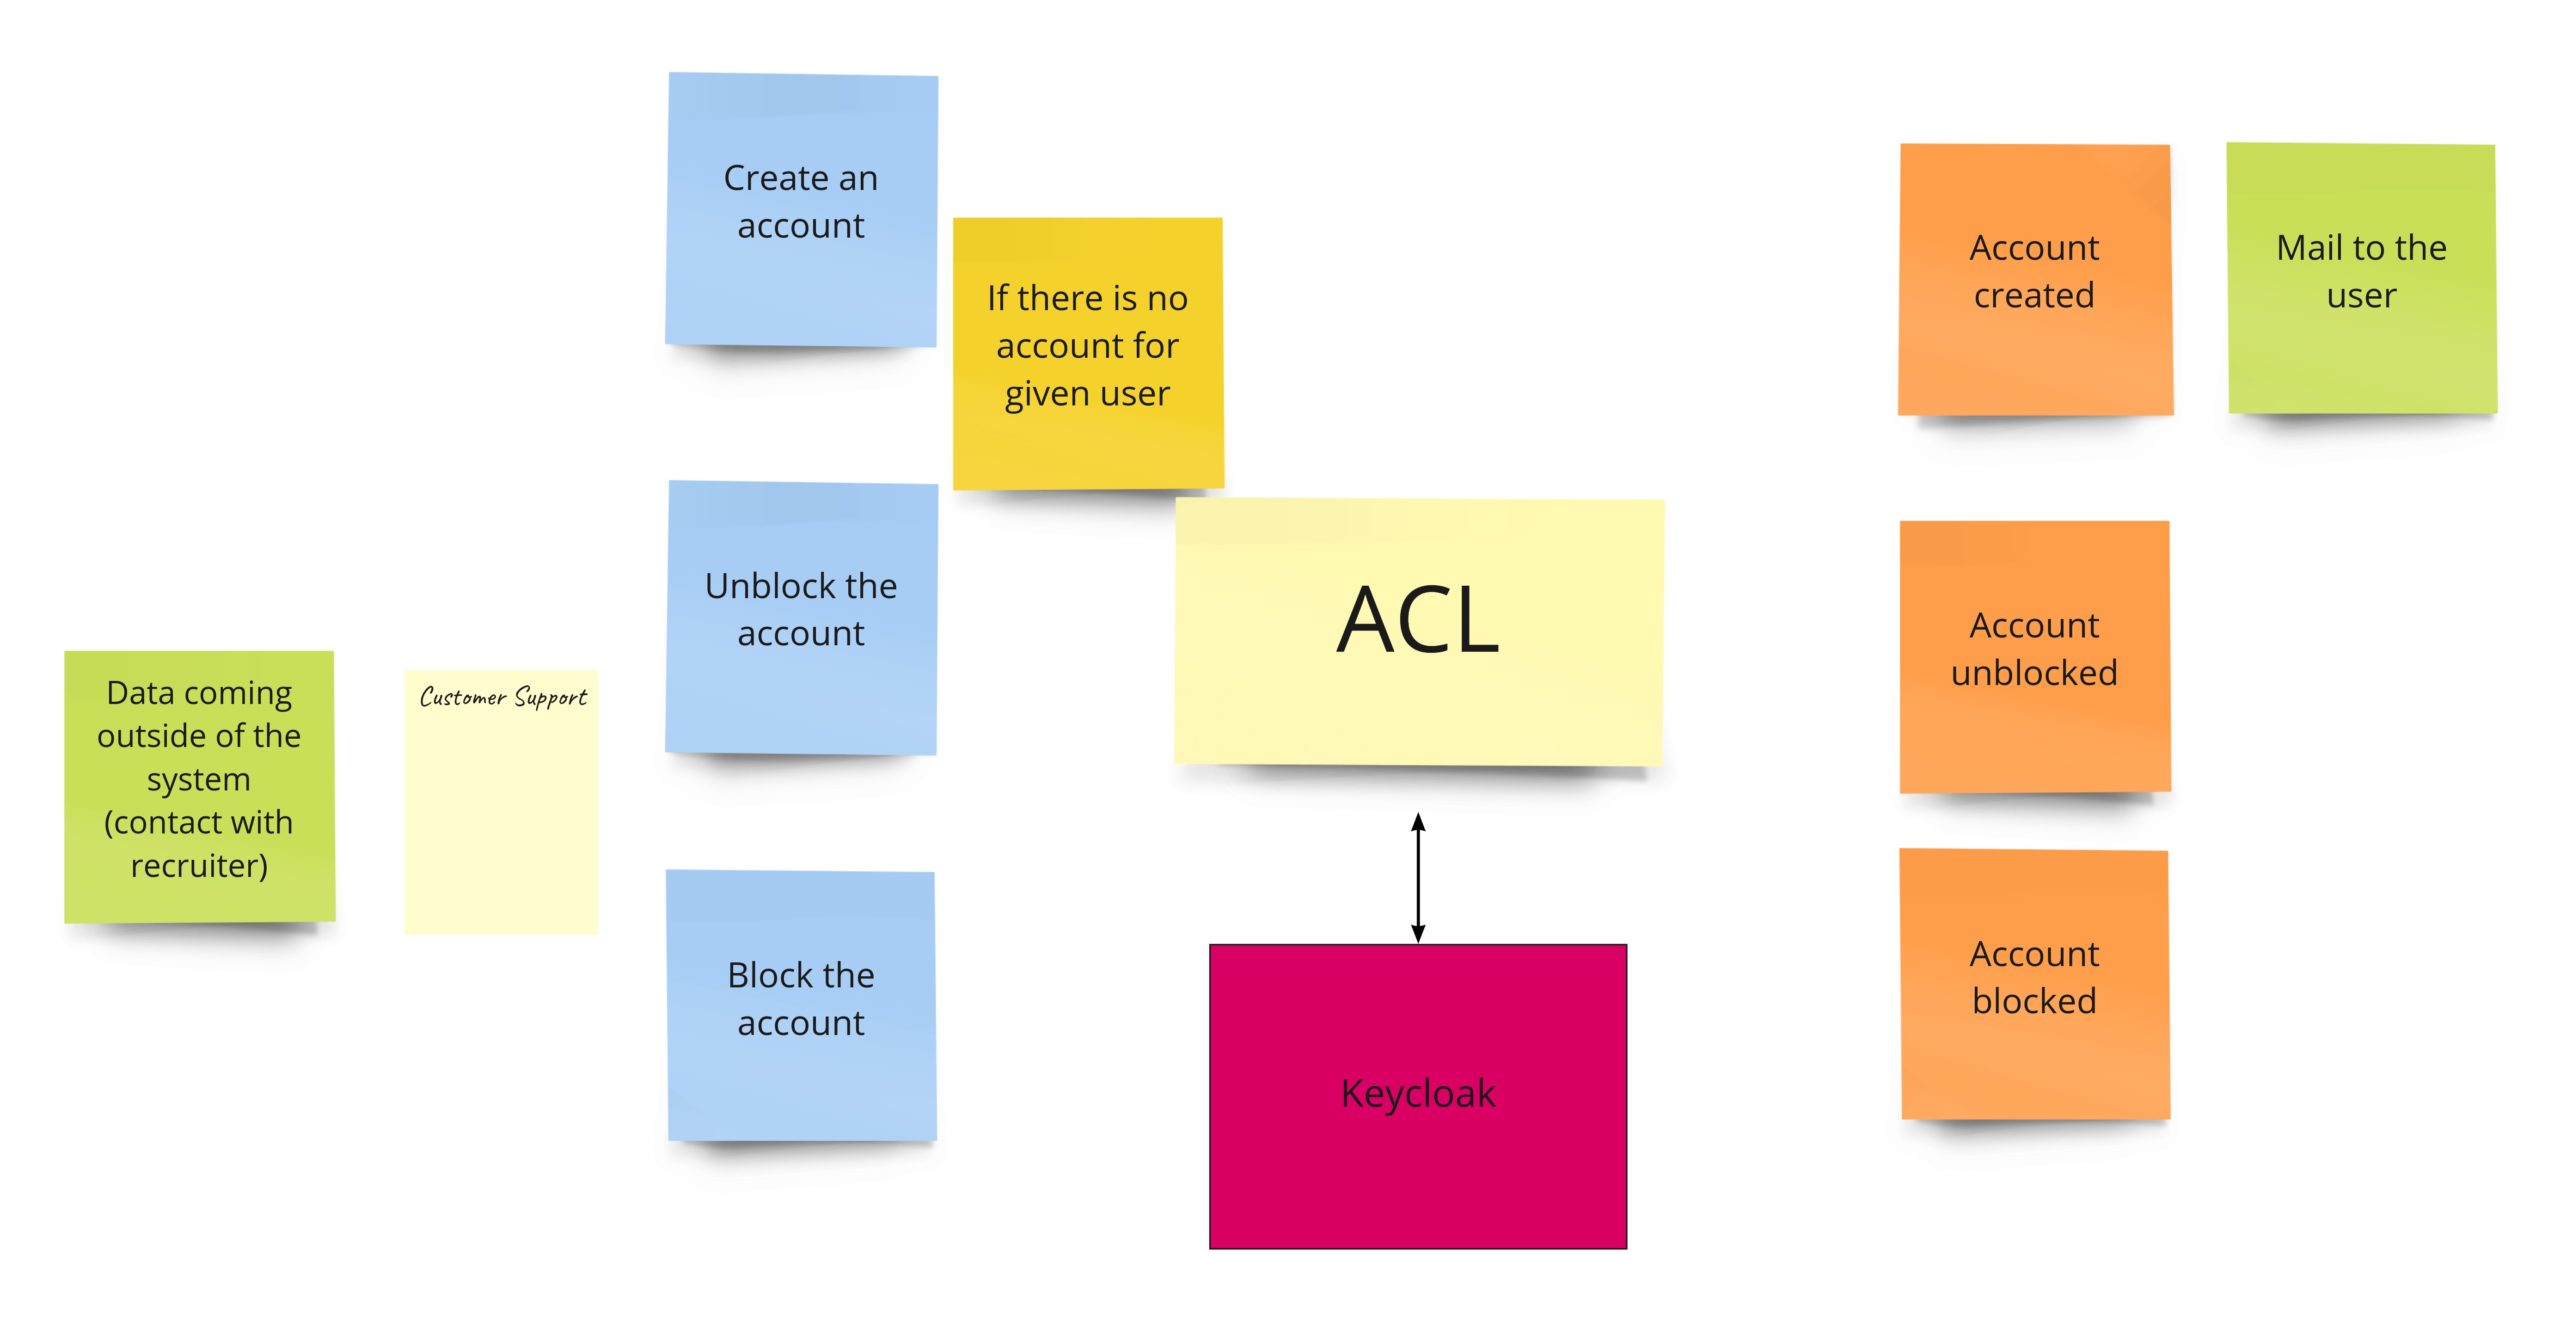
Nevertheless, this approach has some downsides. First of all, it’s an additional module. Secondly, API has to be implemented in such a way that all other services can use it. That’s why I decided to use another approach in this project. I will probably use something like Keycloak, letting other modules integrate “directly” with it. But, of course, as we don’t have control over Keycloak’s API, each of the Bounded Contexts will have a tiny Anti-corruption Layer (ACL). The advantage of such an adapter is that it’s tailored to BC’s needs. Thanks to that, “Publication” will use the registration functionality, and “Banning” will use only block/unblock functionality.  
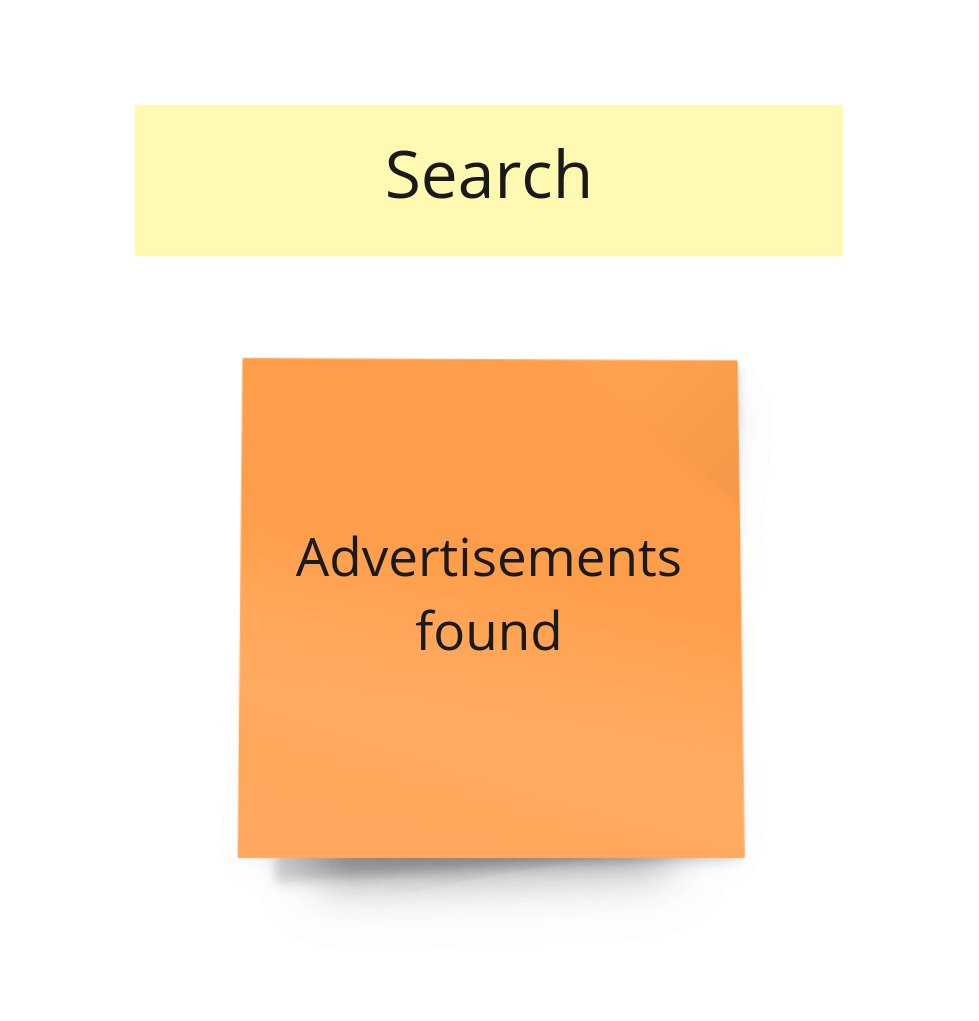
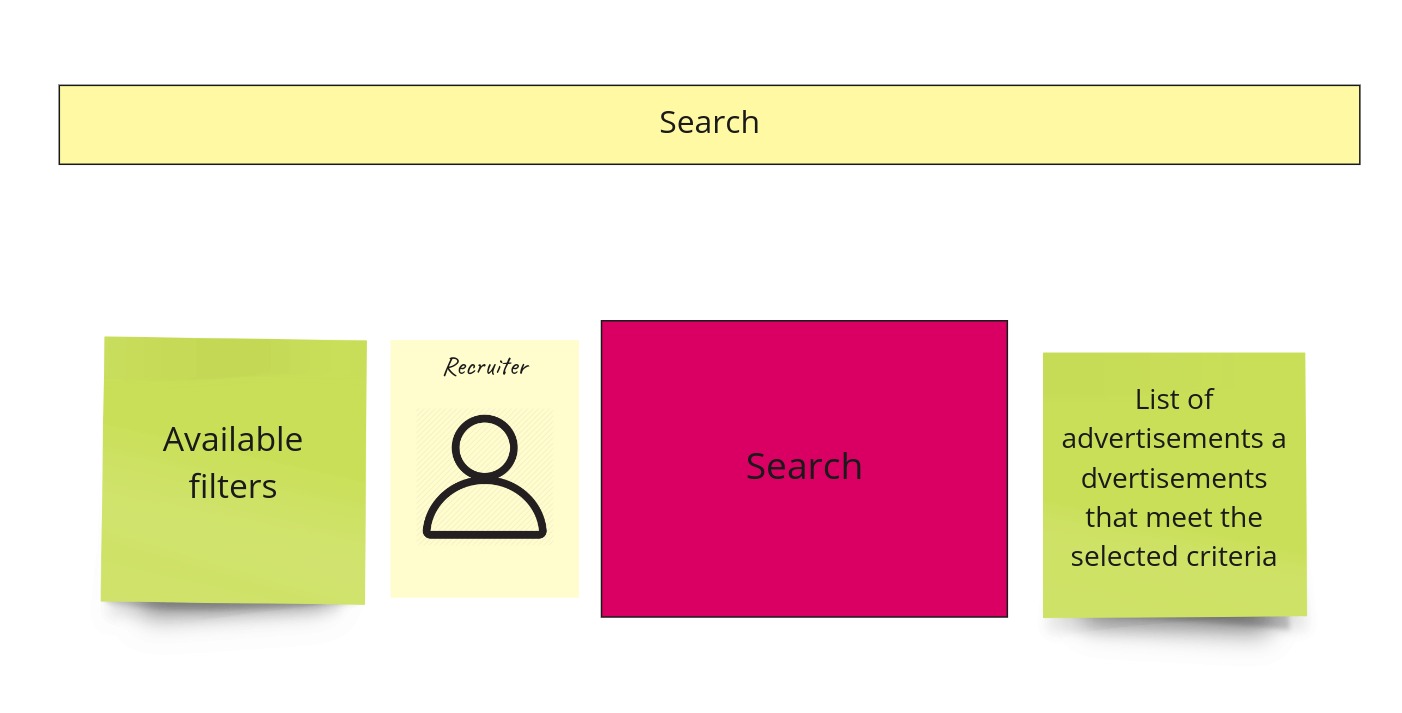
Search

For now, we will have here just an ACL that will communicate with the external service. Communication will be synchronous here.
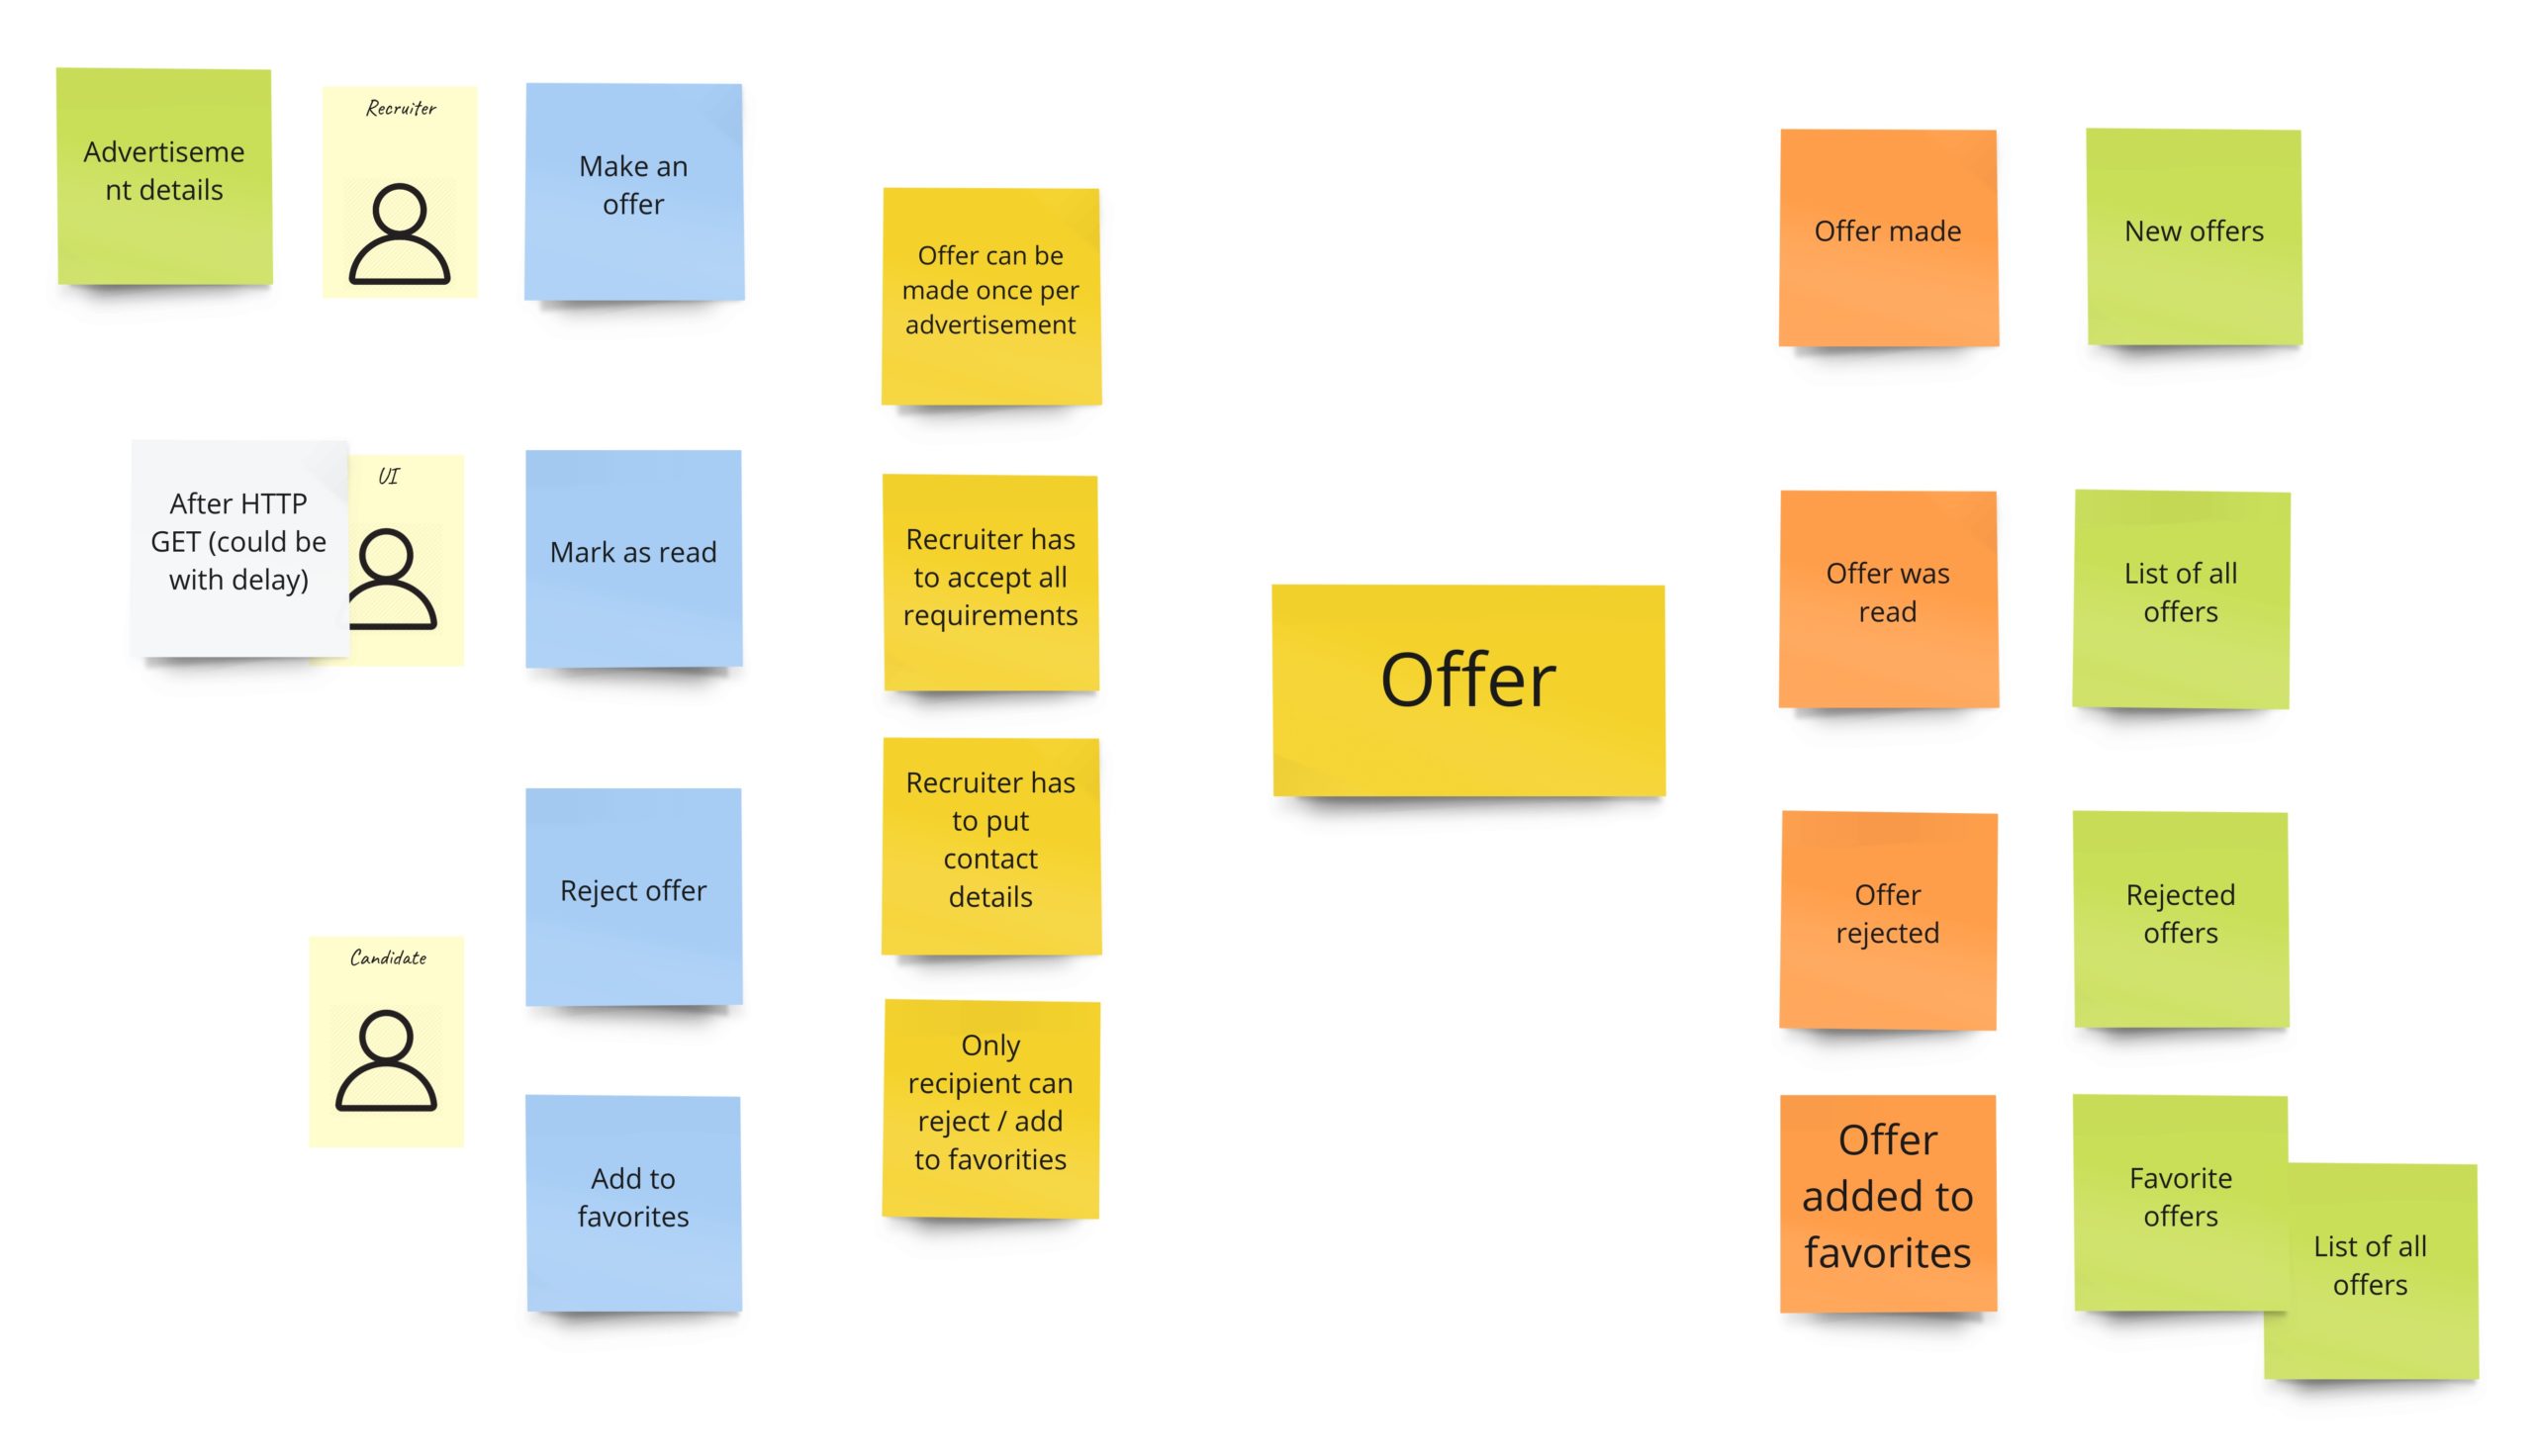
Offering

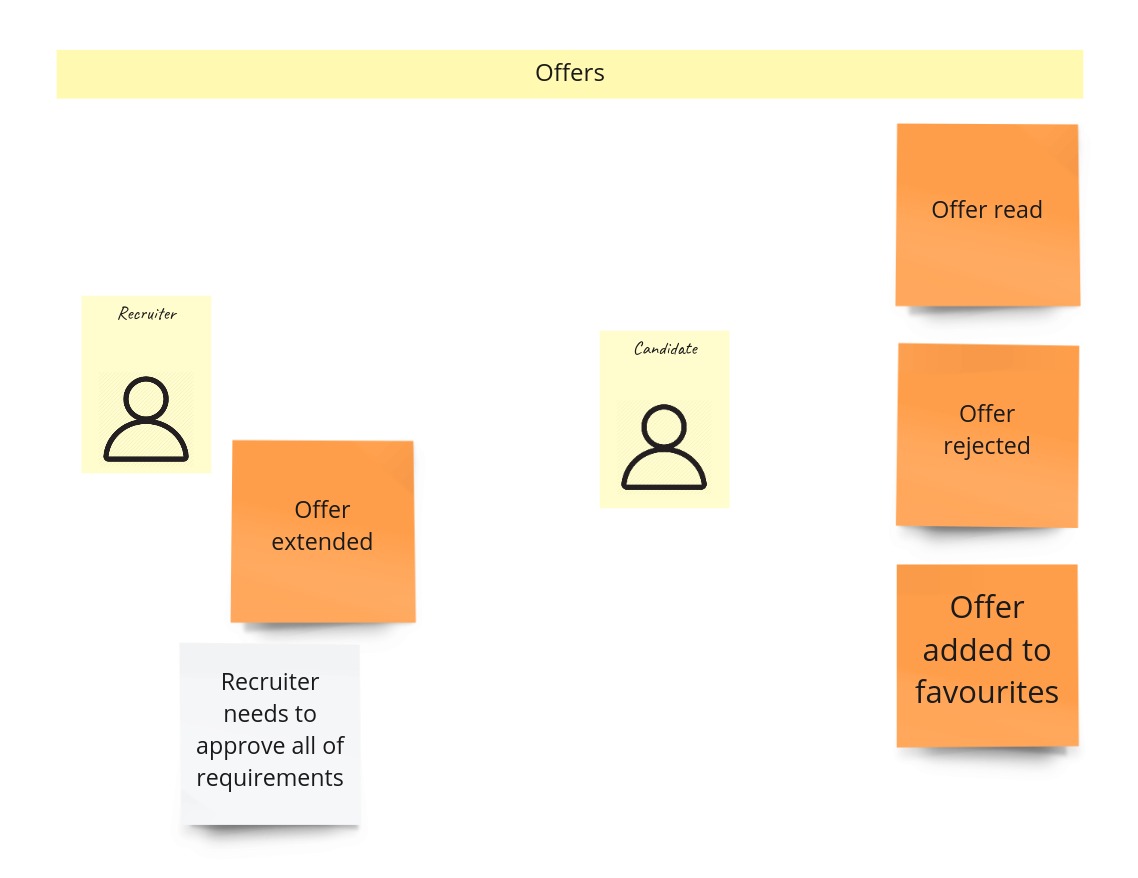
When recruiters find an exciting advertisement, they can make an offer to the developer. The most important rule here, the clue of my whole idea, is two things: 

  1. a recruiter has to accept all developer’s requirements,
  2. a recruiter can make only one offer per advertisement.

Other rules specify primarily who and what can do with the offer. For example, it means only the recipient can reject the offer or add it to favorites. So our offer model could look like this:
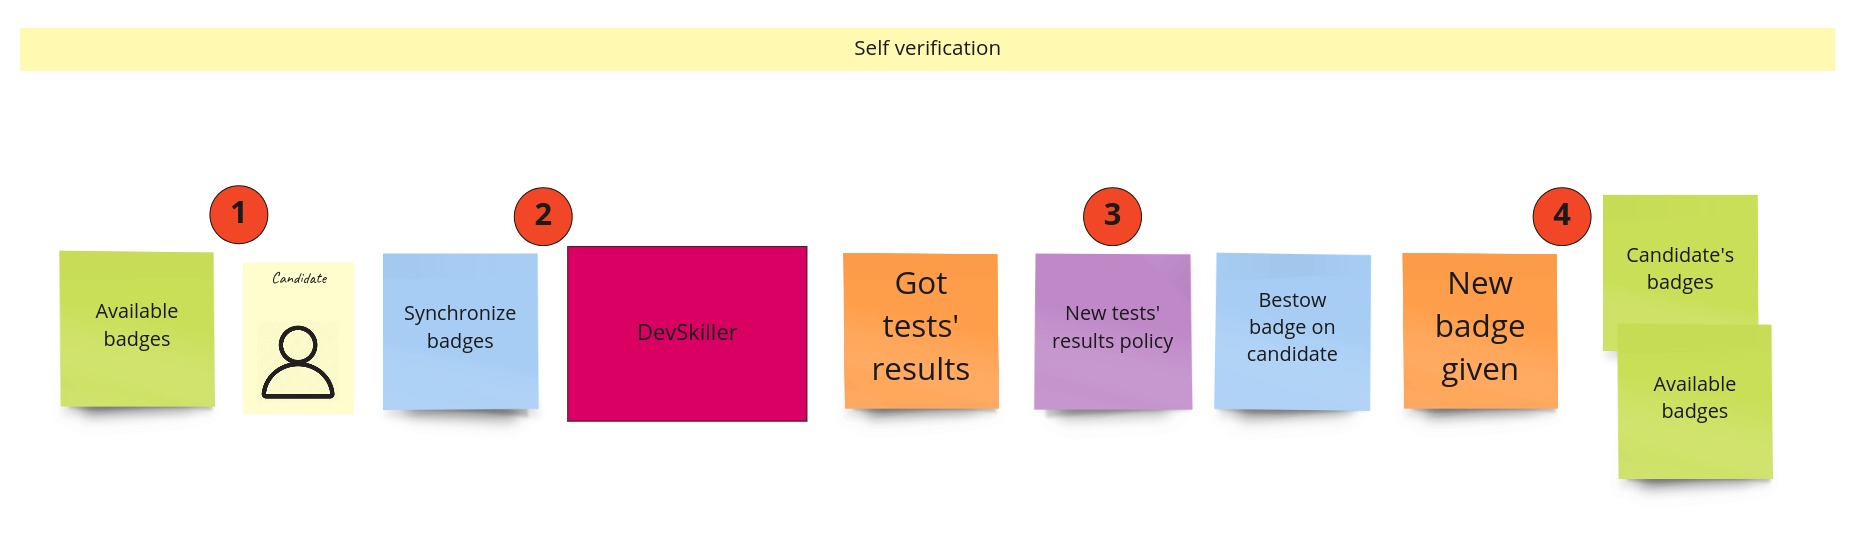
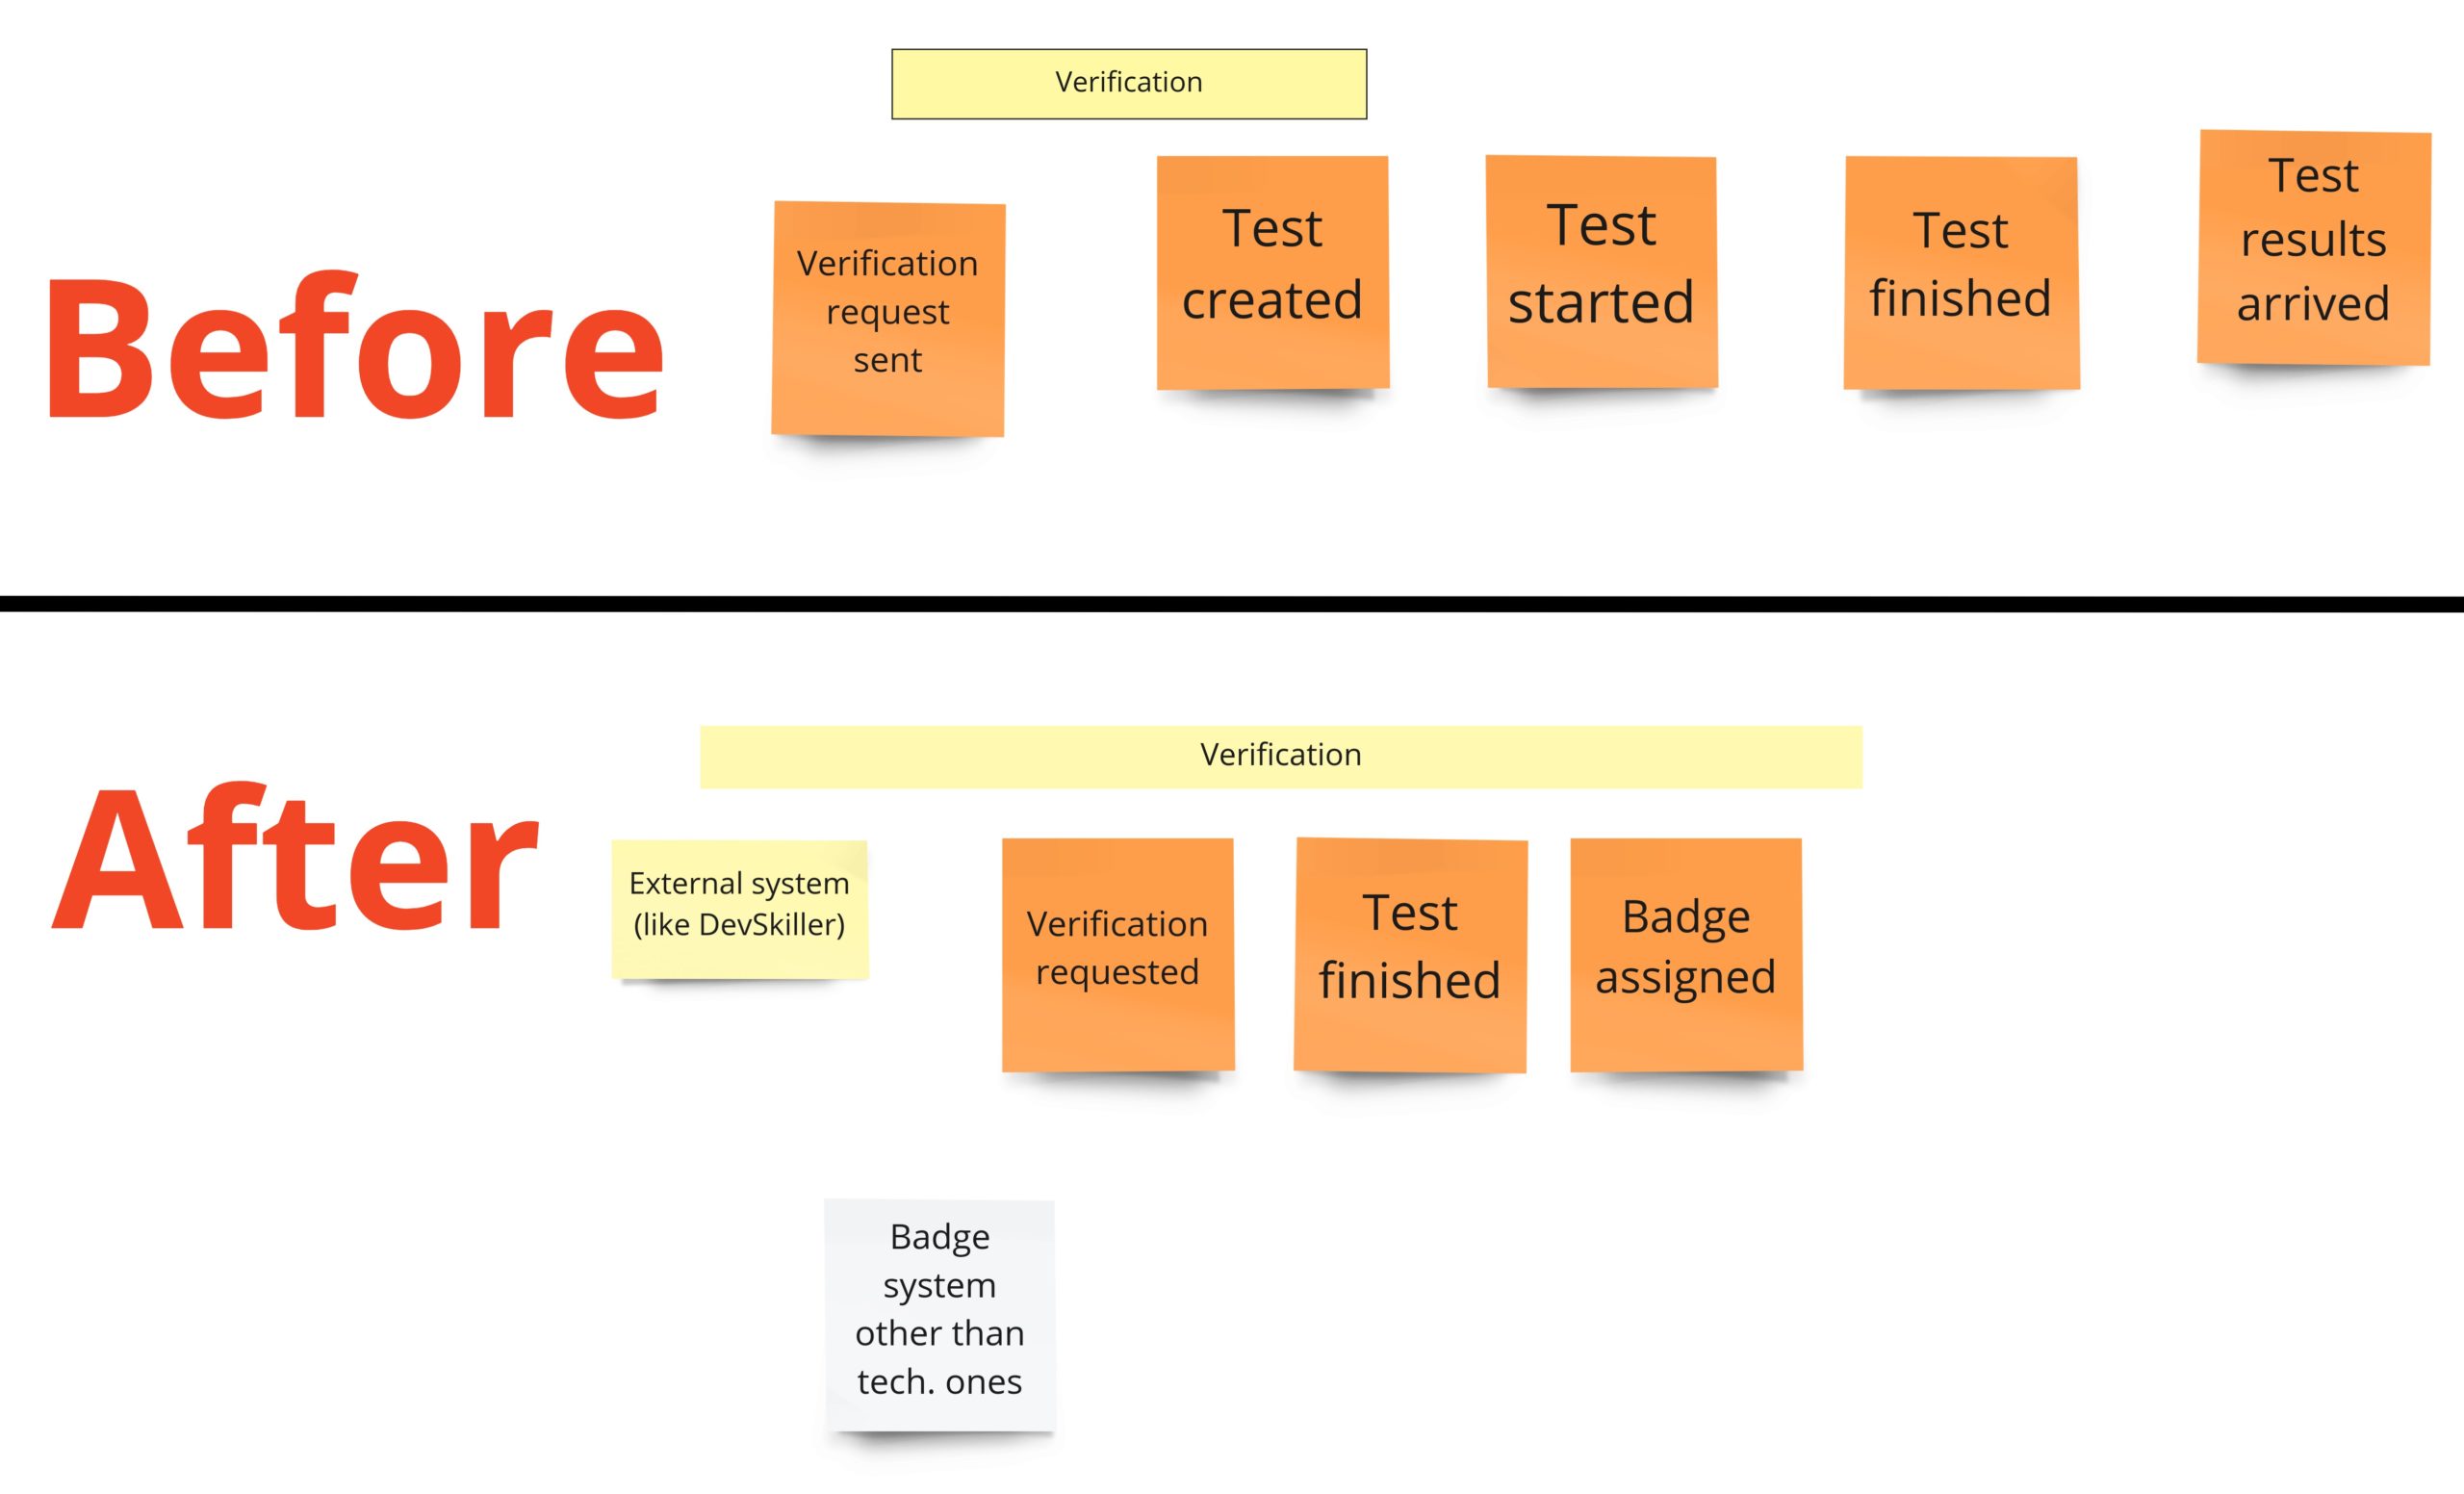
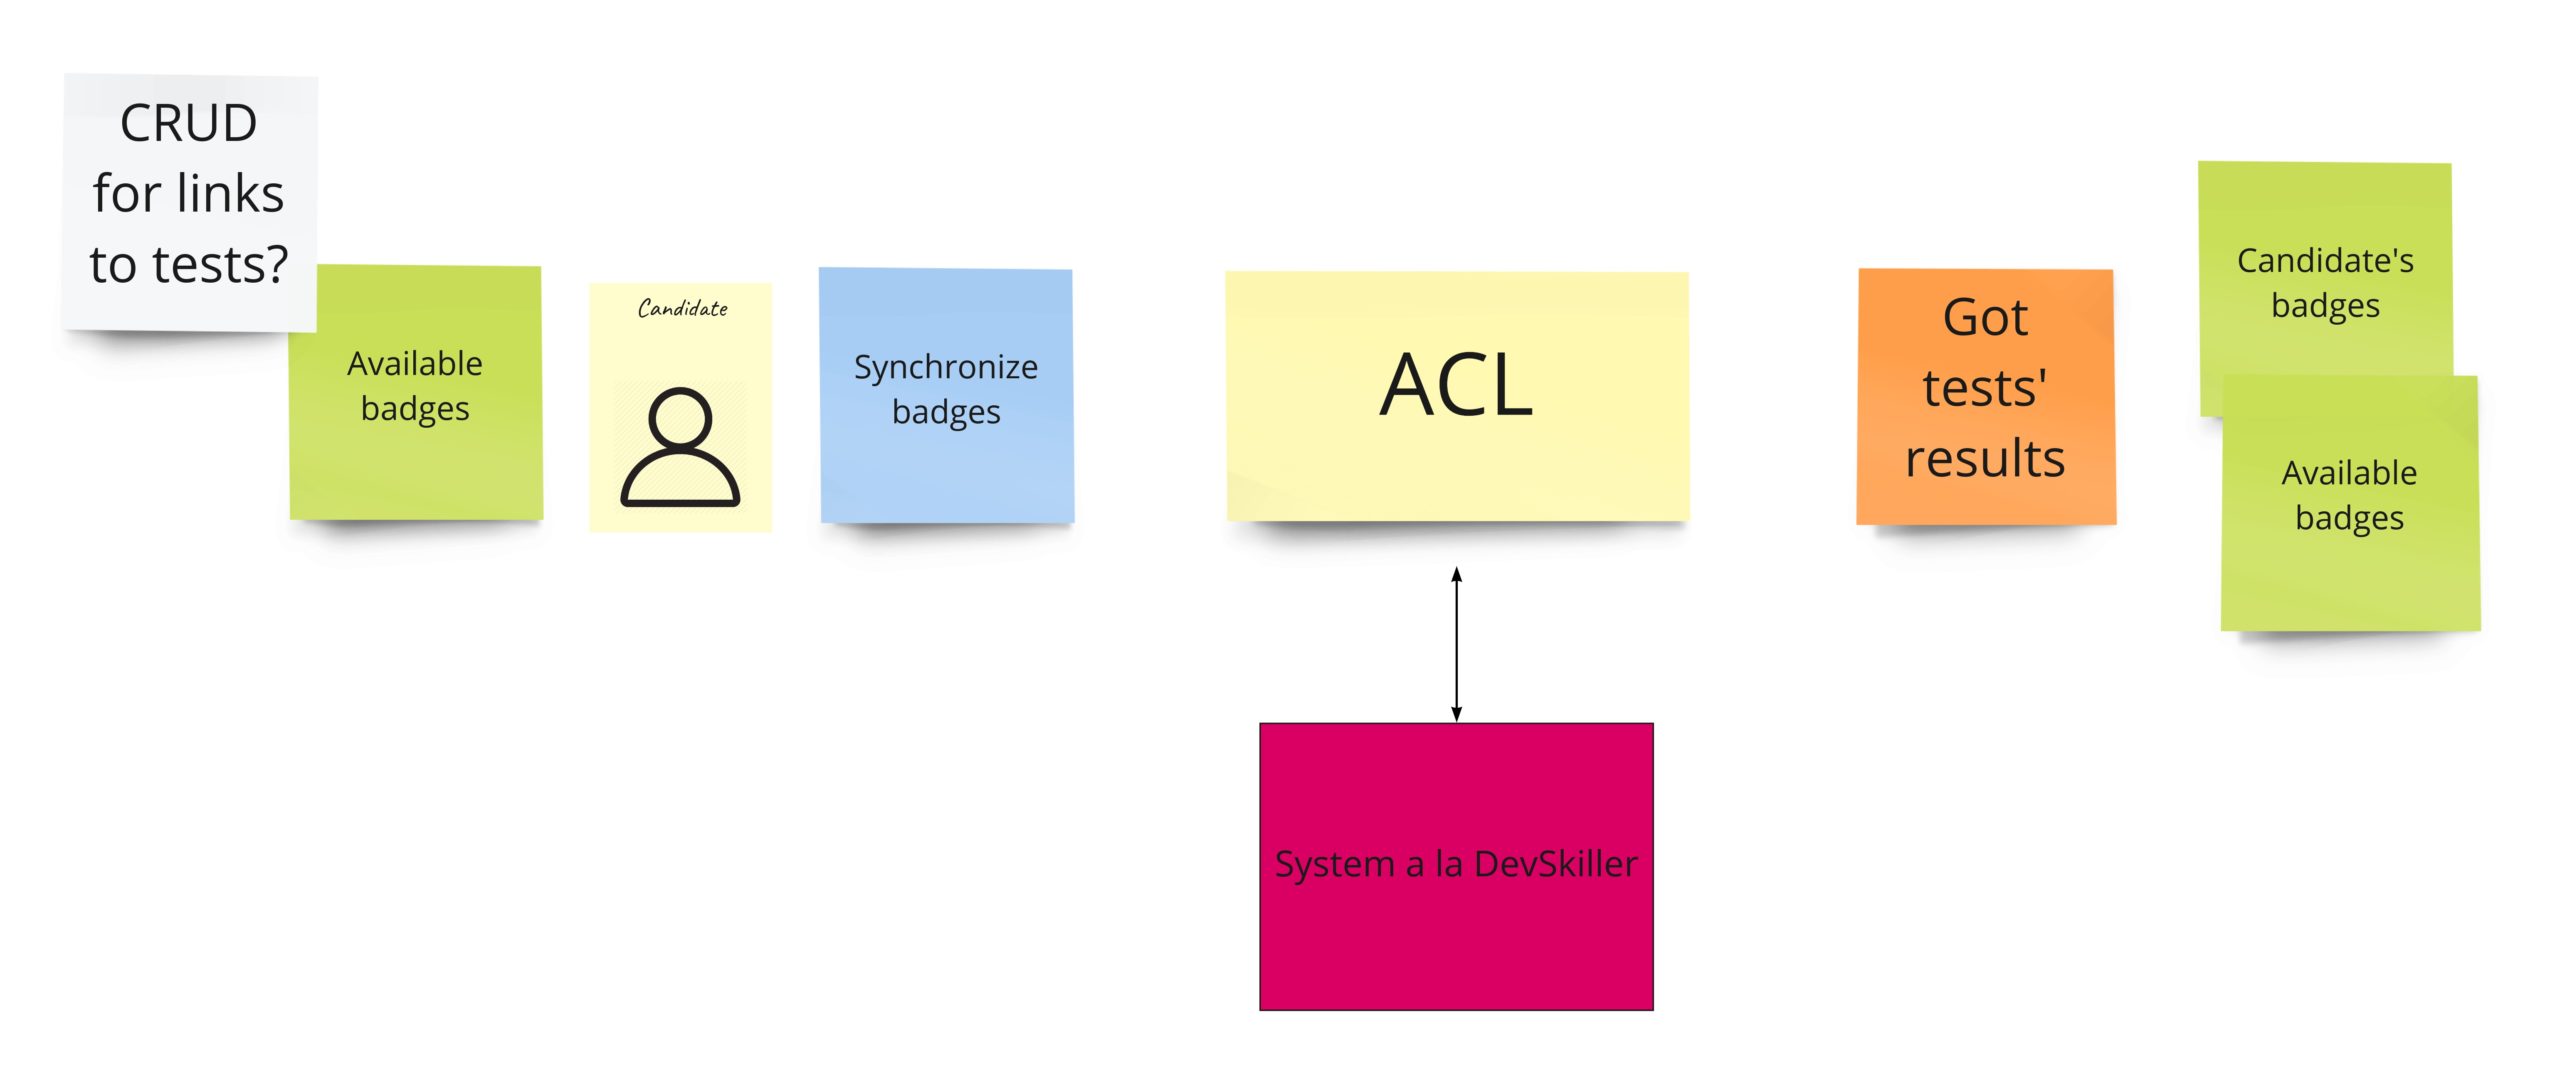
“Self verification”

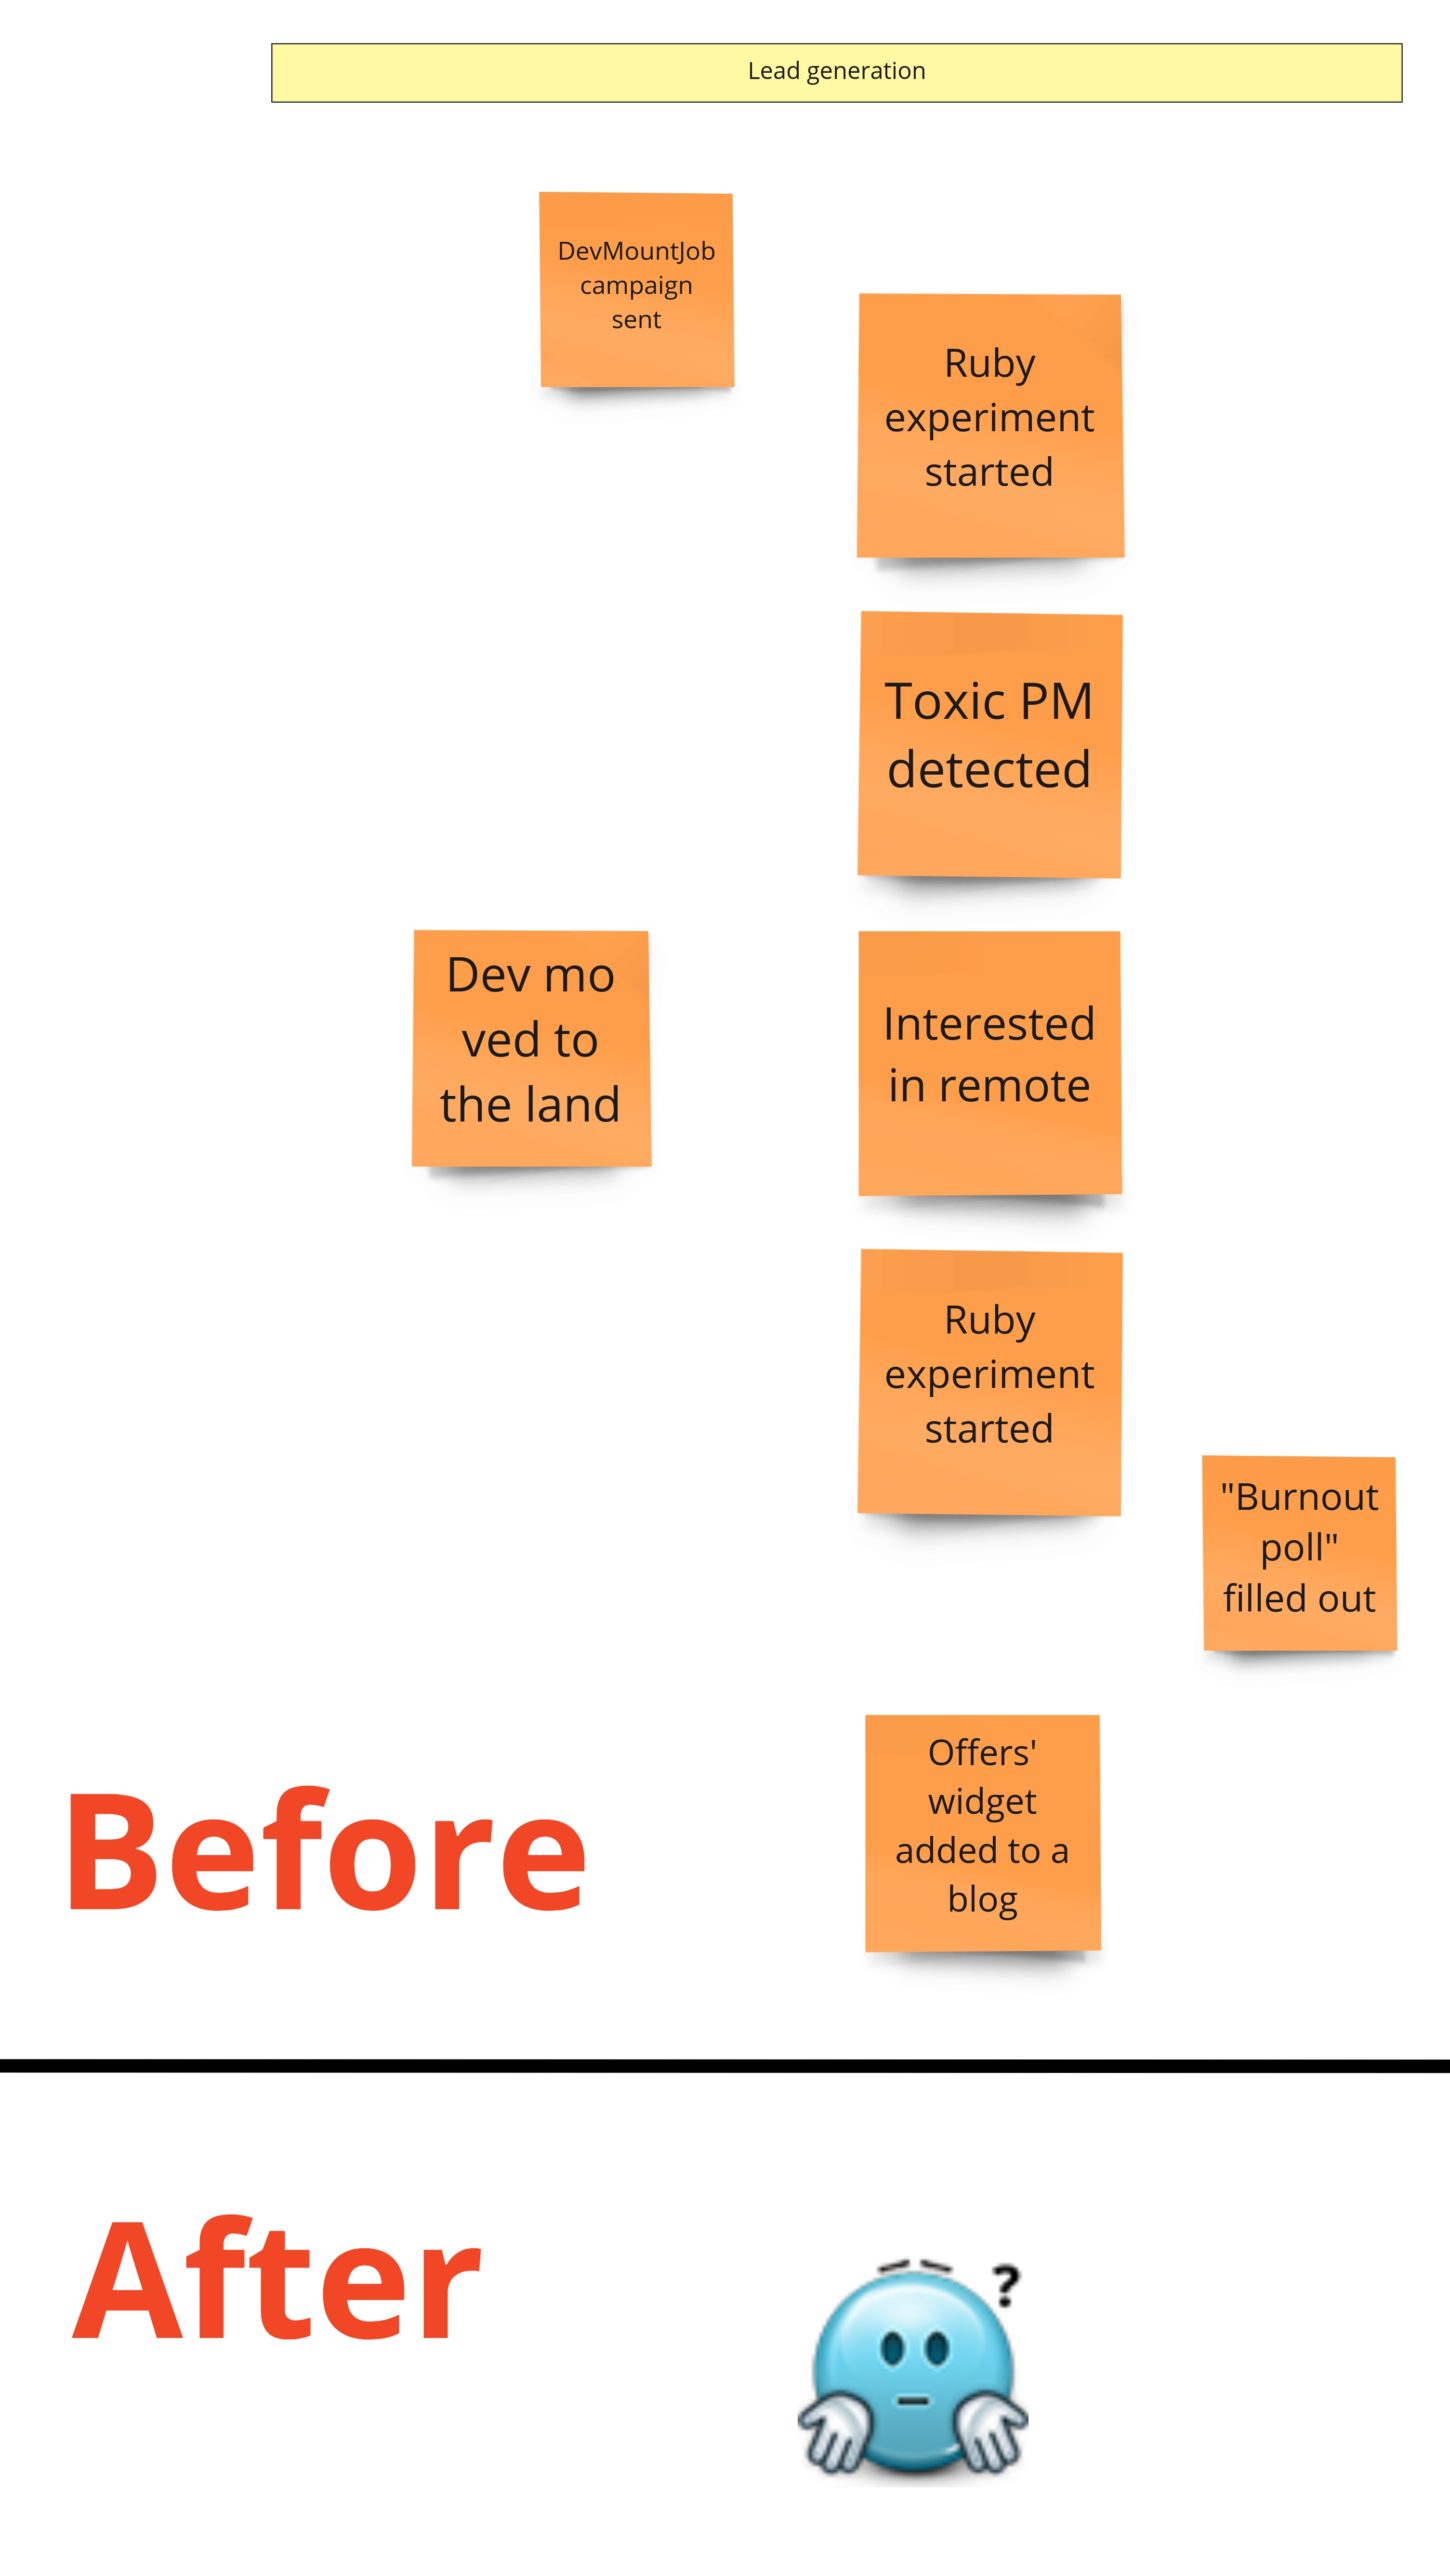
In the first post about Event Storming, you may recall that I totally messed up the idea of this part. I was using events that I had no access to. I mean, those were, in fact, external system events that occurred outside of my domain. Fortunately, it came up quite early. During the PLES, I knew that I just needed to query the external systems about whether the developer solved any tests.

When it comes to the design, it looks like we need two things here. First is a simple CRUD for the links (URLs) to tests in the external system. The second is an integration with the external system that can query it on-demand and give us the list of tests solved by a specific developer. Having those two parts will allow us to manage views with the developer’s badges.
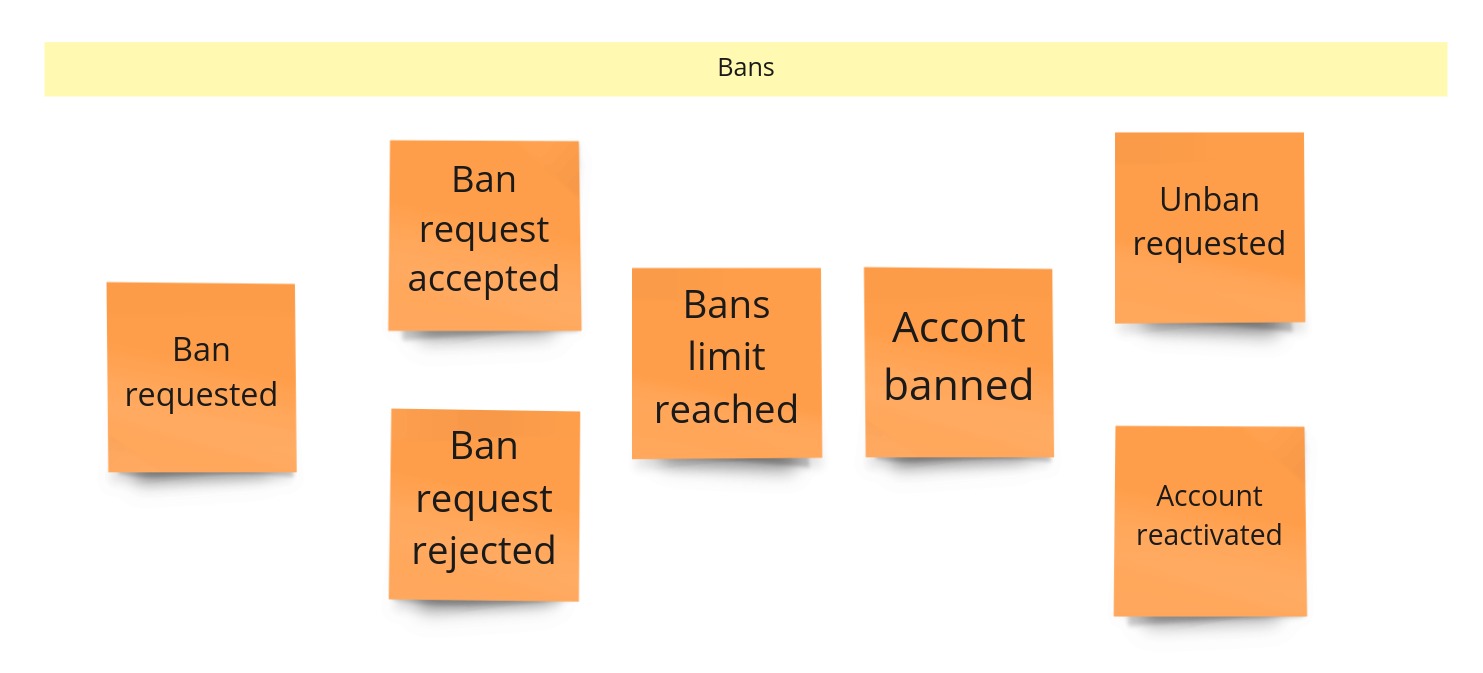
Banning recruiters

Banning is for sure a process that I would skip in the MVP phase. But, nevertheless, we’ve had a lot of discussions about this part, and what’s more, it has one interesting quality: in general, it’s actually a consumer complaint. So that’s why you may already see this process in other domains. Take a look at how I designed it during the DLES:

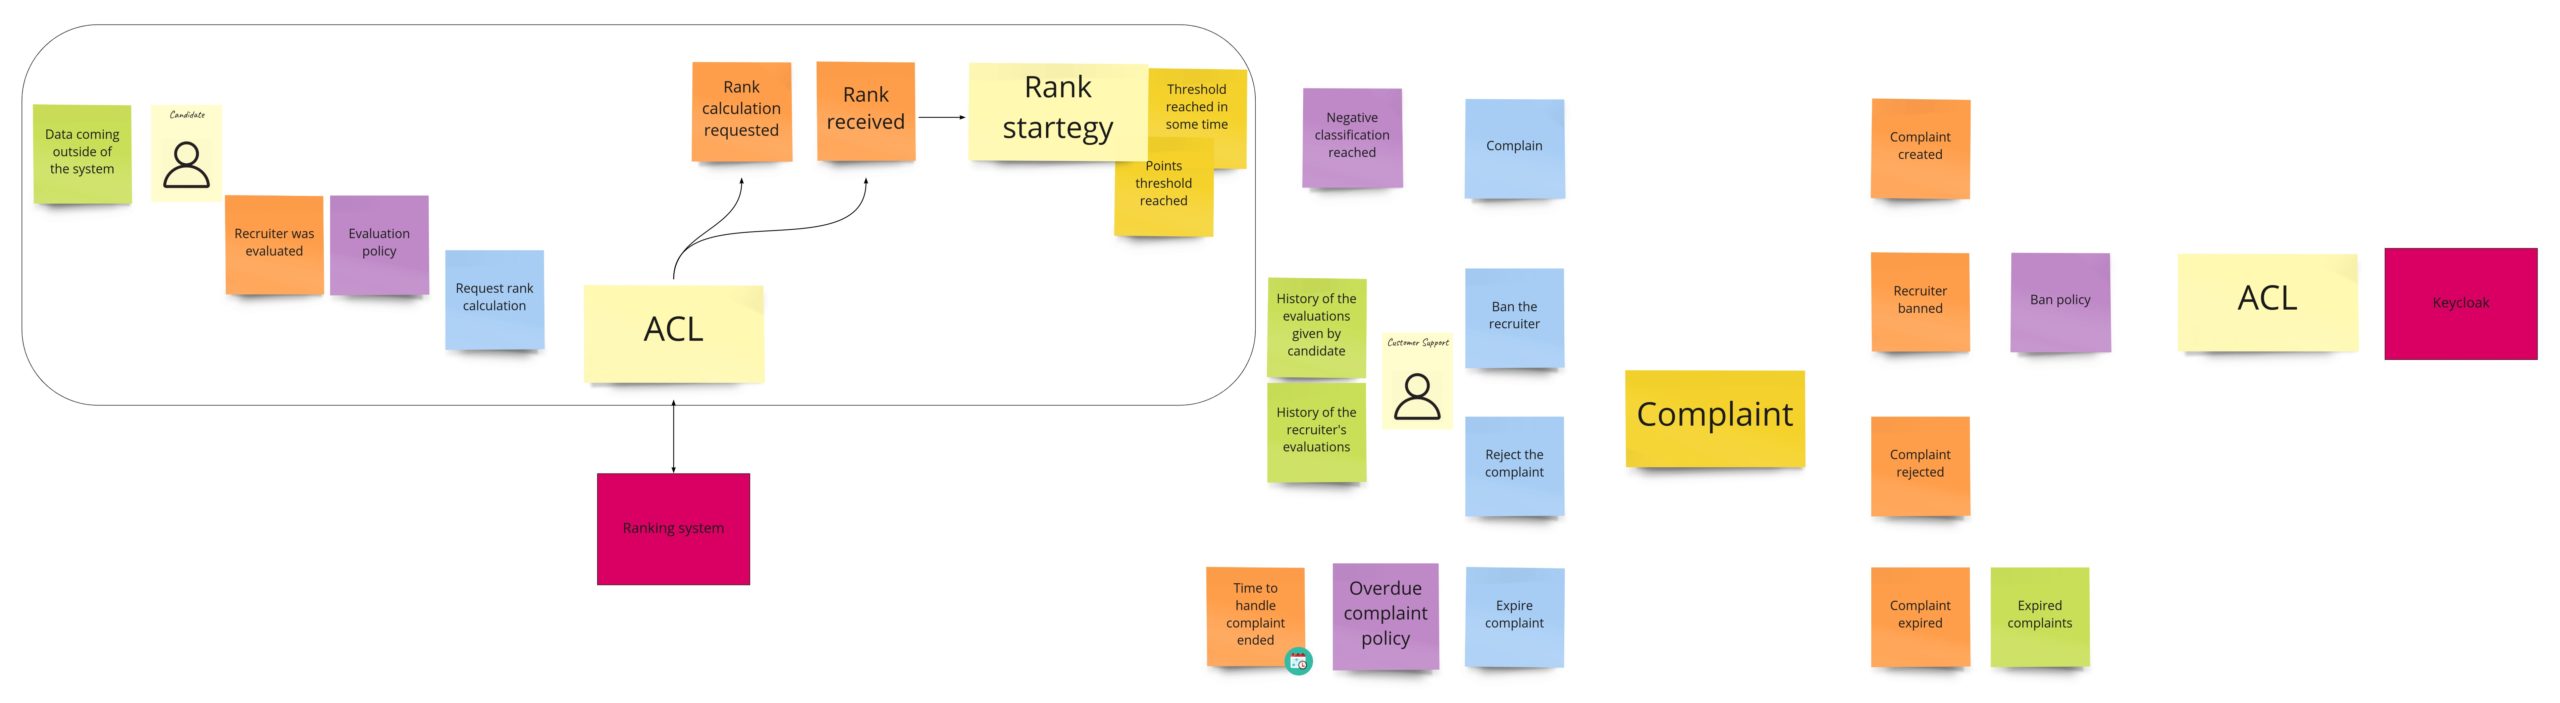
We can spot two parts here:

  1. On the left – probably some kind of process manager, as it’s quite an asynchronous process. It can be initiated by a developer, who felt scammed in the recruitment process, or contrary – wants to commend the recruiter. The developer fills up the “review form”, where they rate a person who made an offer. We send this review to an external rating system, which recalculates the overall recruiter’s rank. When we get the response and see that the rank drops below some threshold, we create a complaint.
  2. On the right, we have the “complaint” itself and its state management.

Even though we call this part “banning”, you can see that we have two concepts here: ranks and bans. We could split them into two separate contexts, but for now, we are interested only in negative ranks, so we will stay with a single context.

Food for thoughts

As developers, we design every day. We may not be aware of it, but each method, each class, has some design. Unfortunately, we rarely visualize it in any form. Instead, we keep it in our heads, where we build huge models and connections between them. It seems that we understand all that entanglement pretty well, as we notice many implementation details and business rules. But, in fact, all that is usually a misleading impression. We realize that when we start to “dump” all those models from our heads to code. There is always something that doesn’t fit.

Design Level Event Storming gives us the advantage of experimenting with each idea that comes to our mind. There is no doubt that we have forgotten something on the way back from lunch ;). Our models are still on the board in the form we left them there. We can move sticky notes around, check different approaches. Thanks to that, the final models that we’ve decided to move to the code are more thoughtful. Of course, our models can still change during the implementation, and we even have a name for that: modeling whirlpool. But those changes will usually result from a better understanding of the domain than the fragility of our memory. In such a case, we can get back to the original board and evaluate a new idea by moving some sticky notes again. Artifacts of DLES are ideas for models. They are not etched in stone. Sometimes, it’s also good to implement some prototypes during the workshop to have a closed feedback loop.

That’s all that I have for you about Event Stormings. We went through all its stages, and now we are going to move models to the code. In the next post, we are going to start doing it on our fancy tech stack. I may surprise you with some of my choices, especially that it will be an “all-in” approach: DDD, event sourcing, and CQRS!!! Stay tuned! Don’t miss it and subscribe to the newsletter!

* indicates required

Process Level Event Storming: let’s get this process started!

Last time we were talking about Big Picture Event Storming (BPES) and now we have a helicopter view of our business process. Next, we need to climb down and model sub-processes that will address our business requirements and issues. We are going to use Process Level Event Storming (PLES) for that.

Back in the BPES workshop, we could notice some smaller, autonomic sub-processes within the whole process. Now we can focus on each of them and take care of the details. PLES gives us a few additional elements that will help us in this job. 

Together with my guests, we created a part responsible for banning recruiters. Then I decided to do the rest independently as I didn’t want to take more of their time. It turned out that the image from Brandolini’s book was great support for me:

Brandolini calls this image: “the picture that explains everything”, and I can’t agree more.

On the BPES level, we were using only events. Now, we will use a few new elements, which you can notice in the above picture. So let’s take a moment to take a closer look at them and the whole cycle:

  • The user, based on some impulse from the real world, decides to take an action. Usually, their decision is driven by information from the system (read model – the green sticky note).
  • The user is taking action (command – the blue sticky note), which will be handled by the system (the pink note). As a result, the event will be produced (the orange note) – information about the change in the system.
  • When the event occurs, two things can happen:
    • policy/reaction (the purple note) to this type of event, which will result in a new command
    • changes in read models, which in turn can give the user new information to make other decisions.

Ok, let’s use this knowledge in practice now! First, we will take a closer look at the advertisement’s draft process.

Draft

After the BPES workshop, this part looks as follows:

Now let’s think how this process should look like. Who should make the decision? What information should this decision be based on? Do events require any reactions? What has to happen to trigger a specific event? To sum it up: we need to use the knowledge we gained from “the picture that explains everything”. Thanks to it, we can design the process here as follows:

Before we go any further, please notice the purple/lilac notes. Those are policies – do not confuse them with a strategy/policy design pattern. Those here are the reactions to some events that should be a trigger for a command. Brandolini, in his book, describes them as follows:

“Of course there has to be some reaction to the event. We can capture reactive logic with (lilac) Policies, like “whenever we receive an order, we add the corresponding pizzas to the backlog.””

Ok, let’s get back to the modeling of the advertisement’s draft. Everything starts when a programmer (candidate) creates a draft by filling up the advertisement’s form (1). That’s the information for the system that it should store this data, in case the user wants to finish the whole process later on. In other words: we create a read model of the form (2). When the user makes any change to the form, the content of the draft will be changed (3). From the domain level, we are not interested in what exactly has been changed. We only care about the fact that it was changed so that we can update the read model. Then, when the user is done with the form and has chosen the payment option, he/she pays for the advertisement (4). Now the external payment system kicks in and eventually gives us the info whether the payment was successful or not (5). Finally, you can notice an interesting business decision: no matter what happens, we publish the advertisement (6). I decided to make this part of the process less complex. I assumed that the failed payment in an external system would be a pretty rare case. It makes no sense to focus on all cases that can go wrong and postpone the publication, at least at the start of the business. For now, let’s publish anyway, and when we eventually get the info that payment failed, we can send this information to the Customer Support. They can decide what to do with the advertisement. Maybe they will retrigger the payment, remove/block the ad or contact the developer to clarify the situation. If we get the information that there are too many such cases, we should solve the problem then. For now, let’s do it the agile way 🙂

It’s worth noticing that when we create a draft, another parallel process kicks in (7). Its responsibility is to remove all overdue drafts, not to store them too long in our system. So, first, we give them some time to live (TTL). Then, each time the draft is updated, we renew that time (8). Finally, we remove the draft when TTL is exceeded and the developer did not publish the advertisement (9).

Registration

Every single app has a registration, right? It’s quite a generic process, so that’s why we didn’t care about it during the BPES. It means that I can’t show you the “before” state. Even after PLES, there is not too much to consider:

Usually, there is a belief that “our project is specific”. That’s why so many applications implement a separate service/app called something like “Accounts”. Nevertheless, in practice, it turns out that a service like Keycloak could often replace it. That being said, we are not going to overcomplicate this part. Even if we don’t use any off-the-shelf solution, we will simplify this process to a single step.

Publication process

After the payment, the advertisement can be viewed and searched in the system. Nevertheless, its life cycle ends when the paid time expires. During that period, the advertisement can be unpublished and published again due to different reasons. That’s why we decided to call this whole process: the publication process. Quite often, when we notice “published” and “unpublished” states, we can try to model the separate availability subdomain. However, we will not do it now, and we will stay with a bigger publication subdomain.

Let’s describe this process step by step. After the payment, we get the request to publish the advertisement (1). We react to this by making it available for searching and viewing (2). When we publish the advertisement, we also start the period when it is available. When it ends, we remove the advertisement from the service (3). To keep this process simple, I again decided to skip the cases where the user could extend this period or create a new advertisement based on the old one.

When the advertisement is published, two things can happen:

  1. A developer can decide about unpublishing it (4). This can happen when there is still some paid time available for the advertisement (it doesn’t make sense to unpublish it when it is already “outdated”). Then we put the ad on hold (5). It means that the user’s list of inactive advertisements is updated. Based on that list, a developer can decide to publish it again (6).
  2. Another case when the ad can be temporarily put on hold is when Customer Support does it. The whole process looks similar to the previous one, but different people make decisions. Moreover, they do it based on other premises or data. Customer Service can put the ad on hold when they get some complaint about it (7). 

It’s noteworthy that we will not decrease the paid time when the advertisement is on hold in both cases. Instead, we will start doing it again when the advertisement resumes.

Just to remind you how this part looked like after the BPES:

Search

It can happen that something that was an event during the BPES isn’t actually an event. An excellent example of it would be the “Advertisements found” event.

Search has nothing in common with the change/modification in our system. That’s just a query. Then, based on the available filters, the recruiter asks the system about the advertisements that meet the selected criteria. That’s why on PLES, we decided to represent this part as follows:

Offering

Let’s focus now on the key process – offering. That’s the part that differentiates our solution from the typical approach. First, a recruiter will have to accept all developers’ requirements if they want to offer any. Then, the offer can be read, rejected, or added to favorites.

After a PLES session, this process looks as follows:

Everything starts on the advertisement page. Recruiter, seeing it, can make an offer (1). They need to accept all requirements and give some contact details. Then the offer details are available to the developer on the offers page (2). This page can be a “starting point” for a few different actions. The most interesting one from a modeling perspective is “Mark as opened” (3). Notice that the UI triggers this one. You may ask why.  So UI will present the new offers as… new ones – not “read”. Then, the developer can click any of them to see the details. This action itself doesn’t change the system’s state, as in this case, we just query the system for more information. Even more, we could already have those details fetched but “hidden” by UI. That’s why after displaying (sometimes after 1-2 seconds) those details, UI sends the command to change the offer state to “opened”/”read”. You could see similar functionality in email clients.

A developer triggers the rest of the commands on this page. Those can be: rejecting the offer (4) or adding to favorites (5).

“Self verification”

This process was quite interesting already in the Big Picture Event Storming. That’s because we cleaned up many events specific to the external system and not ours. To remind you how it looks like after the BPES:

The event informs us about the start of the verification process. What we want to achieve is to give the whole process on our side some TTL (time to live). All that sounds a bit… complex. There is also still a significant coupling between us and an external system. It became even more complex during the PLES part. That’s why I ended up with a much simpler solution:

In this approach, we do not rely so much on the external system as in the previous one. Foremost, we don’t assume this system will expose any information about verification progress on their side. The only requirement for integrating with the external system is that it exposes the API with available tests and tests solved by the specific developer. But let’s follow this process from the beginning. First, the developers go to the badges’ page and see badges they can achieve (1). Each of these badges is linked to the appropriate test in the external system. It means the developer gets redirected to the external system and can start solving the test there. The whole process happens there, and we should not even care about what’s going on or how long it takes. When the developer is done with the test, they can get back to our system and initiate the synchronization (2). It means that our system will query the external one to get the tests’ results for a specific user. Based on the response, we can check whether the developer has achieved any new badge (3). If yes, we update two views: developer’s badges and badges to earn (4).

Banning recruiters

Last but not least, we have a process that we found the most interesting. Actually, we were modeling it in the first instance.

This part after BPES:

On PLES, it ended up as follows:

After the recruitment process, we want to give a developer the chance to evaluate the recruiter who has put in an offer. We assume that the trigger for that action could be something outside of our system (1). It could be, for example, a total mismatch between what the recruiter accepted in DevMountJob and the real offer. The developer, based on the experiences during the recruitment process, evaluates the recruiter. Then evaluation gets to some ranking system (2). This system recalculates the overall rating for the recruiter. Suppose the value falls below some predefined threshold. In that case, we should send a complaint to the Customer Support (3). Now process forks into two paths:

  1. The note has some time when it has to be processed (4). If Customer Support doesn’t handle it within this timeframe, we will need to handle it. It will get to the list with overdue notes. Thanks to that, we can monitor how many requests are not handled in a given time. We can introduce some notifications when there are too many of them or whenever the new one appears on that list.
  2. The note is processed in a given timeframe. Customer Support, based on the history of the recruiter and all other evaluations given by the developer that did the last evaluation, can make one of the two decisions:
    1. ban the recruiter (5) – the recruiter will get information (probably via an email) with the contact details to clarify the situation. Then, Customer Support can unlock the account (6)
    2. reject the note (7) – Customer Support can do it after analysis of additional data. For example, some evil developer could intentionally decrease the recruiter scoring by creating a lot of negative notes 😉

This model we got for the banning process is actually quite generic. I mean that there are many processes in other domains that could be designed the same way. For example, the refund process, to name one of them.

Congrats!

We’ve just done a hell of work! We designed step by step one process after another. We introduced new elements so that we could focus on details. Thanks to that, we could also validate previous assumptions.

Good job!

I bet many projects would benefit from designing their processes on Events Storming workshops, so please help me share knowledge about this technique by sharing this post!

Next time we are going to focus on Design Level Event Storming! Don’t miss it! Subscribe to the newsletter, so you will be the first to get to know about it.

* indicates required

This could be the biggest post about Big Picture Event Storming ever! And with examples!

It’s time to dirty our hands. In the last two posts, I presented the failure of the project. I described the idea of the business model and the requirements I had at that time. Now I would like to add a plot twist. Let’s use this business knowledge and practice some modeling techniques and the DDD approach. In this and the next two posts, we will be working on Event Storming. We will take the described domain/idea, and we will use it as a base for the workshop.

Event Storming – why should I even care?

If you saw a picture of a bunch of people standing in a room and putting their colorful sticky notes on the wall, it could be an Event Storming session. It may sound like another soft skill workshop, but we couldn’t have been more wrong in this case. Event Storming is a powerful tool for business process modeling. Not only “business” as there are even stories about people using it for planning their wedding 😉

But why the sticky notes on the wall? Because it is the easiest thing we can do. At the beginning, your only job is to put the past sentence (business event) on the note and stick it on the wall. This together with the subsequent process stages make a quick workshop session that can expose the lack of knowledge about our business process. Moreover, it’s a great way to share domain knowledge between participants. That’s why it is essential to invite domain experts, a dev team, business people, and anyone else who may have an interesting perspective on the topic.

Having a facilitator who has experience in running such workshops can also be a game-changer. They usually have a toolbox full of heuristics (today, you will also learn a few of them), which can help participants think out of the box. Moreover, facilitators usually have a tech background in creating software systems, so they can notice patterns and solve complex problems quickly.

Event Storming session for Poznan’s community, hosts: Mariusz Gil and Grzegorz Nowicki

The Event Storming technique was introduced in 2013 by Alberto Brandolini, who still actively promotes it worldwide. His book is available on Leanpub. Even though it’s 70% finished, it is the best source of knowledge about the technique.

In my local community, we have Mariusz Gil, who promotes Event Storming a lot in the international arena. He will also play a vital role in this post, but we will get back to it later.

Event Storming at the PHPers Summit 2019 conference, host: Mariusz Gil

Event Storming levels off participants’ knowledge, and helps build a common understanding and finding issues in the whole business process. It also enables us to tackle the complexity of the problem and decision making. It is essential because the business process is often split between different components or even departments. Teams working on their “part” focus and make decisions only there – “locally.” Sometimes teams are not on the same page and, as a result, they can harm the whole process. Event Storming is a tool used to avoid such a situation and to give us a big picture. Thanks to that, we can find optimal and global solutions to our problems.

There is another huge advantage of Event Storming – it helps find patterns on a problem level, which is usually harder but brings simpler solutions. As programmers, we have many libs, services, good practices, or patterns that we use daily. In other words, we focus on a solution instead of a problem. That’s why we should know the domain we are working on, and that’s flat. We knew about it already in the 70s while researching cohesion, and nothing has changed since then. The better code you want to write, the better understanding of the process and business model you need to have. There is no one better to ask than business or domain experts. On the other hand, as tech experts, we can help them with improving and automation of some problematic processes.

Event Storming is actually a set of workshops, starting with a Big Picture Event Storming (BPES). On BPES, we want to see, well… a big picture of the business process – we want to catch sight of participants’ perception. BPES is split into a few phases, and the original pizza recipe (Brandolini uses this metaphor) has around 6 of them:

  • Kick-off – describes the workshop’s goals, a quick introduction of participants, and an explanation of how the workshop is going to look. It’s also a time for an optional warm-up. 
  • Chaotic exploration – sticking orange sticky notes to the wall. On each note, there is a past sentence that describes a business event. 
  • Enforcing the timeline – in the previous phase, each of the participants was sticking notes in different places. In this phase, it is important to order them on a timeline so that we see when they really occur in the whole process. Thanks to this, we can spot some duplicates or different namings for the same event.
  • People and systems – events are usually triggered by particular persons, departments, internal or external systems. Now it’s time to show them in our BP.
  • Problems and opportunities – till this phase, as you’ve probably noticed during the workshop, some places/events were problematic or generated disputes between participants. A hotspot is a name for such a piece of the business process. We are looking at each of them and trying to decide whether it’s a problem we should address or the opposite – an opportunity.
  • Pick your problem – as we probably can’t solve all issues straight away, we should vote to prioritize them.

We could split all of those phases into smaller pieces with specific techniques, but we are not going to do it in this post, as even Alberto encourages us to experiment and work with approaches that work for us. He also points out that those phases can be different when we model an existing process, new functionality, or a startup. If you want to know more about the whole technique and go more in-depth, I recommend reading Brandolini’s book.

We will have our pizza recipe there, let’s see how it will turn out. Hopefully, there won’t be any pineapple on top 😉

The next stage after Big Picture Event Storming is Process Level Event Storming (PLES). In PLES, we focus on the solution, and we model things like we would like them to be. Moreover, a few new concepts will pop-up, like commands, read models, and business rules.

The last part of the workshop is the Design Level Event Storming, where we create a final model that can be moved 1:1 to the code. It’s quite a technical part, so usually only developers participate in it. We introduce an aggregate term here. We can also notice one more advantage of the Event Storming – it’s easier to change names or models on sticky notes than in the code. If something just doesn’t sound right to you, you throw it away or replace it with a different sticky note.

Find problems when modeling, not while implementing. Host: Mariusz Gil

Regarding the workshop itself, it’s essential to keep in mind the purpose of doing it in our project. In other words, we should define the goal before running the workshop. Sticky notes on the wall are the visualization of the process and not the goal itself. The goal is what we want to achieve by having such visualization. It may speed up the process, its automatization, or the list of issues that occur in the process.

A titbit about my failed project

I didn’t mention that before, but it relates to this post very well, so I will do it now. From the very beginning, Andrzej Krzywda was supporting me in my idea. He ideally joins the roles of the programmer, entrepreneur, and marketer. I will tell you a bit more about Andrzej later on, but now I just want to say that he showed me how important it is to think about marketing and selling the product and talking with business people. 

One day, we met with Andrzej in his house next to the forest, and he suggested that we could do a quick Event Storming of my idea. We didn’t have any agenda, phases, nor conventions regarding the colors of sticky notes. We just grabbed them, and we started to produce some events. After a few minutes, we had the following result:

You don’t have a wall? Use the door!

I focused only on the system’s events, like “advertisement was created” or “offer was made.” On the other hand, Andrzej was thinking about events that occurred in the developer’s life and pushed him/her to look for a new job. As a result, events like “Toxic PM detected,” “Ruby/Elixir experiment started,” or “Interested in remote” popped up.

Some other ideas appeared as well. For example, we could analyze some events, like the one about adding a new advertisement and notice different types of people on the HR side. Let’s assume that a CTO is looking for some tech leads. He is notified each time an advertisement is added when the developer has finished some architectural courses/certificates. Another idea was to have a widget that could be included in external blogs and display advertisements of developers who have skills matching some post keywords. The reason for that was that people looking for developers to their teams also read blog posts :). Both of those functionalities could be paid.

This session was the biggest Aha moment for me. As a tech person, I was focused only on the system events, which is fine when it comes to Event Storming as we want to model the system, but Andrzej showed me a totally different perspective. He was thinking of how I can sell my product and get some traffic.

I decided to mention this whole story here, as I think it’s a great introduction to the next chapter. Long story short – you don’t have to stick to any strict form of the workshop. It’s also a visualization tool that you can use for different purposes.

Our form of the workshop

Alberto Brandolini says that an Event Storming workshop should not have a fixed form, and he encourages people to experiment with it. Giving it a structure and following some defined steps is a common mistake. For example, if you have something in your domain that is important and deserves its own notation – go for it! There are some default meanings of colors, like orange for events, or blue for commands, but if for some reason, they don’t work for you, don’t let them stop you, and use different colors. To give you an example, Mariusz once ran the workshop where they wanted to visualize the processes of DB operations in the application. To do that, they decided to assign specific statements (INSERT/UPDATE/DELETE/SELECT) to particular colors.

It is worth mentioning that experienced facilitators play an important role because they usually have a rich toolbox of techniques and heuristics. They can use a different set of those tools based on a group of attendees or the project type.

Although we don’t have to run all phases of BPES, two of them almost always occur: chaotic exploration and enforcing the timeline. We decided to go just with them to run BPES of the domain of this posts’ series. I wrote “we” because I invited three other people to support me with it. Each of them has huge experience in programming and gathering business requirements from customers. Ladies and gentlemen, may I present to you:

  • Mariusz Gil – I told you he is going to play an important role here ;). Mariusz has been in the IT industry for over 20 years. He is passionate about designing and implementing systems with complex business requirements, machine-learning, and solutions that give real business value to his customers. Mariusz takes to conferences like a duck to water and is extremely outgoing. If you meet him at a conference, don’t be surprised that you will be talking about totally different things than IT after a few mins, and you will feel like you’ve known him forever 🙂
  • Łukasz Szydło – he is one out of three mentors in a best-selling ($3M) online course for software architects in Poland. Programmer, architect, trainer, and consultant. He shares his knowledge at conferences. I’ve known Łukasz since my start in IT – he was my first mentor, and I’m delighted that I can still work with him sometimes in various projects. 
  • Andrzej Krzywda – founder of the Arkency software house, which is well-known in the Ruby community all over the world, organizer of wroclove.rb conference, speaker, writer, blogger. As ardent OOP enthusiasts, we like to whine about its current state, even though our points of view may differ a bit. Usually, we do it while hiking together. Lately, we did a live code review session of the Rails app, and you can watch it here.

As we know each other, our Event Storming sessions were quite casual. Thanks to them, we also had a chance to talk and share some thoughts and experiences, which was cool in those COVID times. Sometimes we were drifting and touching different topics, but as a result, we shared a lot of knowledge, and now you, my dear reader, will gain from it.

Before the workshop, I had some business requirements, and you probably know them if you read previous posts. Nevertheless, because I want to give you as much technical and practical knowledge as possible, I was open to different approaches/solutions. Considering our experience, I was pretty sure that the original idea could change a lot. That’s actually one of the most significant advantages of Event Storming – depending on how open we are, it can lead us to changes/improvements/optimization, even on the level of the whole organization.

Due to COVID, all workshops had to move online. Before COVID, there were discussions about whether it makes sense to run such a workshop remotely. Now it is a new norm. It turned out that thanks to great tools, it works pretty well. In our sessions, we used Miro, which became the standard tool for the purposes of Event Storming. 

If you want to listen more about the remote aspect of ES, you can listen to one of Mariusz’s podcast episode. He is talking there with Alberto Brandolini, and I encourage you to listen to it (the episode starts in Polish, but around 04:55 it switches to English).

OK, let me show you in great detail our ES sessions now.

Ready, steady, go!

Before our first session, I sent the domain description to the guys, and I uploaded some original wireframes to our Miro board. We had them for reference, so I could quickly explain the flows on the example. 

Then we started chaotic exploration. Each of us was putting events on the board. First questions, ideas, and discussions popped up. We decided to mark “nice to have ideas” as green notes. It’s a good practice as it usually unleashes creativity. After a while, our board looked as follows:

Please take a look at it and try to refer to the domain description from the first post. You can spot here that some events are organized into some kind of batches/groups. That’s the result of using a “Bulk Mode” feature in Miro. It is a useful functionality in the early phase of a workshop because it allows participants to add a few events at once. You add them as rows in a separate modal form, and after a submit, they are added as “sticky notes” to the board. 

All events were added in quite random order at this stage, so we started the next phase – enforce the timeline. My task was to narrate the whole story. At the same time, I could add some additional information about some pieces, so we had a few extra discussions. Then, Mariusz presented a heuristic that he calls “fantastic four” or “0, 50, 100, 150”. We can usually use it when we observe a  “binary” event – something either happened (100%) or something didn’t happen (0%). Sometimes we have two additional cases: something happened partially (50%) or there was too much of it (150%). In our case, such an event was “Advertisment’s requirements were accepted.” I had a yes/no mindset here: the recruiter accepts or disapproves the requirements. Mariusz suggested that we could try to use the “fantastic four” heuristic because in the real world, in such a situation, there is a place for negotiation. For example: “we don’t allow remote work, but you can bring your pets into work.” We wrote down this idea to consider it in a later part of the workshop.

Another typical example when this heuristic can be used is a payment process. Intuition tells us that we have only two options here: payment succeeded or payment failed. In fact, in the real world, we can have at least four cases:

  • 0% – payment failed
  • 50% – only a part of the payment was paid – due to some typo
  • 100% – payment succeeded as it should
  • 150% – user paid more than needed (typo?) – now we need to trigger a process of some refund

OK, let’s get back to the rest of our events now. We have them in the correct order now. We didn’t remove any duplicates nor needless events yet. Nevertheless, we marked some smaller, quite independent parts of the whole process, telling us about the possible subdomains. It will help us focus on smaller pieces in the Process Level .

At this stage, the board looked as follows:

Below you can also see our 90-minute session in a 90-second video:

In the next step, we put a line to separate from the results of our work. We started to put only domain events under this line – events that cause some real changes in our system’s state. At the same time, we removed some duplicates. We also agreed to skip events from functionalities that will not be implemented in the first iterations. As a result, we were able to visualize our first business process and business model.

To remove all “unnecessary” events, we used another helpful heuristic that concentrates on the event types. Mariusz told us that in his workshops, he distinguishes between 4 types of events:

  • environmental events – exist outside the system – in the real-world, for example, a person entering the shop. Usually, they are not crucial for the workshop, but they help to get the context.
  • UI events – we are clicking/using the UI, but we don’t “submit” our choices. We don’t change the state of the system. As an example: we can choose between pricing plans on UI as many times as we want, but until we confirm our decision, nothing actually happens in our system.
  • infrastructural events – refer to technical things and don’t impact the system at all: “Event to Kafka sent”, “Metric increased”.
  • domain events – the heart of the Event Storming. We should focus only on those in our workshops.

Using the above assumptions and heuristic, we changed the Big Picture as follows:

Let’s go now piece by piece, from left to right, and see what changed. 

At first, we removed all events connected with lead generation: 

You won’t find them in the After section because they don’t belong to our system (at least the one where we have advertisements). They happen “before”, so they can occur in the funnel. They will be essential for the marketing/sales department. We can think of another small app that measures the level of developers’ burnout. When the app recognizes that you should change your job, it can lead you to DevMountJob. 😉

Now I’d like to draw your attention to an interesting reduction of events:

Here you see in action the second heuristic I mentioned – the one about different types of events. We removed all UI events. Notice that “Added a certificate” or “Marked remote job as required” don’t change the system state at all. Those are only actions on UI. In other words, we are working on a draft of the advertisement – we are preparing it. We can describe all those events as one: “Draft was modified”. Actually, we could have no events here if we decided to have no draft concept in our system. Nevertheless, we want to have it because we want users to continue the preparation process even if they leave it for a while. Otherwise, we could remove all draft-related events, handle everything by the UI, and have only a single event when the form is submitted, and the advertisement gets to the system.

When the advertisement is ready, we get to the payment and publication process:

We have some changes here as well. When reading the domain description and my requirements, you could have the impression that I didn’t have a clear idea as for that part. That’s why we had a long discussion. Lukasz pointed out that if the advertisement is available for some period, maybe instead of going on with some pricing plans, we should sell time. If a user wants the advertisement to stay longer in the search results, then they pay a few extra dollars. We liked it, and that’s how the first business model was born. Thanks to that, we could skip all that part with pricing plans. By the way, we also put the hotspot (pink sticky note) here just to mark the place where we had some concerns.

Initially, I also had an idea that after the publication, the advertisement is read-only. I simply wanted to prevent the situation when the recruiter accepts the developer’s requirements, but then they are changed, and we have some inconsistency. In practice, the read-only mode could be really annoying. Imagine that you made a typo and want to fix it after a day or two. The first idea to solve this issue was to give a user X mins after publication to edit the advertisement. That’s why you can see a “Time for adv. edit expired” event in the first version. But then we realized that the recruiter accepts the developer’s requirements that he/she has at a given moment in time. It led us to the idea of something like “snapshot” – an offer made to the specific requirements. 

Now let’s move to the offering:

Do you remember the idea of negotiations? Well, the business didn’t get it 😉 and decided that the recruiter needs to accept all developer’s requirements. We left a note about that and we could move to the last two processes: banning recruiters and developers’ skills verification. It’s important to mention that you can see them as the last ones on the time axis if you look at the whole picture. Nevertheless, each of them can occur at any time in the entire process. Sometimes it’s good to mark such a process with an indicator, but we didn’t do it.

We are going to take a closer look at banning now:

Notice that only the wording of two events has changed:

“Ban request sent” was changed to “Ban requested”

“Unban request sent ” was changed to “Unban requested”

Word “sent” slightly suggests a form of the activity. In the first version, we meant here some kind of HTTP request sent from the HTML form. In practice, in such situations, we should be opened to other options. For example, a ban request could also be made via mail, phone call, Slack, or fax, you name it. It is a small detail but often helps to notice approaches we’ve never thought about.

Now it’s time for the last process – candidate’s verification:

I decided to include this process in the first version of the product, as it shows how to integrate with the external system. Moreover, it is a long-running process. As advertisements are anonymous, I wanted to give developers some optional possibility to show their skills. In other words, they could get badges after solving some tests in the external systems like DevSkiller. You can notice a reduction of events specifying readiness and the start of the test. That’s because those events are outside of our domain, and they belong to the external system. We would only want to start the verification on our part and get the test result when it’s solved.

That would be it when it comes to our Big Picture Event Storming. In the next post, we will do a Process Level Event Storming and model each of the processes in detail – solution space. Now a quick summary and the homework 🙂

Summary

Even though the Event Storming workshop has a simple form, it’s not easy itself. It requires business thinking, which may be totally different from what we have in code or UI. It helps us to notice real business events that occur in our domain and change the state. 

It’s a good idea to participate in the Event Storming workshops led by an experienced facilitator (like my guests). I encourage you to do so!

Now it’s your turn!

I hope we’ve piqued your interest with this technique and that you want to experiment on your own now, so it’s time for a call to action 🙂

Conduct a Big Picture Event Storming workshop. You can even do it alone, but the more people you convince, the better. For modeling, use the business process that you support daily. If you don’t want to use this one, you can use mine – there is enough information to do it in this and the previous posts. No excuses! 🙂

Enjoyed reading this? If you would like to see Domain-Driven Design and Event Stormings on a real-life example, don’t miss the next posts. Subscribe to the newsletter, so you will be the first to get to know about them.

* indicates required